7
6.
Malfunctions
In the event that the infrared heater does not emit any heat, please verify that the appliance and the circuit breaker at the
distribution board are turned on.
If the problem cannot be remedied, please consult your local electrical retailer . If necessary, you may also contact the service
hotline of Glen Dimplex Deutschland GmbH.
Phone: +49 (0) 9221 709-564
Fax:
+49 (0) 9221 709 589
For processing the service call, the product number (E-number) and the manufacturing date code (FD) of the appliance are
required. This information can be found on the nameplate of the patio heater.
Repairs and interventions in the appliance may only be performed by a qualified electrician.
7.
Replacement of Heating Element
The replacement of a heating element should only be carried out by a competent electrician.
Disconnect heater from the electricity supply and allow to cool down.
Loosen nuts on the sides of the heater, remove heater from wall bracket and place it on a suitable surface, e.g. a double
ladder.
Take care not to exert any pull on the connecting cable.
Do not touch heating element and reflector with your bare hands. Use a cloth to protect the surface.
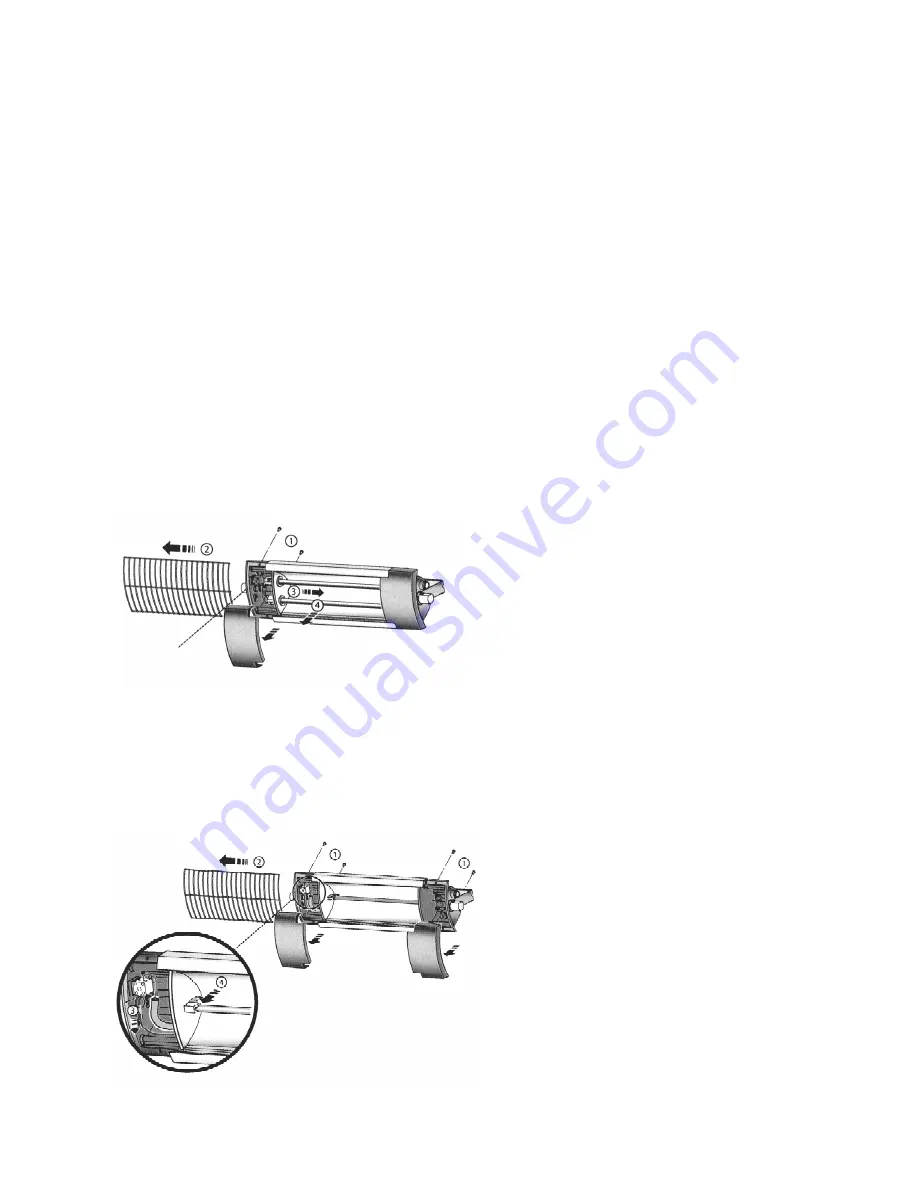
7.1 Model BA 1200
a. Remove the two screws of the left front cover on the rear of the appliance.
b. Unscrew the 4 screws on the side cover a few turns.
c. Lift the left front cover on the outer edge, press a little in the outer direction and remove the cover.
d. Completely slide out protective grille.
e. Caution! Risk of shattering glass! Wear protective gloves. Push heating element to the right.
f.
Swing out heating element on the left-hand side and remove.
g. Insert new heating element. Reassemble in the reverse order of sequence.
7.2 Model BA 1900
a. Remove the two screws of the left and right front covers on the back of the device.
b. Unscrew the 4 screws of the side covers a few turns.
c. Lift the front covers on the outer edge, press a little in the outer direction and remove both covers.
d. Completely slide out protective guard.
e. Loosen heating element connections at the terminals.
f.
Caution! Risk of glass breakage! Wear protective gloves. Bend open the holding clips and remove heating element.
g. Insert new heating element. Reassemble in the reverse order of sequence.


