background image


5

SAVE THESE INSTRUCTIONS

Arrange cord away from traffic area 

and where it will not be tripped over. 

⑭ 

Do not locate the heater 

immediately below a fixed socket-

outlet.

⑮ 

Do not locate the appliance in front 

of a fi xed socket-outlet

⑯ 

to disconnect the fireplace, turn 

the controls off, then remove the plug 

from the outlet.

⑰ 

means for disconnection must be 

incorporated in the fixed wiring in 

accordance with the wiring rules.

⑱ 

Do not insert or allow foreign 

objects to enter any ventilation or 

exhaust opening as this may cause 

an electric shock or fire, or damage to 

the heater.

⑲ 

Do not block air intake or exhaust 

in any manner. Do not use on soft 

surfaces, like a bed, where openings 

may become blocked.

⑳ 

All electrical heaters have hot and 

arcing or sparking parts inside. Do not 

use in areas where gasoline, paint, or 

flammable liquids are used or stored 

or where the unit will be exposed to 

flammable vapors.

㉑ 

Do not modify the electric 

fireplace. use it only as described 

in this manual. Any other use not 

recommended by the manufacturer 

may cause fire, electric shock or 

injury to persons.

㉒ 

Avoid the use of an extension 

cord. Extension cords may overheat 

and cause a risk of fire. If you must 

use an extension cord, the cord must 

be 3-core type and have a rating no 

less than 13 Amps.

㉓ 

Do not burn wood or other 

materials in the electric fireplace.

㉔ 

Do not strike the fireplace glass.

㉕ 

Always use a certified electrician 

should new circuits or outlets be 

required.

㉖ 

Always use properly grounded and 

fused.

㉗ 

Disconnect all power supply 

before performing any cleaning, 

maintenance or relocation of the unit.

㉘ 

When transporting or storing the 

unit and cord, keep in a dry place, 

free from excessive vibration and 

store so as to avoid damage.

  CAUTION: 

 In order to avoid a 

hazard due to inadvertent resetting 

of the thermal cut-out, this appliance 

must not be supplied through an 

external switching device, such as a 

timer, or connected to a circuit that is 

regularly switched on and off by the 

utility.


IMPORTANT INSTRUCTIONS

The heater carries the Warning Symbol 

indicating that it must not be covered.

Summary of Contents for BLF50-AU

Page 1: ...NT SAFETY INFORMATION Always read this manual first before attempting to install or use this fireplace For your safety always comply with all warnings and safety instructions contained in this manual...

Page 2: ...ll result in damage to the equipment Warning Procedures and techniques which if not carefully followed will expose the user to the risk of fire serious injury or death Welcome Congratulations 3 Import...

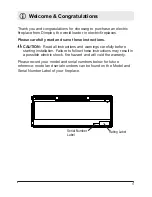
Page 3: ...tions CAUTION Read all instructions and warnings carefully before starting installation Failure to follow these instructions may result in a possible electric shock fire hazard and will void the warra...

Page 4: ...ccupied by persons not capable of leaving the room on their own unless constant supervision is provided Children of less than 3 years should be kept away unless Important Instructions continuously sup...

Page 5: ...e Use it only as described in this manual Any other use not recommended by the manufacturer may cause fire electric shock or injury to persons Avoid the use of an extension cord Extension cords may ov...

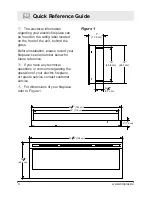
Page 6: ...fore installation please record your fireplace s serial number below for future reference If you have any technical questions or concerns regarding the operation of your electric fireplace or require...

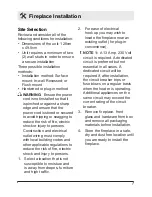
Page 7: ...lations to reduce the risk of fire electric shock and injury to persons Select a location that is not 1 susceptible to moisture and is away from drapes furniture and high traffic Fireplace Installatio...

Page 8: ...AUTION Two people may be required for various steps of this procedure Choose a location for 1 mounting the unit Choose your method of 2 supplying power to the unit Plug in to an existing outlet or ins...

Page 9: ...t of key holes Tighten all four 4 mounting 9 screws down on fireplace chassis Screw the two 2 supplied 10 8 square head screws through two of the permanent mounting holes which align with a wall stud...

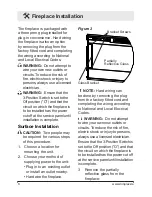
Page 10: ...opening of 118 1 cm wide x 42 cm high Figure 4 NOTE The sizing has allowed for 6 4mm around the fireplace insert for ease of installation This fireplace does not require any additional venting Choose...

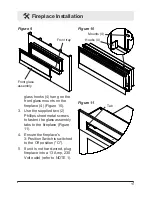
Page 11: ...omplete Lift fireplace and insert into 3 opening Figure 5 Use bubble level supplied to 4 level the fireplace within the framing Adjust as required Drive four 4 supplied 5 mounting screws through the f...

Page 12: ...3 Position Switch is set to the Off position O and that the circuit on which the fireplace is to be installed has the power cut off at the service panel until installation is complete Lift fireplace...

Page 13: ...ps sheet metal screws to fasten the glass assembly tabs to the fireplace Figure 11 Ensure the fireplace s 4 3 Position Switch is switched to the Off position O If unit is not hard wired plug 5 firepla...

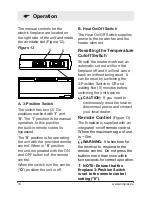
Page 14: ...supplies power to the heater fan and the heater element Resetting the Temperature Cutoff Switch Should the heater overheat an automatic cut out will turn the fireplace off and it will not come back o...

Page 15: ...AAA batteries into the 2 remote control Replace the battery cover 3 Discard leaky batteries Dispose of batteries in the proper manner according to provincial and local regulations Any battery may lea...

Page 16: ...these can be removed by dusting lightly with a clean dry cloth To remove fingerprints or other marks the partially reflective glass can be cleaned with a damp cloth The partially reflective glass sho...

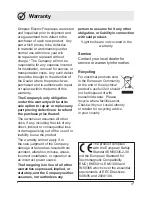
Page 17: ...of or inability to use the product The warranty will not apply if in the sole judgment of the Company damage or failure has resulted from accident alteration misuse abuse incorrect installation or ope...

Page 18: ...IT IMPORTANTES Lisez attentivement ce manuel avant d installer ou d utiliser cette chemin e Pour votre s curit respectez toujours tous les AVERTISSEMENTS et instructions de s curit donn s dans ce manu...

Page 19: ...uipement AVERTISSEMENT Proc dures et techniques qui en cas de non respect pourraient exposer l utilisateur un danger d incendie de graves blessures ou un risque mortel Bienvenue et f licitations 3 Ins...

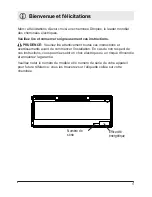
Page 20: ...attentivement toutes ces instructions et avertissements avant de commencer l installation En cas de non respect de ces instructions vous pourriez subir un choc lectrique ou un risque d incendie et ann...

Page 21: ...e l utilisez pas dans des pi c es de petites dimensions lorsqu elles sont occup es par des personnes incapables d en sortir seules moins d assurer leur surveillance permanente Instructions Importantes...

Page 22: ...ue Ne l utilisez que conform ment aux instructions de ce manuel Tout autre type d utilisation non recommand par le fabricant peut causer un incendie un choc lectrique ou des blessures aux personnes vi...

Page 23: ...veuillez noter le num ro de s rie indiqu en bas pour future r f rence Si vous avez des questions ou des probl mes techniques concernant le fonctionnement de votre chemin e lectrique ou qu elle a beso...

Page 24: ...es la construction et les prises lectriques doivent tre conformes aux codes du b timent en vigueur et toutes autres r glementations applicables Installation de votre chemin e Choisissez un emplacement...

Page 25: ...re n cessaires afin de proc der aux diverses tapes de cette proc dure Choisissez l endroit o monter 1 l appareil Choisissez votre m thode 2 d approvisionnement lectrique Branchex l appareil sur une pr...

Page 26: ...la chemin e Vissez les deux 2 vis n 8 t te 10 carr e travers les deux orifices de montage permanent align s sur le poteau mural Replacez et installez 11 soigneusement la vitre semi r fl chissante et l...

Page 27: ...ent un espace suppl mentaire de 6 4 mm tout autour de la chemin e encastrable afin d en faciliter l installation Cette chemin e ne n cessite pas de ventilation suppl mentaire Choisissez votre m thode...

Page 28: ...tallation soit achev e Soulevez la chemin e et 3 introduisez la dan l ouverture Figure 5 Utilisez le niveau bulle fourni 4 afin de mettre la chemin e de niveau dans l encadrement Ajustez la selon les...

Page 29: ...uits Pour r duire le risque d incendie de choc lectrique et de blessures aux personnes faites toujours appel un lectricien professionnel Veillez ce que le commutateur 3 positions soit en position tein...

Page 30: ...trouvent sur les montures vitre de la chemin e 4 Figure 4 Utilisez les deux 2 vis t le 3 cruciformes pour fixer la vitre frontale sur la chemin e Figure 11 Veillez ce que le commutateur 4 3 positions...

Page 31: ...de chauffage ainsi que l l ment chauffant R glage du commutateur d arr t par temp rature En cas de surchauffe de l appareil un syst me de coupure automatique se d clenchera et l teindra celui ci ne s...

Page 32: ...isser Ins rez les piles AAA dans la 2 t l commande Refermez le couvercle des piles 3 liminez les piles qui fuient D barrassez vous de vos vieilles piles conform ment aux r glementations locales et nat...

Page 33: ...d licatement avec un chiffon sec et propre Pour enlever les traces de doigts ou toutes autres marques on pourra la nettoyer avec un chiffon humide L on devra ensuite la s cher compl tement avec un tis...

Page 34: ...utif issu de l utilisation ou de l incapacit utiliser le produit Cette garantie ne s applique pas si la seule appr ciation de l entreprise les dommages ou la panne ont t caus s par un accident une mod...

Page 35: ...AD IMPORTANTE Siempre lea este manual antes de intentar instalar o usar este calentador de aire Por su seguridad cumpla siempre con todas las advertencias e instrucciones de seguridad que se incluyen...

Page 36: ...l equipo ADVERTENCIA Procedimientos y t cnicas que si no se respetan atentamente expondr n al usuario a un riesgo de incendio lesiones graves o muerte Bienvenida y felicitaciones 3 Instrucciones impor...

Page 37: ...CAUCI N Lea atentamente todas las instrucciones y advertencias antes de comenzar la instalaci n Si no sigue estas instrucciones puede provocar descargas el ctricas un posible peligro de incendio y la...

Page 38: ...s por personas que no tienen la habilidad de salir de la habitaci n al menos que tengan constante super visi n Ni os menores de 3 a os deben Instrucciones importantes permanecer alejados del calentado...

Page 39: ...l presente manual Cualquier otro uso que no haya sido recomendado por el fabricante puede provocar un incendio una descarga el ctrica o lesiones a personas Evite el uso de una alargadera los cables ti...

Page 40: ...de capacidad nominal ubicada en la parte delantera de la unidad detr s del cristal Antes de la instalaci n anote a continuaci n el n mero de serie de su calentador de aire para cualquier consulta Si t...

Page 41: ...incendio descarga el ctrica y lesiones a personas Instalaci n del calentador de aire Seleccione un sitio adecuado 1 que no est expuesto a la humedad y que se halle lejos de cortinas muebles y circulac...

Page 42: ...varios pasos de este procedimiento Elija un lugar que tenga como 1 m nimo dos 2 travesa os de pared disponibles para montaje Elija su m todo de alimentaci n 2 para la unidad Ench fela a una toma de co...

Page 43: ...ezas y las arandelas de los tornillos encajar n dentro de los bocallaves y el calentador de aire se deslizar en su lugar los tornillos se deslizar n dentro de la parte estrecha de los bocallaves Aprie...

Page 44: ...necesiten dos personas para realizar varios pasos de este procedimiento Prepare una pared con un orificio 1 enmarcado de 118 1 cm de ancho x 42 cm de alto Figura 4 NOTA El tama o ha permitido que 6 4...

Page 45: ...l de burbuja 4 suministrado para nivelar el calentador de aire en el interior del marco Ajuste seg n sea necesario Inserte los cuatro 4 tornillos 5 de montaje suministrados a Instalaci n del calentado...

Page 46: ...que se haya cortado la alimentaci n en el panel de servicio del circuito en el que se debe instalar el calentador de aire hasta finalizar la instalaci n Levante el calentador de aire e 3 ins rtelo en...

Page 47: ...en de los montajes del vidrio delantero del calentador de aire 4 Figura 10 Use los dos 2 tornillos de 3 l mina de metal Phillips suministrados para asegurar las leng etas del conjunto del vidrio al ca...

Page 48: ...l remoto integrado para encender apagar El alcance m ximo es de 15 m ADVERTENCIA El receptor tarda unos segundos en responder al transmisor Para asegurar el buen funcionamiento del mando espere al men...

Page 49: ...AAA en el control 2 remoto Vuelva a colocar la tapa 3 3 Deseche las pilas que gotean Deseche las pilas respetando las leyes provinciales y locales vigentes Cualquier pila puede perder electrolitos si...

Page 50: ...minarse limpiando ligeramente con un trapo limpio y seco Para quitar marcas de dedos o de otro tipo el vidrio parcialmente reflectante puede limpiarse con un trapo h medo El vidrio parcialmente reflec...

Page 51: ...discreci n El propietario usuario asume todos los dem s riesgos si los hubiera incluyendo el riesgo de cualquier p rdida o da o directo indirecto o consecuencial resultando del uso del producto o de l...

Page 52: ...LA SICUREZZA Leggere sempre questo manuale prima di tentare l installazione o l utilizzo del caminetto Per la sicurezza rispettare sempre tutte le AVVERTENZE e le istruzioni di sicurezza contenute nel...

Page 53: ...re danni all apparecchiatura AVVERTENZA Procedure e tecniche che se non rispettate con attenzione possono esporre l utente al rischio di incendi lesioni gravi o morte Benvenuto e congratulazioni 3 IST...

Page 54: ...le AVVERTENZE prima di iniziare l installazione Il mancato rispetto di queste istruzioni pu causare scosse elettriche e pericolo di incendio rendendo nulla la garanzia Prendere nota del proprio model...

Page 55: ...dotte quando sono occu pate da persone incapaci di lasciare la stanza per conto proprio a meno che non siano supervisionate costante mente ISTRUZIONI IMPORTANTI I bambini sotto i 3 anni devono essere...

Page 56: ...ltro uso non raccomandato dal produttore pu causare incendi scosse elettriche e lesioni personali Evitare l uso di prolunghe per il cavo di alimentazione La prolunga potrebbe surriscaldarsi provocando...

Page 57: ...l installazione prendere nota del numero di serie del caminetto che si trova in basso per futuro riferimento Per qualsiasi domanda tecnica 2 o questione riguardante il funzionamento del caminetto elet...

Page 58: ...e di ridurre il rischio di incendi scosse elettriche e lesioni personali Selezionare una posizione non 1 soggetta a umidit e lontana da tendaggi mobili e traffico intenso di persone Per un collegament...

Page 59: ...e per diversi punti di questa procedura Scefliere un ubicazione per il 1 montaggio dell unit Scegliere il metodo di 2 alimentazione dell unit Inserire la spina in una presa esistente o installare una...

Page 60: ...ano con un montante a parete Sostituire e installare con 11 attenzione il vetro parzialmente riflettente e i supporti del vetro utilizzando le viti del punto 1 Consultare la sezione 12 Installazione d...

Page 61: ...del caminetto per comodit di installazione Questo caminetto non richiede aperture di ventilazione aggiuntive Scegliere il metodo di 2 alimentazione dell unit Inserimento dell spina si pu far passare i...

Page 62: ...r mettere a livello il caminetto all interno del vano Regolare come necessario Far passare le quattro 4 viti 5 di montaggio in dotazione attraverso i quattro 4 fori di montaggio presenti in ciascun an...

Page 63: ...sul quale il caminetto deve essere installato abbia l alimentazione interrotta sul pannello di servizio fino al completamento dell installazione Sollevare il caminetto e inserirlo 3 nell apertura I bo...

Page 64: ...er fissare le linguette del vetro al caminetto Figura 11 Assicurarsi che l interruttore a 3 4 posizioni del caminetto si trovi nella posizione di spento o Se l unit non collegata 5 direttamente inseri...

Page 65: ...ola del riscaldatore e il riscaldatore stesso Reimpostazione della temperatura Interruttore di disattivazione Se il riscaldatore si surriscalda un interruzione automatica fa spegnere il caminetto che...

Page 66: ...re batterie del tipe AAA 2 nel telecomando Riposizionare il coperchio delle 3 batterie Se le batterie presentano dell perdite smaltirle Smaltire le batterie in maniera appropriata in base alle normati...

Page 67: ...osse spolverando leggermente con un panno asciutto e pulito Per rimuovere impronte e altre macchie il vetro parzialmente riflettente pu essere pulito con un panno umido Il vetro parzialmente rifletten...

Page 68: ...uso o dall incapacit di utilizzare il prodotto La garanzia non sar applicata se a esclusivo giudizio della Societ il danno o il guasto sono conseguenza di incidente alterazione uso improprio abuso in...

Page 69: ...dieses Handbuch immer zuerst bevor Sie versuchen diesen Kamin zu installieren oder zu verwenden Um Ihre Sicherheit zu gew hrleisten halten Sie sich stets an alle WARNUNGEN und Sicherheitsanweisungen d...

Page 70: ...ltiger Befolgung zu Sch den an der Anlage f hren werden WARNUNG Verfahren und Techniken die bei nicht sorgf ltiger Befolgung den Benutzer der Gefahr von Feuer ernsten Verletzungen Krankheit oder Todau...

Page 71: ...WARNHINWEISE sorgf ltig durch bevor Sie mit der Installation beginnen Die Nichtbeachtung dieser Anweisungen kann eventuell zu einem Stromschlag oder Feuergefahr f hren und l sst die Garantie erl sche...

Page 72: ...erwen den Sie diese Heizung nicht in kleinen R umen wenn sich darin Menschen befinden die den Raum nicht alleine verlassen k nnen sofern diese nicht WICHTIGE ANWEISUNGEN st ndig beaufsichtigt werden K...

Page 73: ...uch beschrieben Jede andere nicht vom Hersteller empfohlene Verwendung kann zu Feuer Strom schl gen oder Verletzungen f hren Vermeiden Sie die Nutzung eines Verl ngerungskabels Verl ngerungska bel k n...

Page 74: ...nstallation notieren Sie sich bitte unten die Seriennummer Kamins f r sp teres Nachschlagen F r technische Fragen oder 2 Anliegen bez glich des Betriebs ihres elektrischen Kamins oder f r ben tigten S...

Page 75: ...fahr von Feuer Stromschl gen oder Verletzungen zu verringern W hlen Sie einen Standort der 1 nicht anf llig f r Feuchtigkeit ist und sich nicht in der N he von Einbau des Kamins Vorh ngen M beln und s...

Page 76: ...st Aufputzmontage ACHTUNG F r verschiedene Schritte dieses Verfahrens sind zwei Mann erforderlich W hlen Sie den Ort f r die Monta 1 ge des Ger tes W hlen Sie Ihre Methode f r den 2 Stromanschluss des...

Page 77: ...en Platz gleiten Die Schraubenk pfe gleiten in den engeren Teil des Lochs Ziehen Sie alle vier 4 Monta 9 geschrauben am Kamingeh use fest Schrauben Sie die zwei 2 mit 10 gelieferten 8 Vierkantschraube...

Page 78: ...te dieses Verfahrens sind zwei Mann erforderlich Bereiten Sie eine Wand ffnung 1 mit 118 1 cm Breite und 42 cm H he Bild 4 vor Hinweis Die Bemessung hat eine Toleranz von 6 4 mm um den Kamin herum zug...

Page 79: ...amin angeschlossen werden soll bis zur Fertigstellung der Installation durch Ausschalten der Hauptsicherung im Schalterschrank vom Stromkreis getrennt ist Heben Sie den Kamin an und 3 setzen Sie ihn i...

Page 80: ...tallieren Um die Gefahr von Feuer Stromschl gen oder Ver letzungen zu verringern ziehen Sie immer einen qualifizierten Elektroins tallateur heran Stellen Sie sicher dass sich der 3 Po sitions Schalter...

Page 81: ...in 4 h ngen Bild 10 Verwenden Sie die mitgelieferten 3 zwei 2 Kreuzschlitzblechschrau ben um die Aufh nger des Glas aufbaus am Kamin zu befestigen Bild 11 Stellen Sie sicher dass sich der 4 3 Position...

Page 82: ...ngsschalter Sollte das Heizger t berhitzen schaltet ein automatischer berhit zungsschalter den Kamin aus der sich ohne einen Reset nicht von selbst wieder einschaltet Er l sst sich zur cksetzen indem...

Page 83: ...Sie undichte Batterien Entsorgen Sie Batterien ordnungsge m nach den geltenden staatlichen und rtlichen Vorschriften Aus jeder Batterie kann Akkumulators ure aus treten wenn sie mit einem anderen Bat...

Page 84: ...en mit einem sauberen trockenen Tuch entfernt werden Um Fingerabdr cke oder andere Flecken vom teilweise reflektieren den Glas zu entfernen reinigen Sie dieses mit einem feuchten Tuch Das teilweise re...

Page 85: ...cheidung des Unternehmens der Schaden oder der Defekt aus einem Unfall Unbau falschem Gebrauch Miss brauch inkorrektem Einbau oder Betrieb an iner inkorrekten Stromquelle resultiert Das Vorstehende gi...

Page 86: ...customer services glendimplex com Glen Dimplex Espa a S L C Bail n 20 4 2 e 08010 BARCELONA 34 93 238 61 59 Fax 34 932384375 Glen Dimplex Australasia 38 Harris Ro ad East Tamaki Auckland New Zealand 6...

Page 87: ...e 2 P riode de garantie en ann es 3 Mod le s 4 Date d achat 5 Cachet et signature du vendeur 6 Anomalie D faut 7 Nom et adresse du contact 1 Scheda di garanzia 2 Periodo di garanzia in anni 3 Modello...

Reviews: