11
Fireplace Installation
ensure that the 3-Position Switch is
set to the Off position ("O") and that
the circuit on which the fireplace is
to be installed has the power cut off
at the service panel until installation
is complete.
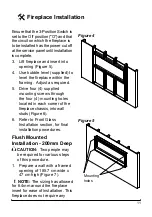
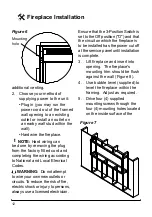
3. Lift fireplace and insert into
opening (Figure 5).
4.
Use bubble level (supplied) to
level the fireplace within the
framing. Adjust as required.
5. Drive four (4) supplied
mounting screws through
the four (4) mounting holes
located in each corner of the
fireplace chassis, into wall
studs (Figure 6).
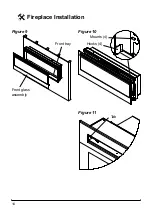
6. refer to Front Glass
Installation section, for final
installation procedures.
Flush Mounted
Installation - 200mm Deep
CAUTION:
Two people may
be required for various steps
of this procedure.
1.
Prepare a wall with a framed
opening of 185.7 cm wide x
47 cm high (Figure 7).
!
NOTE:
The sizing has allowed
for 6.4mm around the fireplace
insert for ease of installation. this
fireplace does not require any
Figure 5
Mounting
holes
Figure 4
Summary of Contents for BLF74-EU
Page 120: ...1 BLF74 EU 08 53176 0 RU 1 RU...
Page 121: ...2 3 4 7 8 8 9 100 10 200 12 13 15 17...
Page 122: ...3 Dimplex...
Page 123: ...4 1 2 3 4 5 8 6 3 3 8 3 8...
Page 124: ...5 7 8 9 1 10 11 12 13 14 15...
Page 125: ...6...
Page 126: ...7 1 1 7 1 in 467 mm 18 4 in 1883 mm 74 1 in 493 mm 19 4 in 187 mm 7 3 in 1844 mm 72 6 in...
Page 127: ...8 188 3 x 49 5 3 1 2 1 13 mp 230 240 3 4...
Page 128: ...9 3 O 1 3 56 142 2 3 4 3 4 2...
Page 129: ...10 100 1 185 7 42 4 6 4 2 5 1 1 3 8 6 13 350 2 7 3 8 9 10 3...
Page 130: ...11 3 O 3 5 4 5 4 4 6 6 5 4...
Page 131: ...12 200 1 185 7 47 7 6 4 2 6 7...
Page 132: ...13 8 3 O 3 8 4 5 4 4 8 6 1 9 2 4 4 10 3 2 Phillips 11 4 3 O...
Page 133: ...14 10 4 4 5 10 230 240 1 9 11...
Page 134: ...15 12 A 3 2 I II I II II O B 12 B A 3 5 13 7...
Page 135: ...16 13 2 3 II 13 7 1 2 3 CR2025 CR2032 2...
Page 136: ...17...


