7
Remote Control Receiver Replacement
Tools Required:
Philips head screwdriver
Flat Head Screwdriver
WARNING:
Disconnect power before attempting any
maintenance to reduce the risk of electric shock or damage
to persons.
!
NOTE:
Ensure that all of the components that
contain water have been emptied before performing any
maintenance.
1. Disconnect and remove the media from the unit and
put them in a safe place.
2. Remove the 2 screws that secure the engine assembly
to the unit, located under the sump.
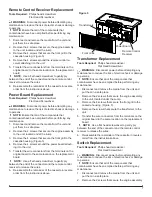
3. Remove the 4 screws that secure the front grill to the
cassette housing. (Figure 5)
4. Remove the 4 screws around the remote control re-
ceiver attaching it to the unit.
5. Transfer the wire connectors from the terminals on the
original board to the same location on the replacement
board.
!
NOTE:
Use a flat head screwdriver to gently pry
between the end of the connector and the remote control
receiver to release the wires.
6. Re-assemble the remainder of the cassette in reverse
order from the instructions above.
Power Board Replacement
Tools Required:
Philips head screwdriver
Flat Head Screwdriver
WARNING:
Disconnect power before attempting any
maintenance to reduce the risk of electric shock or damage
to persons.
!
NOTE:
Ensure that all of the components that
contain water have been emptied before performing any
maintenance.
1. Disconnect and remove the media from the unit and
put them in a safe place.
2. Remove the 2 screws that secure the engine assembly
to the unit, located under the sump.
3. Remove the 4 screws that secure the front grill to the
cassette housing. (Figure 5)
4. Remove the 4 screws around the power board attach-
ing it to the unit.
5. Transfer the wire connectors from the terminals on the
original board to the same location on the replacement
board.
!
NOTE:
Use a flat head screwdriver to gently pry
between the end of the connector and the remote control
receiver to release the wires.
6. Re-assemble the remainder of the cassette in reverse
order from the instructions above.
Transformer Replacement
Tools Required:
Philips head screwdriver
Flat Head Screwdriver
WARNING:
Disconnect power before attempting any
maintenance to reduce the risk of electric shock or damage
to persons.
!
NOTE:
Ensure that all of the components that
contain water have been emptied before performing any
maintenance.
1. Disconnect and remove the media from the unit and
put them in a safe place.
2. Remove the 2 screws that secure the engine assembly
to the unit, located under the sump.
3. Remove the 4 screws that secure the front grill to the
cassette housing. (Figure 5)
4. Remove the screws that secure the transformer to the
unit.
5. Transfer the wire connectors from the terminals on the
original board to the same location on the replacement
board.
!
NOTE:
Use a flat head screwdriver to gently pry
between the end of the connector and the remote control
receiver to release the wires.
6. Re-assemble the remainder of the cassette in reverse
order from the instructions above.
Switch Replacement
Tools Required:
Philips head screwdriver
Flat Head Screwdriver
WARNING:
Disconnect power before attempting any
maintenance to reduce the risk of electric shock or damage
to persons.
!
NOTE:
Ensure that all of the components that
contain water have been emptied before performing any
maintenance.
1. Disconnect and remove the media from the unit and
put them in a safe place.
2. Remove the 2 screws that secure the engine assembly
Figure 5
Front Grille
Transformers
Power Board
Remote Control
Receiver


