Additional Information
AFTER SALES SERVICE
Your product is guaranteed for one year from the date of purchase. Within this period, we undertake to repair or exchange
this product free of charge (excluding lamps and transducer discs & subject to availability) provided it has been installed
and operated in accordance with these instructions. Your rights under this guarantee are additional to your statutory
rights, which in turn are not affected by this guarantee.
Should you require after sales information or assistance with this product please go to www.dimplex.co.uk and select
“Customer Support” or ring our help desk on 0844 879 3588 (UK) or 01 842 4833 (R. O. I.). Spare parts are also
available on the web site. Please retain your receipt as proof of purchase.
RECYCLING
For electrical products sold within the European Community - At the end of the electrical products useful life
it not be disposed of with household waste. Please recycle where facilities exist. Check with your Local
Authority or retailer for recycling advice in your country.
PATENT / PATENT APPLICATION
Products within the Optimyst range are protected by one or more of the following patents and patent applications:
Great Britain GB 2402206, GB 2460259, GB 2460453 , GB 2418014, GB 2465738, GB 2449925, GB 2465537 , GB
2455277 , GB1020534.2, GB1020537.5, GB1110987.3
United States US 7967690, US 2010299980, US 2011062250, US 2008028648, US 13/167,042
Russia RU2008140317
European EP 2029941, EP 2201301, EP 2315976, EP 1787063, EP07723217.1 , EP11170434.2, EP 11170435.9
China CN 101883953, CN 200980128666.2, CN 101057105, CN 101438104
Australia AU 2009248743, AU 2007224634
Canada CA 2725214, CA 2579444, CA 2645939
International Patent Application WO 2006027272
South Africa ZA 200808702
Mexico MX 2008011712
Korea KR 20080113235
Japan JP 2009529649
Brazil BR P10708894-9
India IN 4122/KOLNP/2008
New Zealand NZ 571900
3. Remove the water tank by lifting upwards.
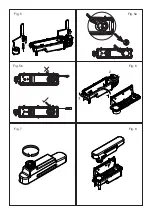
4. Disconnect the electrical connector, located on the right side of the sump. (See Fig.5) .
5. Release the right sump locking tabs by turning 90º. This allows the sump to be lifted completely from its location.
6. Gently lift up the sump, taking care to keep level so as not to spill any water. Sit the assembly in the sink.
7. Release the left sump locking tabs by turning 90º, then lift off the Nozzle. (See Fig.3)
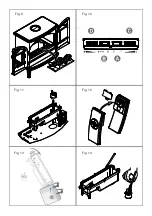
8. Lift out the transducer and carefully tilt, as shown, so that the liquid drains out of the sump. (See Fig.13)
9. Put a small amount of washing up liquid into the sump, and using the supplied brush, gently clean all surfaces in the
sump and gently clean the transducer including the metal discs located in the top grooved surface. (See Fig.14)
10. When cleaned, thoroughly rinse the sump with clean water to remove all traces of washing up liquid.
11. Clean the Nozzle with the brush and fl ush out thoroughly with water. (See Fig.15)
12. Reverse the above steps to reassemble.
Air fi lter
1. Gently lift out the fuelbed and place carefully on the ground.
2. Gently slide the air fi lter upwards out of its plastic holder. (See Fig.16)
3. Gently rinse with water in the sink and dry with fabric towel before returning.
4. Replace the fi lter making sure that the coarse black fi lter is facing the front of the fi re.
5. Replace the fuelbed.

