background image


3


KDS6401E CONTEMPRA  


NOTE 

A 15amp, 120 volt circuit is required.  A dedicated circuit is preferred but not 
essential in all cases.  A dedicated circuit will be required if, after installation, the 
circuit breaker trips or fuse blows on a regular basis when the heater is 
operating.  Additional appliances on the same circuit may exceed the current 
rating of the circuit breaker. 


WARNING 

Ensure the power cord is not installed so that it is pinched or against a sharp 
edge and ensure that the power cord is stored or secured to avoid tripping or 
snagging to reduce the risk of fire, electric shock or injury to persons. 


Construction and electrical outlet wiring must comply with local building codes 
and other applicable regulations to reduce the risk of fire, electric shock and 
injury to persons. 


Do not attempt to wire your own new outlets or circuits.  To reduce the risk of fire, 
electric shock or injury to persons, always use a licensed electrician. 


CONTEMPTA INSTALLATION 

1. Make sure the unit is switched OFF (refer to operating instruction section). 


2. Plug the unit into a 15Amp/120volt outlet.  If the cord does not reach, you 

may use an extension cord rated for a minimum of 1875 watts 

OPERATION 


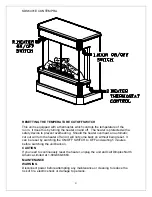
To access the controls go to the front panel of the unit (refer to diagram below) 


 1.


MAIN ON/OFF SWITCH 


The on/off switch supplies power to all unit functions (heat/flame) 


2.  HEATER ON/OFF SWITCH  

The HEATER ON/OFF SWITCH supplies power to the heater fan and the 
heater element and must be turned on before heat can be created. 


3.  HEATER THERMOSTAT CONTROL 

To adjust the temperature to your individual requirements, turn the heater 
thermostat control knob clockwise all the way to turn on the heater.  When the 
room reached the desired temperature, turn the thermostat knob counter 
clockwise until you hear a click.  Leave in this position to maintain the room 
temperature at this setting.  For additional heat, turn clockwise until you hear 
the click again and the heater will turn on.  To turn the heater off, switch the 
HEATER ON/OFF SWITCH to the OFF position. 


NOTE:-

 When the heater is switched ON, the heater fan will operate.  The heater 

element may or may not be on, depending on the thermostat control setting (SEE 
“HEATER THERMOSTAT CONTROL” above).  


Summary of Contents for contempra ef KDS6401E

Page 1: ...CONTEMPRA MODEL KDS6401E PARTS SERVICE MANUAL...

Page 2: ...PAGE 8 PARTS LIST PAGE 9 LIGHT BULB REPLACEMENT PAGE 10 MAIN POWER ON OFF SWITCH REPLACEMENT PAGE 11 FLAME MOTOR FLAME ROD REPLACEMENT PAGE 12 HEATER ON OFF SWITCH PAGE 13 HEATER THERMOSTAT REPLACEMEN...

Page 3: ...o operating instruction section 2 Plug the unit into a 15Amp 120volt outlet If the cord does not reach you may use an extension cord rated for a minimum of 1875 watts OPERATION To access the controls...

Page 4: ...eat an automatic cut out will turn the heater off and it will not come back on without being reset It can be reset by switching the ON OFF SWITCH to OFF and waiting 5 minutes before switching the unit...

Page 5: ...towel Do not use abrasive cleaners on glass surface or spray liquids directly onto any surface contempraef SURFACE CLEANING Use warm water only to clean painted surfaces of the contempraef Do not use...

Page 6: ...l 5 The remote control works up to 50 feet away 6 Push the ON button to turn stove on push the OFF button to turn the stove off NOTE To prevent the risk of fire the stove plug must be inserted fully i...

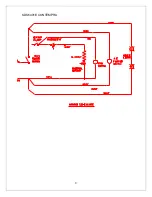
Page 7: ...7 KDS6401E CONTEMPRA...

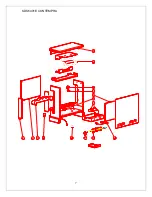
Page 8: ...8 KDS6401E CONTEMPRA...

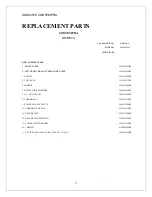
Page 9: ...OG SET 0438270100RP 4 TOP PANEL 1103820171RP 5 MIRROR 5900210200RP 6 REFLECTOR ROTISSIERE 5900080600RP 7 A C MOTOR ASSY 2000140300RP 8 THERMOSTAT 2300150100RP 9 POWER ON OFF SWITCH 2800070200RP 10 THE...

Page 10: ...Insert new bulb 5 Install the front door over the rods gently lifting up to engage the door into the slot in the roof 6 Screw the two black knobs clockwise until tightened TO REPLACE THE LOWER LIGHT B...

Page 11: ...TO REPLACE MAIN ON OFF SWITCH 1 Remove the stove pipe kit if equipped 2 Remove the four screws from the rear panel and remove 3 Locate the main on off switch mounted to the top panel and disconnect th...

Page 12: ...s with a short handled screw driver 4 Locate and remove the wiring connections and remove the flame rod and flame motor assembly NOTE When removing the flame motor some damage may occur to the flame r...

Page 13: ...REPLACE HEATER ON OFF SWITCH 1 Remove the stove pipe kit if equipped 2 Remove the four screws from the rear panel and remove 3 Locate the heater on off switch mounted to the top panel and disconnect...

Page 14: ...tric shock or damage to persons TO REPLACE HEATER THERMOSTAT 1 Remove the stove pipe kit if equipped 2 Remove the four screws from the rear panel and remove 3 Locate the heater thermostat mounted on t...

Page 15: ...our screws from the rear panel and remove 3 Locate and remove the wiring connections for the power cord 4 With needle nose pliers grasp the power cord strain relief grommet from inside the bottom cove...

Page 16: ...emove the four screws on the inner heater panel 4 Locate the eight cam locks on the side and front panels inside the upper corners of the stove and turn with a large slot screwdriver so the triangle o...

Reviews: