background image

Operation

When the power is connected, flick the power switch at the back of the unit to turn 
the device on. A buzzer noise will ring, and the power indicator light will switch on. 
You can select different modes by pressing the keys/buttons on the control panel 
and/or remote control.

1.

By pressing the 

WARM WIND

 button, the unit will begin to produce warm air.


There are 2 heat settings within this unit. If you click this button once, the unit will


run on its low heat setting mode and the display will show 'H1.' If you click this


button again, the unit will run on its high heat setting mode, and the display will


show 'H2.'

2.

By pressing the 

NATURAL WIND 

button, the unit will begin to produce a cool air


flow. There are 2 fan speed settings within this unit. If you click this button once,


the unit will run on its low fan speed setting, and the display will show 'C1.' If you


click this button again, the unit will run on its high fan speed setting, and the dis-
play will show 'C2.'

3.

By pressing the 

HUMIDIFICATION

 button, the unit will 

utilize

 its humid

ifying

 func-

tion. This button allows the units atomizer to function, and the unit will start to


spray 

mists

 of water. The display will show a water droplet logo as per above,


and 

when this logo flashes, it means the water tank level is low and needs a fill.


When 

this happens, ensure you press this button again to stop the humidifying


function, 

and then carefully open the water tank cover to slowly add clean tap


water 

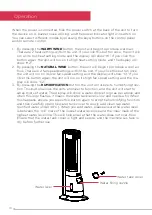
(purified water under 40°C). When you add water, please ensure the water


level 

is between the 'min' mark of the lowest water level line and the 'max' mark


of the 

highest water level line. This will help ensure that the water does not over-flow. 
Ensure that the water tank cover is tight and secure, and the machine sur-face is 
dry before further use.

MAX

MIN

Water tank cover

Water filling nozzle

Water level

10

Summary of Contents for DCTF3HCH

Page 1: ...For domestic household use only INSTRUCTION MANUAL Heat Cool Humidifier Tower Fan Model DCTF3HCH...

Page 2: ...and cause burns Particular attention has to be given where children and vulnerable people are present If the supply cord is damaged it must only be replaced by the manufacturers service agent or a sim...

Page 3: ...to the heater The heater must not be located immediately below a power outlet WARNING To avoid danger of suffocation please remove all packaging materials particularly plastic and EPS and keep these...

Page 4: ...and potential perforation of the oesophagus If you suspect your child has swallowed or inserted a button battery immediately call the 24 hour Poisons Information Centre on 13 11 26 in Australia or 080...

Page 5: ...xtension leads or power boards Where there is risk of fire or close to a naked flame Where the power cable may be damaged On a slope or uneven surface Where it may be damaged by chemicals If there is...

Page 6: ...gs 2 Heat settings 2 Timer 12 hours Mist output 120ml h Adjustable temperature 20 30 C Water tank 1 5L Oscillation 85 Noise level MAX 55dB A Weight net 3 6kg Dimensions w x d x h 228 x 285 x 672mm Spe...

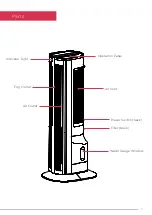
Page 7: ...MAX MIN Parts Operation Panel Air Inlet Power Switch back Filler back Water Gauge Window Indicator Light Fog Outlet Air Outlet 7...

Page 8: ...Off Warm Wind Natural Wind Increase Timer Decrease Timer Humidification Increase Temperature Decrease Temperature Swing Child Lock Light Temperature Timer Swing Child Lock Humidification Natural Wind...

Page 9: ...f the unit 2 Fix the base onto the bottom of the unit using the four included screws 3 The Tower Fan should look as per below image 3 When the device is not in use place the remote control in the hous...

Page 10: ...and the display will show C1 If you click this button again the unit will run on its high fan speed setting and the dis play will show C2 3 By pressing the HUMIDIFICATION button the unit will utilize...

Page 11: ...increase or de crease the timer between 1 12 hours 6 When the WARM WIND function is turned on press the TEMPERATURE SETTING button to set the temperature You are able to set the tempera ture as 20 C 2...

Page 12: ...control panel and other parts must not come into contact with water or any other liquids After long term usage dust may begin to block the air inlet Regular maintenance is required to clean this Disco...

Page 13: ...ormation regarding the collection systems available If electrical appliances are disposed of in landfills or dumps hazardous substances can leak into the ground water polluting the food chain and dama...

Page 14: ...14...

Page 15: ...15...

Page 16: ...u Supplied by Glen Dimplex Australia 8 Lakeview Drive Scoresby Victoria 3179 Glen Dimplex Australia All rights reserved Material contained in this publication may not be reproduced in whole or in part...

Reviews: