background image

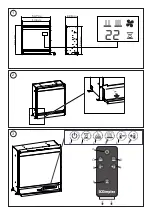
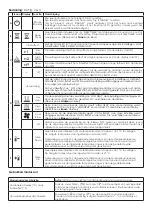
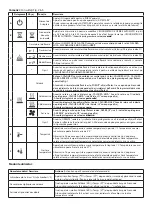
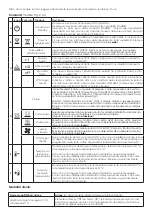
Controls: 

See Fig. 2 & 3

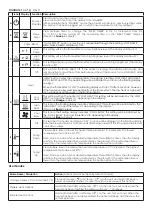
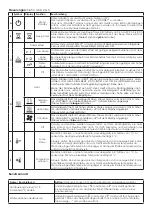
Icon Display Function Description

A

-

Power / 

Standby

Press Once to turn the product ‘ON’.

Press a second time to put the product into ‘STANDBY’

(When returning from ‘STANDBY’ mode the product will return to previous settings unless 

the product has been plugged out, in which case it will reset to factory settings)

B

Sleep 

Timer

Press  multiple  times  to  change  the  ‘SLEEP  TIMER’  in  0.5  hr  increments  from  0.5 

hr  to  8.0  hr  before  turning  off.  The  remaining  time  on  the  ‘SLEEP  TIMER’  displays.                                                                                         

(This icon is 

Green 

in Colour)

C

Flame Effect

‘FLAME EFFECT’ button cycles the unit 

sequentially through the 4 setting, LOW FLAME, 

HIGH FLAME, DEMO MODE and OFF.

f1

Low 

Flame

This setting will run the flame effect at a low brighness level. (The display will show F1)

f2

High 

Flame

This setting will run the flame effect at a high brighness level. (The display will show F2)

fP

Demo 

Mode

This setting will slowly pulse the flame effect between low and high brightness. (The display 

will show FP)

-

Off

This  will  turn  the  flame  effect  off.  If  the  heater  is  running,  the  display  will  activate  and 

remain active to read the set temperature and show if the product is on LOW HEAT/ HIGH 

HEAT/COOL BLOW.

D

Heat 

‘HEAT’ button cycles the unit sequentially through the 4 settings: LOW HEAT, HIGH HEAT, 

COOL BLOW and OFF. The heat setting will be indicated by an icon in the floating display 

see Fig.1. 

When the flame effect is ‘ON’ the floating display will turn off after 5 seconds, however 

if the heater is being used independantly of the flame effect. The low heat or high heat 

icon will appear continuously in the floating display.

Low 

Heat

This setting will run the heater at ‘LOW HEAT’ this setting will be indicated by the ‘LOW 

HEAT’ icon and the letters ‘LO’ appearing in the display.

(This icon is 

Orange

 in Colour)

High 

Heat

This icon in the floating display indicates ‘HIGH HEAT’ this setting will be indicated by the 

‘HIGH HEAT’ icon and the letters ‘HI’ appearing in the display.

(This icon is 

Red

 in Colour)

Cool 

Blow

This icon in the floating display indicates ‘COOL BLOW’ this setting will be indicated by 

the ‘COOL BLOW’ icon and the letters ‘CB’ appearing in the display.

(This icon is 

Blue

 in Colour)

-

Off

This switches the heater and blower ‘OFF’, no icon will be displayed in the floating display. 

Note the blower will run for 10-20 seconds after being turned off this is to ensure the product 

cools down safely.

E

-

Temp 

Down

Press multiple times to lower the heater temperature in 1

0

C increments. The lowest 

temperature that can be set 5

0

C. 

Note: Once you stop at your desired temperature this will flash 3 times, then the display 

will show the room temperature as detected by the product. If the set temperature is 

lower than the detected room temperature the heater will not activate.

F

-

Temp 

Up

Press multiple times to increase the heater temperature in 1

0

C increments. The highest 

temperature that can be set 37

0

C. 

Note: Once you stop at your desired temperature this will flash 3 times, then the display 

will show the room temperature as detected by the product. If the set temperature is 

lower than the detected room temperature the heater will not activate.

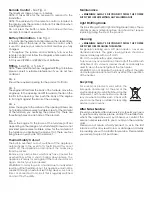
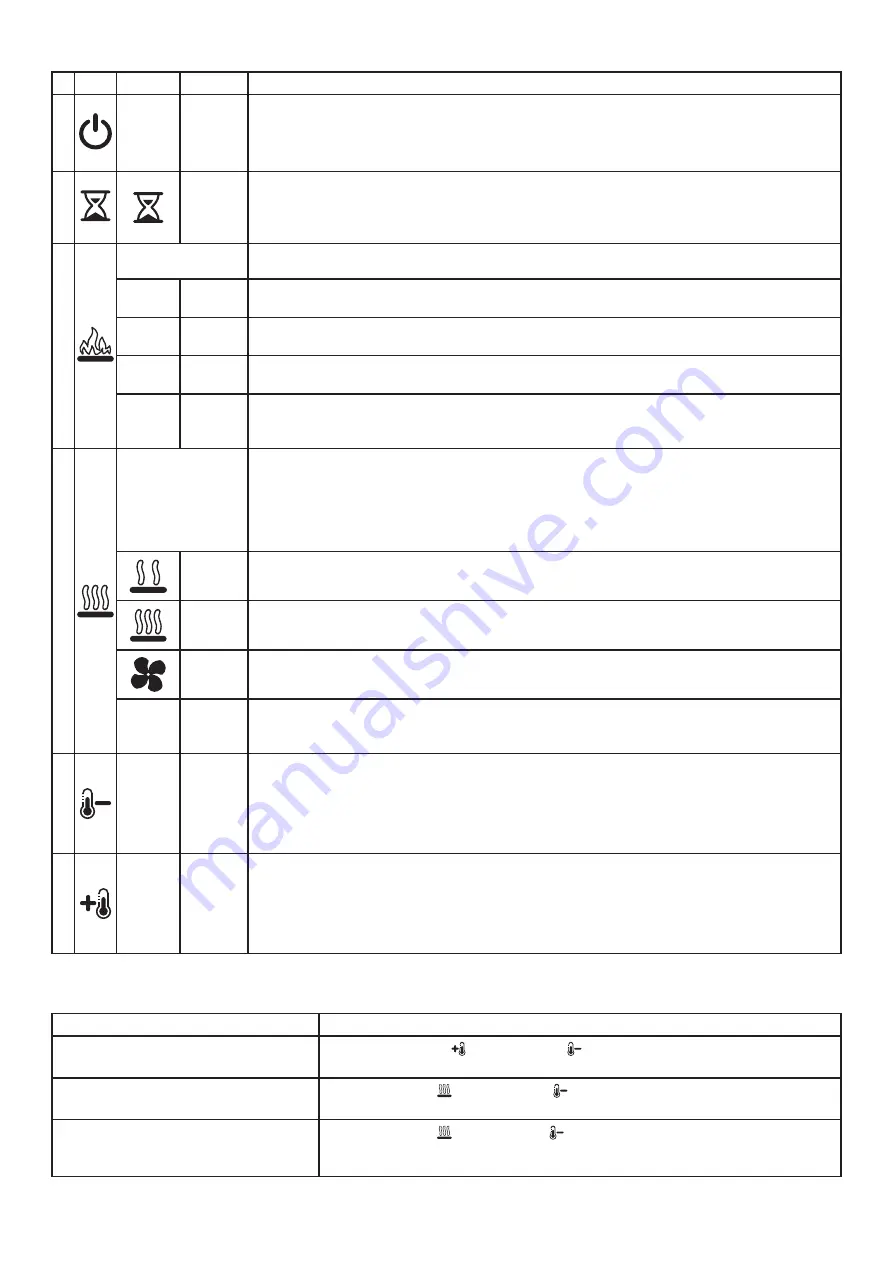
User Modes:

Mode Name /Discription

Action (Actions cannot be input by remote control)

Change Celsius (

0

 C) to Fahrenheit (

0

 F)  Press both Temp+ (

) and Temp–  (

) on the unit and hold until beep is 

heard and display flashes. (To revert back to Celsius repeat this action)

Disable Heat Options

Hold both Heat (

) and Temp–  (

), on the unit, for 2 seconds, when the 

heater has been disabled the display will read “--” and beep.

Enable Heat Options

Hold both Heat (

) and Temp– (

), on the unit, for 2 seconds. When the 

heater has been sucessfully enabled the heater will beep and the show the 

set temperature.

Summary of Contents for DF2010-EU-E

Page 1: ...b do okazjonalnego u ytku NO Dette produktet egner seg kun for godt isolerte rom eller sporadisk bruk RO Acest produs este adecvat exclusiv spa iilor bine ventilate sau utiliz rii ocazionale CZ Tento...

Page 2: ...1 2 3 A B C D E F A C E B D F...

Page 3: ...4 5 6 7...

Page 4: ...ildren aged from 3 years and less than 8 years shall not plug in regulate and clean the appliance or perform user maintaince The appliance must be positioned so that the plug is accessible Although th...

Page 5: ...he display This icon is Orange in Colour High Heat This icon in the floating display indicates HIGH HEAT this setting will be indicated by the HIGH HEAT icon and the letters HI appearing in the displa...

Page 6: ...buttons more than once within two seconds for correct operation Battery Information See Fig 4 1 To activate the remote control remove the clear battery isolation strip at the base of the remote contr...

Page 7: ...Gefahren verstehen Kinder ab 3 Jahren und unter 8 Jahren d rfen das Ger t nicht einstecken regulieren oder reinigen oder Wartungsarbeiten vornehmen Das Ger t muss so aufgestellt werden dass der Steck...

Page 8: ...Modus wird durch das Symbol f r LOW HEAT und die Buchstaben LO auf dem Display angezeigt Dieses Symbol ist orange als Farbe Hohe Hitze Das Heizger t l uft mit hoher W rme Dieser Modus wird durch das S...

Page 9: ...gedr ckt Wenn das Heizger t aktiviert wurde ert nt ein Piepen und das Display zeigt die eingestellte Temperatur an Fernbedienung Siehe Abb 4 Die maximale Reichweite betr gt ca 5 Meter HINWEIS Der Rec...

Page 10: ...begrijpen Kinderen ouder dan 3 en jonger dan 8 jaar mogen de stekker van het apparaat niet in het stopcontact steken hem instellen en reinigen of onderhoudswerkzaamheden uitvoeren Het apparaat moet zo...

Page 11: ...EAT en de letters LO verschijnen op de display Deze icoon is Oranje van kleur High Heat Deze icoon op de drijvende display geeft HIGH HEAT aan deze instelling wordt aangegeven door de icoon HIGH HEAT...

Page 12: ...Zowel Heat en Temp op de eenheid 2 seconden ingedrukt houden Als de verwarming is ingeschakeld gaat de verwarming piepen en wordt de ingestelde temperatuur getoond Afstandsbediening Zie Fig 4 Het max...

Page 13: ...ues encourus Les enfants de 3 8 ans ne doivent pas brancher r gler ou nettoyer l appareil ni effectuer aucune des op rations de nettoyage et d entretien r alisables par l utilisateur IMPORTANT LIRE AT...

Page 14: ...EAT indiqu e par l ic ne correspondante et les lettres LO l cran Cette ic ne est Orange Chaleur intense Cette ic ne sur le Floating Display indique une chaleur lev e HIGH HEAT Les lettres HI appara tr...

Page 15: ...est d environ 5 m tres REMARQUE il faut un certain temps pour que le r cepteur r ponde l metteur REMARQUE le r cepteur de la t l commande se trouve dans l cran Viser dans sa direction avec la t l comm...

Page 16: ...iiicuv rsta ntre3 i8aninuau voie s conecteze la priz s regleze i s cure e aparatul i nu au voie s realizeze ntre inerea efectuat de utilizator Aparatul trebuie pozi ionat n a a fel nc t techerul s fie...

Page 17: ...i aj Aceast pictogram are culoarea portocalie C ldur mare Aceast pictogram depeafi ajulflotantindic C LDUR MARE Aceast setarevafiindicat de pictograma C LDUR MARE i de literele HI care apar pe afi aj...

Page 18: ...Receptorul telecomenzii se afl n afi aj ndrepta i telecomanda n aceast direc ie atunci c nd da i comenzi Pentru o func ionare corespunz toare nu ap sa i butoanele la intervale sub dou secunde Informa...

Page 19: ...bambini di et compresa fra i 3 e gli 8 anni non devono collegare regolare e pulire l apparecchiatura o eseguire la manutenzione da parte dell utente Questa apparecchiatura deve essere posizionata in...

Page 20: ...er dopo 5 secondi a prescindere dall uso della stufa in modo indipendente dall effetto fiamma L icona calore basso o calore alto apparir continuamente sul display mobile Calore basso Questa impostazio...

Page 21: ...le opzioni calore Tenere premuto sia Heat sia Temp sull unit per 2 secondi quando la stufa si disattiva il display visualizza e viene emesso un segnale acustico Attivare le opzioni calore Tenere prem...

Page 22: ...nstruowane w zakresie bezpiecznego korzystania z urz dzenia oraz b d wiadome zwi zanych z tym zagro e Dzieci w wieku od 3 do 8 lat nie mog pod cza regulowa ani czy ci urz dzenia jak r wnie wykonywa ad...

Page 23: ...dzy 4 ustawieniami LOW HEAT HIGH HEAT COOL BLOW oraz OFF Ikona ustawie grzania jest widoczna na wy wietlaczu patrz rys 1 W przypadku w czonego efektu p omienia wy wietlacz wy czy si po 5 sekundach jed...

Page 24: ...ja wy czenia grzania Przytrzyma przyciski Heat i Temp na urz dzeniu przez 2 sekundy Po wy czeniu funkcji grzania na wy wietlaczu wy wietli si i rozlegnie si sygna d wi kowy Funkcja w czenia grzania Pr...

Page 25: ...vilka risker som finns Barn mellan 3 r och 8 r f r inte ansluta reglera och reng ra produkten eller utf ra underh llsarbetet Produkten m ste placeras s att kontakten r l tt tkomlig ven om den h r pro...

Page 26: ...H g v rme Med denna ikon i displayen indikeras H G V RME och indikeras med ikonen f r H G V RME och bokst verna Hi visas p displayen Denna ikon r r d Kall utbl sning Med denna ikon p displayen indike...

Page 27: ...kt funktion Batteriinformation Se fig 4 1 F r att aktivera fj rrkontrollen ta bort remsan som sitter vid batterierna i botten p kontrollen s att fj rrkontrollen ska kunna laddas ordentligt 2 F r att b...

Page 28: ...ar ni limpiar el aparato o llevar a cabo tareas de mantenimiento Este aparato debe colocarse de modo que el enchufe quede accesible Aunque este aparato cumple las normas de seguridad no se recomienda...

Page 29: ...recer continuamente en la pantalla flotante Low Heat Poco calor Con este ajuste la estufa funcionar con POCO CALOR este ajuste se indicar por medio del icono LOW HEAT y las letras LO apareciendo en la...

Page 30: ...es de calor Mantenga pulsados Heat y Temp en la unidad durante 2 segundos Cuando se haya activado satisfactoriamente la estufa esta emitir un pitido y mostrar la temperatura establecida Mando a distan...

Page 31: ...idades compreendidas entre os 3 anos e os 8 anos n o devem ligar regular e limpar o aparelho ou executar manuten o do utilizador O aparelho deve ser posicionado de forma que a ficha fique acess vel E...

Page 32: ...fini o ir executar o aquecedor em LOW HEAT esta defini o ser indicada pelo cone LOW HEAT e as letras LO aparecem no visor Este cone Laranja em Cor High Heat Calor alto Este cone no visor flutuante ind...

Page 33: ...mp na unidade durante 2 segundos Quando o aquecedor for ativado com xito o aquecedor emitir um bip e mostrar a temperatura definida Controlo remoto Ver Fig 4 O intervalo m ximo 5metros NOTA Demora tem...

Reviews: