


10
www.dimplex.com
WARNING:
This electric
firebox must be properly installed
before it is used.
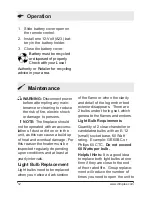
Manual Controls
A. 3-Position Switch
The switch has two ON positions
marked. The "--" position is for
manual operation. In this position
the built-in remote control is by-
passed. The "=" position is for op-
erating the unit with the provided
remote control.
When the switch is in the center
“o” position the unit is off.
B. Heater ON/OFF Switch
The Heater ON/OFF Switch sup-
plies power to the heater fan and
the heater element. When the
switch is in the ON position the
heater operates if the thermostat
calls for heat.
C. Heater Thermostat Control
To adjust the temperature to your
individual requirements, turn the
thermostat control clockwise all
the way to turn on the heater.
When the room reaches the de-
sired temperature, turn the ther-
mostat knob counter-clockwise
until you hear a click. Leave in
this position to maintain the room
temperature at this setting. For
additional heat, turn clockwise un-
til you hear the click again and the
heater will turn on.
!
NOTE:
The heater on your
fireplace may emit a slight,
harmless odor when first used.
This odor is a normal condition
caused by the initial heating of
internal heater parts and will
not occur again.
Resetting the Temperature
Cutoff Switch
Should the heater overheat, an
automatic cut out will turn the fire-
place off and it will not come back
on without being reset. It can be
reset by switching the
3-Position
Figure 4
A
B
C
Operation


