background image

10 


www.dimplex.com

3-POSITION SWITCH REPLACEMENT

Tools Required:

  Phillips head screwdriver. 


WARNINg:

  If the fireplace was operating prior to 

servicing allow at least 10 minutes for light bulbs and 

heating elements to cool off to avoid accidental burning 

of skin.


WARNINg:

  Disconnect circuit power before attempt-

ing any maintenance or cleaning to reduce the risk of 

electric shock or damage to persons.

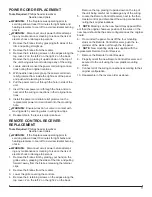
Remove the firebox trim by placing your hand on the 

1. 

grille section, grasping the sides of the trim and pulling 

forward, away from the firebox, releasing the retainer 

clips.

Remove the firebox from the mantel.

2. 

Remove the 6 retaining screws on the edges along the 

3. 

top cover: 2 on the left; 2 on the right; 2 on the back.  

Remove the top, placing it upside down on the top of 

the unit being careful not to damage any of the wiring.
Locate the 3-Position Switch mounted on the front top 

4. 

panel and disconnect the wiring clips and connections 

noting their original locations.
Depress the retainer clips on the rear of the switch and 

5. 

push the switch out of the rear cover.
Properly orient the new 3-Position Switch and connect 

6. 

all of the wiring clips and connections.
Align the top cover with the cabinet assembly and se-

7. 

cure with 6 retaining screws.

Place the firebox in the mantel.

8. 

Place trim back on firebox by opening grille, grasping 

9. 

both sides of trim, and hook the trim down into the trim 

slots.

!

  NOTE:

 The trim slots are located on the front surface 

of the firebox.

Close the grille.

10. 

THERMOSTAT CONTROL 

REPLACEMENT

Tools Required:

 Phillips head screwdriver

Flat Head Screwdriver


WARNINg:

  If the fireplace was operating prior to 

servicing allow at least 10 minutes for light bulbs and 

heating elements to cool off to avoid accidental burning 

of skin.


WARNINg:

  Disconnect circuit power before attempt-

ing any maintenance or cleaning to reduce the risk of 

electric shock or damage to persons.

Remove the firebox trim by placing your hand on the 

1. 

grille section, grasping the sides of the trim and pulling 

forward, away from the firebox, releasing the retainer 

clips.

Remove the firebox from the mantel.

2. 

Remove the 6 retaining screws on the edges along the 

3. 

top cover: 2 on the left; 2 on the right; 2 on the back.  

Remove the top, placing it upside down on the top of 

the unit being careful not to damage any of the wiring.
Locate the thermostat control mounted on the front top 

4. 

panel and disconnect the wiring clips and connections 

noting their original locations.

!

  NOTE:

  Using a flat head screwdriver gently pry be

-

tween the end of the connector and the controller to release 

the wires.

Pull off the thermostat control knob to expose the 

5. 

mounting screws.
Remove the mounting screws and remove the thermo-

6. 

stat control.
Properly orient and mount the new heater thermostat 

7. 

control and connect all of the wiring connections.
Reassemble in the reverse order as above.

8. 

HEATER ASSEMBLY REPLACEMENT

Tools Required:

  Phillips head screwdriver

Flat Head Screwdriver


WARNINg:

  If the fireplace was operating prior to 

servicing allow at least 10 minutes for light bulbs and 

heating elements to cool off to avoid accidental burning 

of skin.


WARNINg:

  Disconnect circuit power before attempt-

ing any maintenance or cleaning to reduce the risk of 

electric shock or damage to persons.

Remove the firebox trim by placing your hand on the 

1. 

grille section, grasping the sides of the trim and pulling 

forward, away from the firebox, releasing the retainer 

clips.

Remove the firebox from the mantel.

2. 

Remove the 6 retaining screws on the edges along the 

3. 

top cover: 2 on the left; 2 on the right; 2 on the back.  

Remove the top, placing it upside down on the top of 

the unit being careful not to damage any of the wiring.
Locate the heater assembly mounted on the top panel 

4. 

and disconnect the wiring clips and connections noting 

their original locations.

!

  NOTE:

  Using a flat head screwdriver gently pry be

-

tween the end of the connector and the heater to release 

the wires.

Turn the top back over, remove the 6 heater mounting 

5. 

screws, being careful to support the heater assembly 

as you do this.

Remove the 4 screws attaching the vent/deflector 

6. 

around the elements; 2 top and 2 bottom.
Properly orient the new heater assembly and connect 

7. 

all of the wiring connections.
Reassemble in the reverse order as above.

8. 

Summary of Contents for DF2600

Page 1: ...ithout notice 2011 Dimplex North America Limited Dimplex North America Limited 1367 Industrial Road Cambridge ON Canada N1R 7G8 1 888 346 7539 www dimplex com REV PCN DATE 00 21 SEP 11 IMPORTANT SAFETY INFORMATION Always read this manual first before attempting to service this fireplace For your safety always comply with all warnings and safety instructions contained in this manual to prevent pers...

Page 2: ... not carefully followed will expose the user to the risk of fire serious injury or death OPERATION 3 MAINTENANCE 4 EXPLODED PARTS DIAGRAM 6 WIRING DIAGRAM 7 ON OFF SWITCH REPLACEMENT 8 DIMMER CONTROL REPLACEMENT 8 FLAME SPEED CONTROL REPLACEMENT 8 FLICKER MOTOR FLICKER ROD REPLACEMENT 9 3 POSITION SWITCH REPLACEMENT 10 THERMOSTAT CONTROL REPLACEMENT 10 HEATER ASSEMBLY REPLACEMENT 10 POWER CORD REP...

Page 3: ...quencies to prevent interference with other units NOTE Before attempting any operation with the remote control pull the plastic insulator strip out from between the remote casing and battery cover Figure 2 NOTE The remote control is an EEPROM system therefore if power is interrupted for whatever reason the built in receiver board will hold the memory of the remote s radio frequency for up to 24 ho...

Page 4: ... down and in until it 5 rests against the Partially Reflective Glass LOWER LIGHT BULB REQUIREMENTS Quantity of 4 clear chandelier or candelabra bulbs with an E 12 small socket base 60 watt rating CAUTION Do not exceed 60 watts per bulb C To replace the top light bulbs Figure 6 Locate the two upper bulbs inside the firebox at the 1 top Examine the bulbs to determine which bulbs require 2 replacemen...

Page 5: ...placement will reduce the number of times you need to open the unit to replace light bulbs GLASS CLEANING The glass is cleaned in the factory during the assembly operation During shipment installation handling etc the clear door may collect dust particles these can be removed by dusting lightly with a clean dry cloth To remove fingerprints or other marks the clear door can be cleaned with a damp c...

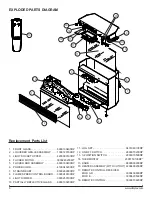
Page 6: ...N RELIEF 7 8500260003RP FLAME SPEED CONTROL BOARD 8 3000240100RP LIGHT DIMMER 9 3000250100RP PARTIALLY REFLECTIVE GLASS 10 6900100200RP LOG SET 11 0437960100RP ON OFF SWITCH 12 2800070200RP 3 POSITION SWITCH 13 2800070500RP THERMOSTAT 14 2300150100RP KNOB 15 8800000300RP HEATER ASSEMBLY WITH CUTOUT 16 2200490200RP REMOTE CONTROL RECEIVER 17 MOD 0 D 3000430800RP MOD E 3000820500RP REMOTE CONTROL 18...

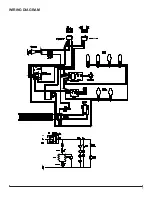
Page 7: ...7 WIRING DIAGRAM ...
Page 8: ...on grasping the sides of the trim and pulling forward away from the firebox releasing the retainer clips Remove the firebox from the mantel 2 Lower the grille covering the controls 3 Remove the 6 retaining screws on the edges along the 4 top cover 2 on the left 2 on the right 2 on the back Remove the top placing it upside down on the top of the unit being careful not to damage any of the wiring Lo...

Page 9: ...t glass and set aside 3 Remove the log set by lifting up the front edge of the 4 log until it clears the front tabs Pull out until the rear tab clears the back ledge then lift out IMPORTANT Only handle the log set by the plastic ember bed not the logs themselves NOTE Log set fits tightly into firebox Some force may be necessary to remove Remove the firebox from the mantel and unplug 5 Remove 2 scr...

Page 10: ...asing the retainer clips Remove the firebox from the mantel 2 Remove the 6 retaining screws on the edges along the 3 top cover 2 on the left 2 on the right 2 on the back Remove the top placing it upside down on the top of the unit being careful not to damage any of the wiring Locate the thermostat control mounted on the front top 4 panel and disconnect the wiring clips and connections noting their...

Page 11: ...Required Phillips head screwdriver Needle nosed pliers Warning If the fireplace was operating prior to servicing allow at least 10 minutes for light bulbs and heating elements to cool off to avoid accidental burning of skin Warning Disconnect circuit power before attempt ing any maintenance or cleaning to reduce the risk of electric shock or damage to persons Remove the firebox trim by placing you...

Page 12: ...S EXTERIOR VIEW OF MANUAL CONTROLS Front Grille Open Flicker Motor Light Sockets INTERIOR VIEW FROM THE BOTTOM 3 Position Switch LED Indicator Lights Thermostat Control Knob Flame Speed Control Knob Interior Light Control On Off Switch Flicker Rod ...

Page 13: ...ed Control Board Terminal Block ON OFF Switch Potentiometers Flame Speed Dimmer Con trols Heater Assembly blower motor fan elements Thermostat Control 3 Position Switch INTERIOR VIEW OF RIGHT SIDE TOP FRONT PANEL Dimmer Control Board Remote Control Receiver ...

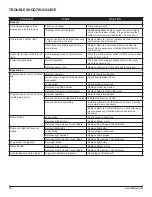
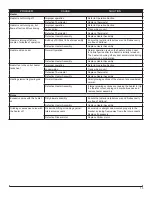
Page 14: ...coming voltage from the electrical wall socket Check Fuse Breaker Panel Loose wiring Check wiring connections Defective 3 Position Switch Replace 3 Position Switch Defective Remote Control Receiver Replace Remote Control Receiver Fireplace does not turn on using the Remote Control Improper operation Refer to Operation Section Remote Control not initialized to fireplace Initialize the Remote Contro...

Page 15: ...cturing or operation Defective Heater Assembly Replace Heater Assembly Heater fan turns on but heater lacks heat Improper operation Refer to Operation Section Loosw wiring Trace wiring in unit Defective Thermostat Replace Thermostat Defective Heater Assembly Replace Heater Assembly Heating element is glowing red Normal Operation Small glowing sections of the element are considered normal Defective...

Reviews: