background image

15

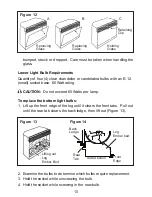
bumped, struck or dropped.  Care must be taken when handling the 

glass.

Lower Light Bulb Requirements

Quantity of four (4) clear chandelier or candelabra bulbs with an E-12 

(small) socket base, 60 Watt rating.

 CAUTION:  

Do not exceed 60 Watts per lamp.

To replace the bottom light bulbs:

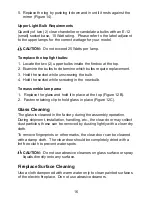
1.  Lift up the front edge of the log until it clears the front tabs.  Pull out 

until the rear tab clears the back ledge, then lift out (Figure 13).


Figure 12


A

B

C

Removing

Glass

Replacing

Glass

Holding

Glass

Retaining

Clip

Figure 13

Side Section

Front

Edge

Log 

Ember bed

Back

Ledge

Rear

Tab

Figure 14

Lifting out

Log

Ember Bed

2.  Examine the bulbs to determine which bulbs require replacement.
3.  Hold the socket while unscrewing the bulb.
4.  Hold the socket while screwing in the new bulb.

Summary of Contents for DF2603

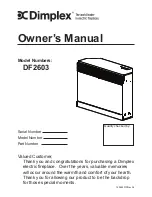
Page 1: ...ngratulations for purchasing a Dimplex electric fireplace Over the years valuable memories will occur around the warmth and comfort of your hearth Thank you for allowing our product to be the backdrop...

Page 2: ...ht harmless odor when first used This odor is a normal condition caused by the initial heating of internal heater parts 3 The information regarding the model of your unit can be found on the rating pl...

Page 3: ...and used in accordance with the instructions may cause harmful interference to radio or television reception which can be determined by turning the equipment off and on the user is encouraged to try...

Page 4: ...trical or mechanical adjustment or repair 6 Do not use outdoors 7 The electric fireplace is not intended for use in bathrooms laundry areas and similar indoor locations Never locate heater where it ma...

Page 5: ...1875 Watts 16 Do not burn wood or other materials in the electric fireplace 17 Do not strike the glass front 18 Always use a certified electrician should new circuits or outlets be required 19 Always...

Page 6: ...tructions for selecting a location and preparing the site to install the fireplace into Existing fireplace New wall construction Dimplex mantel surround kit or custom made mantel surround NOTE The fir...

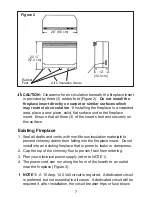
Page 7: ...fibrous insulation materials to prevent chimney debris from falling into the fireplace insert Do not install into an existing fireplace that is prone to leaks or dampness 2 Cap the top of the chimney...

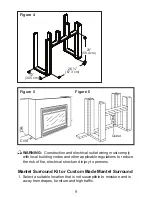
Page 8: ...sceptible to moisture and is away from drapes furniture and high traffic NOTE The fireplace insert must be installed on a hard surface 2 Place the fireplace in the desired location to see how it will...

Page 9: ...ust comply with local building codes and other applicable regulations to reduce the risk of fire electrical shock and injury to persons Mantel Surround Kit or Custom Made Mantel Surround 1 Select a su...

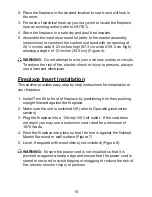
Page 10: ...eplace Insert Installation This section provides easy step by step instructions for installation of your fireplace 1 Install Trim Kit to front of fireplace by positioning trim then pushing straight fo...

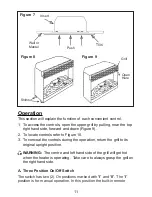
Page 11: ...Figure 10 3 To conceal the controls during the operation return the grill to its original upright position WARNING The centre and left hand side of the grill will get hot when the heater is operating...

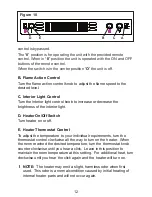
Page 12: ...t D Heater On Off Switch Turn heater on or off E Heater Thermostat Control To adjust the temperature to your individual requirements turn the thermostat control clockwise all the way to turn on the he...

Page 13: ...local dealer Remote Control The fireplace is supplied with an integrated On Off remote control NOTE Ensure that the fireplace s Three Position Switch is set to the Remote Control setting II position...

Page 14: ...h illuminate the log set exterior and four 4 bulbs under the log set which generate the flames and embers Helpful Hints It is a good idea to replace all light bulbs at one time if they are close to th...

Page 15: ...Lift up the front edge of the log until it clears the front tabs Pull out until the rear tab clears the back ledge then lift out Figure 13 Figure 12 A B C Removing Glass Replacing Glass Holding Glass...

Page 16: ...bulb To reassemble lamp area 1 Replace the glass and hold it in place at the top Figure 12B 2 Fasten retaining clip to hold glass in place Figure 12C Glass Cleaning The glass is cleaned in the factor...

Page 17: ...pected prior to shipment Subject to the provisions of this warranty Dimplex warrants such products to be free from defects in material and workmanship for a period of 2 years from the date of the firs...

Page 18: ...in lieu of repair or replacement choose to refund the purchase price for such product or part This limited warranty entitles the purchaser to on site or in home warranty services Accordingly Dimplex w...

Page 19: ...ce agents are also not responsible for IN NO EVENT WILL DIMPLEX OR ITS DIRECTORS OFFICERS OR AGENTS BE LIABLE TO THE PURCHASER OR ANY THIRD PARTY WHETHER IN CONTRACT IN TORT OR ON ANY OTHER BASIS FOR...

Reviews: