background image

Thermal Safety Cut-out

The built-in overheat cut-out, switches off the appliance 

automatically in the event of a fault! Should this occur 

switch off the appliance or disconnect the mains plug from 

the socket.

Remove any obstructions which may have caused the 

overheating. After a short cooling down phase, the 

appliance is ready for use again! If the fault should occur 

again, contact your local dealer!

WARNING: In order to avoid a hazard due to inadvertent 

resetting of the thermal cut-out, this appliance must not be 

supplied through an external switching device, such as a 

timer, or connected to a circuit that is regularly switched on 

and off by the utility.

Maintenance

 WARNING:

 ALWAYS DISCONNECT FROM THE POWER SUPPLY 

BEFORE ATTEMPTING ANY MAINTENANCE.

Light Emitting Diode

This fire is fitted with LED (Light Emitting Diode) lamps. These 

LED lamps are maintenance-free and should not require 

replacing during the life of the product.

Cleaning

 WARNING: 

ALWAYS DISCONNECT FROM THE POWER SUPPLY 

BEFORE CLEANING THE HEATER.

For general cleaning use a soft clean duster – never use 

abrasive cleaners. The glass viewing screen should be 

cleaned carefully with a soft cloth.  

DO NOT use proprietary glass cleaners.

To remove any accumulation of dust or fluff the soft brush 

attachment of a vacuum cleaner should occasionally be 

used to clean the outlet grille of the fan heater.

WARNING: do not operate the product without the grille 

and outer glass in position as this may effect the operation 

of the heater.

Recycling

For electrical products sold within the European 

Community. At the end of the electrical 

products useful life it should not be disposed 

of with household waste. Please recycle where 

facilities exist. Check with your Local Authority 

or retailer for recycling advice in your country.

After Sales Service

Should you require after sales service or should you need 

to purchase any spares, please contact the retailer from 

whom the appliance was purchased or contact the service 

number relevant to your country on the warranty card.

Please do not return a faulty product to us in the first instance 

as this may result in loss or damage and delay in providing 

you with a satisfactory service. Please retain your receipt 

as proof of purchase.

Summary of Contents for DF2624L-INT

Page 1: ...roduct complies with the European Safety Standards EN60335 2 30 and the European Standard Electromagnetic Compatibility EMC EN55014 EN60555 2 and EN60555 3 These cover the essential requirements of EE...

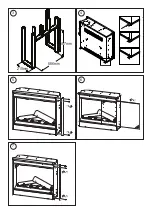
Page 2: ...A B C E F G 695mm 595mm 182mm 205mm 1 2 A C F B D E G...

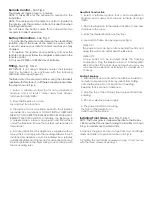
Page 3: ...587mm 686mm 210mm 3 5 6 7 4...

Page 4: ...ildren aged from 3 years and less than 8 years shall not plug in regulate and clean the appliance or perform user maintaince The appliance must be positioned so that the plug is accessible Although th...

Page 5: ...is setting will be indicated by the LOW HEAT icon and the letters LO appearing in the display This icon is Orange in Colour High Heat This icon in the floating display indicates HIGH HEAT this setting...

Page 6: ...nsmitter NOTE The reciever for the remote control is located in the display aim the remote control in this direction when inputting commands Do not press the buttons more than once within two seconds...

Page 7: ...r general cleaning use a soft clean duster never use abrasive cleaners The glass viewing screen should be cleaned carefully with a soft cloth DO NOT use proprietary glass cleaners To remove any accumu...

Page 8: ...8 3 3 8 3 8 DF2624L INT 230V 240V P Nom 1 3 1 4 P 1 3 1 4 P c 1 3 1 4 In Standby mode el SB 0 39 0 41 W RU...

Page 9: ...5 8 0 0 5 SLEEPTIMER C FLAME EFFECT 4 LOWFLAME HIGHFLAME DEMOMODE OFF f1 F1 f2 F2 fp FP D LOG EFFECT 3 Lp FP LS FS E HEAT 4 LOW HEAT HIGH HEAT COOL BLOW OFF 1 5 LOW HEAT LO HIGH HEAT HIGH HEAT HI COO...

Page 10: ...1 2 3 4 3 1 2 10 13 230 240 3 10 1 2 3 4 5 6 7 1 5 2 6 3 1 7 2 5 2 1 2 3 CR2025 CR2032 3 4 Dimplex 3 L 4 1 2 3 4...

Page 11: ...LED...

Page 12: ...8 3 8 3 8 DF2624L INT 230 240 P Nom 1 3 1 4 P min 1 3 1 4 P max c 1 3 1 4 el SB 0 39 0 41 UK...

Page 13: ...3 A STANDBY 0 5 0 5 8 0 C FLAMEEFFECT 4 f1 F1 f2 F2 fp FP D LOG EFFECT 3 Lp FP LS FS E HEAT 4 1 5 LO HI CB 10 20 F 1 C 5 C 3 G 1 C 37 C 3 C F 2...

Page 14: ...1 2 3 4 3 1 2 10 13 230 240 10 1 2 3 4 5 6 7 1 3 5 2 6 3 1 7 2 5 2 1 2 3 CR2025 CR2032 3 4 Dimplex 3 L 4 1 1 2 3 4...

Page 15: ......

Page 16: ...huit ans ne doivent pas brancher r gler IMPORTANT THESE INSTRUCTIONS SHOULD BE READ CAREFULLY AND RETAINED FOR FUTURE REFERENCE ou nettoyer l appareil ni effectuer aucune des op rations de nettoyage...

Page 17: ...l ic ne correspondante et les lettres LO l cran Cette ic ne est orange Chaleur lev e Cette ic ne sur le Floating Display indique une chaleur lev e HIGH HEAT Les lettres HI appara tront l cran Cette i...

Page 18: ...le r cepteur r ponde l metteur REMARQUE le r cepteur de la t l commande se trouve dans l cran Viser dans sa direction avec la t l commande lorsque l on souhaite commander l unit distance Do not press...

Page 19: ...ffon de d poussi rage propre Ne jamais utiliser de produits nettoyants abrasifs La vitre permettant de voir les flammes doit tre nettoy e d licatement avec un chiffon doux DO NOT use proprietary glass...

Reviews: