background image


11 


WARRANTY 


Dimplex Electric Fireplaces are tested and inspected prior to shipment and are 
guaranteed from defect to the purchaser of each new product.  Any part which 
proves to be defective in material or workmanship under normal use within 
one year will be repaired or replaced without charge.*  The Company will 
not be responsible for any expense incurred for installation, removal for 
service, or transportation costs.  Any such defect should be brought to the 
attention of the Dealer where the product was purchased and is authorized to 
repair or replace within the terms of this warranty. 
 
The Company’s only obligation under this warranty will be at its sole option to 
repair or replace any part proving defective or to refund the purchase price 
thereof. 


The owner/user assumes all other risks, if any, including the risk of any direct, 
indirect or consequential loss or damage arising out of the use of or inability to 
use the product. 
 
The warranty will not apply if, in the sole judgment of the Company, damage 
or failure has resulted from accident, alteration, misuse, abuse, incorrect 
installation, or operation on an incorrect power source. 
 
The foregoing is in lieu of all other warranties expressed, implied, or statutory, 
and the Company neither assumes, nor authorizes any person to assume for 
it any other obligation, or liability in connection with said product. 


*Light bulbs are not covered in the warranty. 

 
SERVICE 
Contact your local dealer for service or warranty information. 


The product comlies with the European Safety Standard EN60335-2-30 and the 
European Standard for Electromagnetic Compatibility (EMC) EN55014, EN6055-2 and 
EN60555-3 which cover the essential requirements of EEG Directives 73/23 and 89/336.


Summary of Contents for EF3003-230

Page 1: ...ed that you have chosen to purchase an electric fireplace manufactured by Dimplex North America Ltd Over the years valuable memories will occur around the warmth and comfort of your hearth Thank you for allowing our product to be the backdrop for those special moments 7206700100REV02 Quality checked by ...

Page 2: ...CONTENTS PAGE 1 Important Instructions PAGE 2 Model and Serial Number Information PAGE 3 Site selection and preparation PAGE 5 Fireplace Installation PAGE 6 Operation PAGE 9 Maintenance PAGE 12 Warranty ...

Page 3: ... the maintenance section of this manual 2 The heater on your fireplace may emit a slight harmless odor when first used This odor is a normal condition caused by the initial heating of internal heater parts and will not occur again 3 If your heater does not emit heat ensure the switch is on and the thermostat is turned fully clockwise If this does not work switch the unit off for 5 minutes and try ...

Page 4: ...ot cover cord with throw rugs runners or the like Arrange cord away from traffic area and where it will not be tripped over 14 Do not locate the heater immediately below a fixed socket outlet 15 To disconnect the fireplace turn the controls off then remove the plug from the outlet 16 Do not insert or allow foreign objects to enter any ventilation or exhaust opening as this may cause an electric sh...

Page 5: ...RTANT INSTRUCTIONS If you have any questions about our products please have the product model and serial numbers available upon calling Dimplex customer service To locate the model and serial number labels see below 2 Firebox Carton ...

Page 6: ...eath the fireplace insert is provided by three rubber feet FIGURE 1 DO NOT INSTALL THE FIREPLACE INSERT DIRECTLY ON CARPET OR SIMILAR SURFACES WHICH MAY RESTRICT AIR CIRCULATION If installing the fireplace in a carpeted area place a one piece solid flat surface under the fireplace insert Ensure that all three of the insert s feet rest securely on this surface EXISTING FIREPLACE INSTALLATION 1 Seal...

Page 7: ...urning it should be inspected by the local building department prior to use to reduce the risk of fire and personal injury NEW WALL CONSTRUCTION 1 Select a suitable location that is not susceptible to moisture and is away from drapes furniture and high traffic 2 Place the fireplace in the desired location to see how it will look in the room 3 Mark the desired location on the floor and store the fi...

Page 8: ... refer to NOTE 1 4 Store the fireplace in a safe dry and dust free location 5 Assemble the mantel surround kit refer to the mantel assembly instructions or construct the custom surround with an opening of 775mm X 654mm X 305mm FIREPLACE INSERT INSTALLATION This section provides easy step by step instructions for installation of your fireplace 1 Install Trim Kit to front of fireplace by positioning...

Page 9: ...t position WARNING Ensure the power cord is not installed so that it is pinched or against a sharp edge and ensure that the power cord is stored or secured to avoid tripping or snagging to reduce the risk of fire electric shock or injury to persons FIGURE 8 WARNING The centre and left hand side of the grille will get hot when the heater is operating Take care to always grasp the grille on the righ...

Page 10: ...d the desired temperature turn the thermostat knob counter clockwise until you hear a click Leave in this position to maintain the room temperature at this setting For additional heat turn clockwise until you hear the click again and the heater will turn on NOTE The heater may emit a slight harmless odor when first used This odor is a normal condition caused by initial heating of internal heater p...

Page 11: ... the fireplace levels sequentially The level is increased every time the ON button on the transmitter is pressed The fireplace can be turned off at any point by pressing the OFF button on the remote control transmitter Level 1 The flame effect is turned on and the first red indicator light illuminates Level 2 The flame effect remains on the heater is activated to the low heat setting and the first...

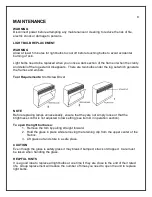
Page 12: ...r NOTE Before replacing lamps unnecessarily ensure that they are not simply loose or that the brightness control is not adjusted to low setting see item D in operation section To open the light bulb area 1 Remove the trim by pulling straight forward 2 Hold the glass in place while removing the retaining clip from the upper center of the firebox 3 Lift glass out and store in a safe place CAUTION Ev...

Page 13: ...ity of 4 clear chandelier or candelabra bulbs with an E 14 small socket base 60 watt rating CAUTION Do not exceed 60 watts per lamp To replace the top light bulbs 1 Locate the two upper bulbs inside the firebox at the top 2 Examine the bulbs to determine which bulbs require replacement 3 Hold the socket while unscrewing the bulb 4 Hold the socket while screwing in the new bulb UPPER LIGHT BULB REQ...

Page 14: ...during the assembly operation During shipment installation handling etc the clear door may collect dust particles these can be removed by dusting lightly with a clean dry cloth To remove fingerprints or other marks the clear door can be cleaned with a damp cloth The clear door should be completely dried with a lint free cloth to prevent water spots CAUTION Do not use abrasive cleaners on glass sur...

Page 15: ... The owner user assumes all other risks if any including the risk of any direct indirect or consequential loss or damage arising out of the use of or inability to use the product The warranty will not apply if in the sole judgment of the Company damage or failure has resulted from accident alteration misuse abuse incorrect installation or operation on an incorrect power source The foregoing is in ...

Page 16: ...12 ...

Reviews: