background image


10


EWM-COPPER, EWM-SS, EWM-SS-BLK 


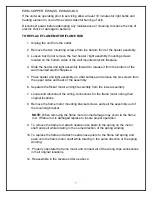
If the unit was operating prior to servicing allow at least 10 minutes for light bulbs and 
heating element to cool off to avoid accidental burning of skin. 
 
Disconnect power before attempting any maintenance or cleaning to reduce the risk of 
electric shock or damage to persons. 
 

TO REPLACE HEATER THERMOSTAT CONTROL 


1.  Unplug the unit from the outlet. 


2.  Remove the two mounting screws from the bottom front of the heater assembly.  


3.  Loosen but do not remove the four heater / light assembly mounting screws 

located on the bottom sides of the wall mounted electric fireplace.


4.  Slide the heater and light assembly forward to release it from the bottom of the 

wall mounted electric fireplace. 


5.  Place heater and light assembly on a flat surface and remove the six screws from 

the upper sides and back of the assembly. 


6.  Separate the flicker motor and light assembly from the lower assembly. 


7.  Locate the heater thermostat mounted in the lower cover and disconnect the 

wiring clips and connections noting their original locations. 


8.  Remove the thermostat control knob to expose the mounting screws. 


9.  Remove the mounting screws and remove the heater thermostat control switch. 


9.  Properly orientate the new thermostat and connect all of the wiring clips and 

connections. 


10. Reassemble in the reverse order as above. 


Summary of Contents for EWM-COPPER

Page 1: ...PARTS AND SERVICE MANUAL FOR THE WALL MOUNTED FIREPLACE MODEL NUMBER EWM COPPER EWM SS EWM SS BLK...

Page 2: ...3 PARTS LIST PAGE 4 LIGHT BULB REPLACEMENT PAGE 5 MAIN POWER ON OFF SWITCH REPLACEMENT PAGE 6 FLAME MOTOR FLAME ROD REPLACEMENT PAGE 7 HEATER ON OFF SWITCH REPLACEMENT PAGE 8 HEATER ASSEMBLY REPLACEME...

Page 3: ...hear a click Leave in this position to maintain the room temperature at this setting For additional heat turn clockwise until you hear the click again and the heater will turn on To turn the heater of...

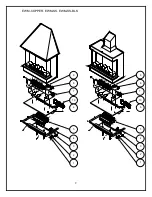
Page 4: ...2 EWM COPPER EWM SS EWM SS BLK 10 7 8 9 6 5 4 3 2 1 10 7 8 9 6 5 4 3 2 1...

Page 5: ...3 EWM COPPER EWM SS EWM SS BLK WIRING DIAGRAM...

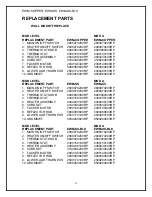
Page 6: ...ON OFF SWITCH 2800070200RP 2800070200RP 3 THERMOSTAT KNOB 8800000300RP 8800000300RP 4 THERMOSTAT 2300150100RP 2300150100RP 5 HEATER ASSEMBLY 2000230100RP 2000230100RP 6 CORDSET 4100040200RP 410004020...

Page 7: ...replace light bulbs TOOL REQUIREMENTS Slot screwdriver LOWER BULB REPLACEMENT 1 Unplug the unit from the outlet 2 Remove the two mounting screws from the bottom front of the heater assembly FIGURE 2 3...

Page 8: ...heater light assembly mounting screws located on the bottom sides of the wall mounted electric fireplace 4 Slide the heater and light assembly forward to release it from the bottom of the wall mounted...

Page 9: ...and remove the six screws from the upper sides and back of the assembly 6 Separate the flicker motor and light assembly from the lower assembly 7 Locate and disconnect the wiring connections for the...

Page 10: ...heater light assembly mounting screws located on the bottom sides of the wall mounted electric fireplace 4 Slide the heater and light assembly forward to release it from the bottom of the wall mounted...

Page 11: ...crews located on the bottom sides of the wall mounted electric fireplace 4 Slide the heater and light assembly forward to release it from the bottom of the wall mounted electric fireplace 5 Place heat...

Page 12: ...he wall mounted electric fireplace 4 Slide the heater and light assembly forward to release it from the bottom of the wall mounted electric fireplace 5 Place heater and light assembly on a flat surfac...

Page 13: ...to release it from the bottom of the wall mounted electric fireplace 5 Place heater and light assembly on a flat surface and remove the six screws from the upper sides and back of the assembly 6 Separ...

Reviews: