background image


11

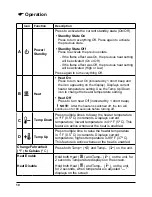
 Operation

Icon Function

Description

E

Color 
Themes

Press multiple times to change the flame base colors 

from Red to Blue to Off. (The first segment on the 

display will change from "r" to "b" to blank) This 

feature is active only when the flame effect is On.  

F

360

o

 Light

Press multiple times to change the LEDs on the sides 

and back of the unit from Midnight mode to white to 

yellow to red. (The middle segment on the display 

will change through 0 - 3 respectively. This feature is 

active only when the Flame is oN.)  

G

Brightness

Press to change the LED lights from High to Low. 

(The last segment on the display will change from 

"H" to "L") The Realog

tm

 LEDs remain On when the 

heater is ON and the flame effect is Off.

!

NOTE: 

When the Light Sensor is activated, High 

and Low flickering brightness settings are also available 

(Flashing "H" and "L").

H

Flame

Press to light the log set and start the flame effect. 

Press again to turn feature Off.

I

Light 

Sensor

Press to activate (ABS ON) the ambient light sensor. 

Press again to turn the sensor off (ABS OFF).

!

NOTE: 

The light sensor will adjust the brightness of the 

fireplace based on the ambient light in the room.

J

Timer

Press multiple times to change the sleeper timer in 

0.5 hr increments from 0.5 hr to 8.0 hr before turning 

off. The remaining time on the sleep timer displays.  

Control Lock

Control unlock

Hold both Temp– (

) and Brightness (

), on the 

unit, for 2 seconds to disable the manual controls. 
Hold both Temp– (

) and Brightness (

), on the 

unit, for 2 seconds to enable the manual controls. 

Resetting the Temperature Cutoff Switch 

Should the heater overheat, an automatic cut out will turn the heater off and it will 

not come back on without being reset. It can be reset by disconnecting power at 

the main electrical panel and waiting 5 minutes before plugging the unit back in. 


CAuTION

:  If you need to con tinuously reset the heater, unplug the unit and call 

technical support.

Summary of Contents for RBF30-AU

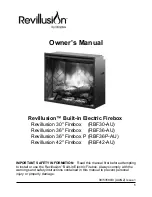
Page 1: ...llusion 36 Firebox P RBF36P AU Revillusion 42 Firebox RBF42 AU Owner s Manual IMPORTANT SAFETY INFORMATION Read this manual first before attempting to install or use the Revillusion Built in Electric Firebox Always comply with the warnings and safety instructions contained in this manual to prevent personal injury or property damage ...

Page 2: ...ize CAUTION Procedures and techniques which if not carefully followed will result in damage to the equipment WARNING Procedures precautions and techniques which if not carefully followed will expose the user to the risk of fire serious injury or death Welcome 3 Important Instructions 4 Specifications 6 Installation 7 Operation 9 Maintenance 12 ...

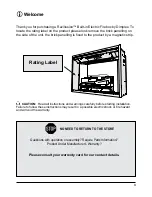
Page 3: ...roduct by a magnetic strip CAUTION Read all instructions and warnings carefully before starting installation Failure to follow these instructions may result in a possible electric shock or fire hazard and will void the warranty NO NEED TO RETURN TO THE STORE Questions with operation or assembly Require Parts Information Product Under Manufacturer s Warranty Please consult your warrenty card for ou...

Page 4: ... use of the appliance in a safe way and understand the hazards involved Children shall not play with the appliance Cleaning and user maintenance shall not be made by Children without supervision 6 Children of less than 3 years should be kept away unless continuously supervised Children aged from 3 years and less than 8 years shall only switch on off the appliance provided that it has been placed o...

Page 5: ...fied person in order to avoid a hazard 14 Keep the supply cord away from the front of the appliance WARNING In order to avoid overheating do not cover the appliance Do not place material or garments on the appliance or obstruct the air circulation around the appliance for instance by curtains or furniture as this could cause overheating and a fire risk WARNING In order to avoid a hazard due to ina...

Page 6: ...rcuit is preferred but not essential in all cases A dedicated circuit will be required if after installation the circuit breaker trips or the fuse blows on a regular basis when the heater is operating Additional appliances on the same circuit may exceed the current rating of the circuit breaker Unpacking the Unit The unit comes packed with a protective sheet covering the front of the unit This she...

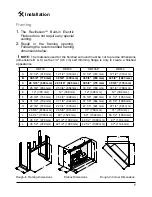
Page 7: ...27 1 4 691 mm I 26 5 8 6764 mm 26 5 8 674 mm 31 788 mm 31 788 mm J 54 1 4 1378 mm 60 1524 mm 60 1524 mm 66 1 2 1689 mm K 38 1 2 978 mm 42 1 2 1080 mm 42 1 2 1080 mm 47 1194 mm L 38 1 2 978 mm 42 1 2 1080 mm 42 1 2 1080 mm 47 1194 mm Rough In Framing Dimensions Firebox Dimensions Rough In Corner Dimensions Framing 1 The RevillusionTM Built in Electric Firebox does not require any special venting 2 ...

Page 8: ...NOT be in direct contact with any building vapor barrier or insulation 1 Place the firebox into the framed opening Level with shims if necessary 2 From the inside of the unit gently remove the interior brick panels attached magnetically and bent out up to 90 to be flush with the surrounding studs 3 Attach the firebox to frame using four mounting flanges on the sides of firebox and suitable hardwar...

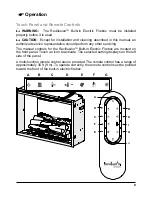
Page 9: ...ative should perform any other servicing The manual controls for the RevillusionTM Built in Electric Firebox are located on the front panel Touch an icon to activate The selected setting displays on the left side of the panel A multi function remote control also is provided The remote control has a range of approximately 30 ft 9 m To operate correctly the remote control must be pointed toward the ...

Page 10: ...etting Heat Off Press to turn heat Off indicated by 1 short beep NOTE After the heater is switched off the fan will continue on for 60 seconds before turning off C Temp Down Press multiple times to lower the heater temperature in 10 F 0 50 C increments Displays current temperature lowest temperature is 410 F 50 C This feature is active whenever the heat is enabled D Temp Up Press multiple time to ...

Page 11: ...light the log set and start the flame effect Press again to turn feature Off I Light Sensor Press to activate ABS ON the ambient light sensor Press again to turn the sensor off ABS OFF NOTE The light sensor will adjust the brightness of the fireplace based on the ambient light in the room J Timer Press multiple times to change the sleeper timer in 0 5 hr increments from 0 5 hr to 8 0 hr before tur...

Page 12: ...ore attempting any maintenance or cleaning to reduce the risk of fire electric shock or injury CAUTION Except for installation and cleaning described in this manual an authorized service representative should perform any other servicing Clean Logs and Base The built in electric firebox set should not be operated with an accumulation of dust or dirt on or in the firebox as this can cause a build up...

Reviews: