background image

Operation

Operating Instructions 

Icon

Function

Description

A

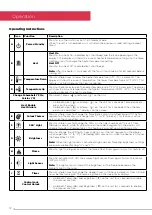
Power/Standby

Press to turn the unit on or put it in Standby mode.
When the unit is turned back on, it will retain the previously used settings (except 
timer).

B

Heat

Heat On

Press to turn heat On (indicated by 1 short beep and the icon appearing on the 
display). The display will show the current heater temperature setting. Use the Temp 
Up/Down icon to change the heater temperature setting.

Heat Off

Press to turn heat Off (indicated by 1 short beep).

Note: 

After the heater is switched off, the fan will continue on for 60 seconds before 

turning off.

C

Temperature Down

Press multiple times to lower the heater temperature in 1°F (1°C) increments. The 
display will show the current temperature; the lowest temperature is 41°F (5°C). This 
feature is active whenever the heat is enabled.

D

Temperature Up

Press multiple times to raise the heater temperature in 1°F (1°C) increments. The display 
will show the current temperature; the highest temperature is 99°F (37°C). This feature 
is active whenever the heat is enabled.

Change Fahrenheit (°F) to 

Celsius (°C)

Press both Temp+ (    ) and Temp- (    ) on the unit.

Heat Enable

Heat Disable

• 

Hold both Heat (    ) and Temp- (    ) on the unit for 2 seconds. Temperature dis-
plays on the screen.

• 

Hold both Heat (    ) and Temp- (    ) on the unit for 2 seconds. When the tem-
perature is adjusted "---" displays on the screen.

E

Colour Themes

Press multiple times to change the flame base colours from Red-Blue-Off (The first 
segment on the display will change from "r" to "b" to blank). This feature is active 
only when the fame effect is on.

F

360° Light

Press multiple times to change the LEDs on the sides and back of the unit from 
Midnight mode to white to yellow to red (the middle segment on the display will 
change through 0-3 respectively). This feature is only active when flame is ON.

G

Brightness

Press to change the LED lights from High to Low (the last segment on the display 
will change from "H" to "L"). The Realog LEDs remain On when the heater is ON and 
the flame effect is OFF.

Note: 

When the light sensor is activated, High and Low flickering brightness settings 

are also available (flashing "H" and "L").

H

Flame

Press to light the log set and start the fame effect. Press again to turn this feature off.

I

Light Sensor

Press to activate (ALS ON) the ambient light sensor. Press again to turn the sensor 
OFF (ALS OFF).

Note: 

The light sensor will adjust the brightness of the fireplace based on the 

ambient light in the room.

J

Timer

Press multiple times to change the sleeper timer in 0.5 hour increments from 0.5 to 8 
hours before turning off. The remaining time on the sleep timer displays.

Control Lock

Control Unlock

• 

Hold both Temp- (    ) and brightness (    ) on the unit for 2 seconds to disable 
the manual controls.

• 

Hold both Temp- (    ) and Brightness (    ) on the unit for 2 seconds to enable 
the manual controls.

12

Summary of Contents for Revillusion HXY20-AU

Page 1: ...INSTRUCTION MANUAL For domestic household use only Huxley Sherwood 2kW Revillusion Suites Model SWD20 AU HXY20 AU 8 54150 0 Issue 7 OCN 11905 ...

Page 2: ... immediately below a fixed socket outlet or connection box This appliance is not intended for use by persons including children with reduced physical sensory or mental capabilities or lack of experience and knowledge unless they have been given supervision or instruction concerning use of the appliance by a person responsible for their safety Children should be supervised to ensure that they do no...

Page 3: ...ppliance or obstruct the air circulation around the appliance for instance by curtains or furniture as this could cause overheating and a fire risk This Heater carries the warning symbol indicating that it must not be covered In order to avoid a hazard due to inadvertent resetting of the thermal cut out this appliance must not be supplied through an external switching device such as a timer or con...

Page 4: ... Unfortunately it is not obvious when a button or coin battery is stuck in a child s oesophagus food pipe There are no specific symptoms associated with this The child might cough gag or drool a lot appear to have a stomach upset or virus be sick point to their throat or stomach have a pain in their abdomen chest or throat be tired or lethargic be quieter or more clingy than usual or otherwise not...

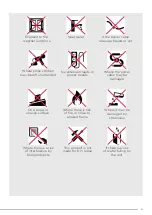
Page 5: ...extension leads or power boards Where there is risk of fire or close to a naked flame Where the power cable may be damaged On a slope or uneven surface Where it may be damaged by chemicals If there is a risk of water falling on the unit Where there is a risk of interference by foreign objects This product is not made for DIY repair 5 ...

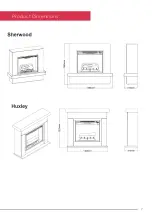
Page 6: ...ite Wattage 2000 Heat Settings 2 Thermostat Control Y Remote Control Y Warranty 2 years Dimensions w x d x h 1380 x 415 x 1245 1400 x 415 x 1225 Specifications For greater precision please always refer to the rating label placed on the product 6 ...

Page 7: ...Product Dimensions 7 ...

Page 8: ...he fuse blows on a regular basis when the heater is operating Additional appliances on the same circuit may exceed the current rating of the circuit breaker Unpacking the Unit The unit comes packed with a protective sheet covering the front of the unit This sheet is intended to prevent dust and debris from entering during construction This sheet is designed so that it can be partially removed to c...

Page 9: ...ng instructions are supplied with this kit Please follow these instructions carefully Thermal Safety Cut out A thermal safety cut out is incorporated in the fan heater to prevent damage due to overheating This can happen if the heat outlet was restricted in any way If the cut out operates unplug the heater from the socket outlet and allow approximately 10 minutes before reconnecting Before switchi...

Page 10: ...ft side of the panel Remote control The maximum range of use is 9 metres WARNING It takes time for the receiver to respond to the transmitter Do not press the buttons more than once within two seconds for correct operation NOTE The receiver for the remote control is located in the display aim the remote control in this direction when inputting demands 1 To activate the remote control remove the ba...

Page 11: ...ve side of the battery faces up 3 Close the battery cover and replace the screw Discard leaking batteries Dispose of batteries in the proper manner according to provincial and local regulations Any battery may leak electrolyte if mixed with a different battery type if inserted incorrectly if all batteries are not replaced at the same time if disposed on a fire or if an attempt is made to change a ...

Page 12: ...em perature is adjusted displays on the screen E Colour Themes Press multiple times to change the flame base colours from Red Blue Off The first segment on the display will change from r to b to blank This feature is active only when the fame effect is on F 360 Light Press multiple times to change the LEDs on the sides and back of the unit from Midnight mode to white to yellow to red the middle se...

Page 13: ...d and display flashes To revert back to Celsius repeat this action Disable Enable Heat Options Hold both Flame cycle and Heat cycle on the product for 5 seconds when the heater has been disabled the product will beep This will disable heat control functions on the product only To enable heat repeat this action Note the remote control will still be able to operate heat functions Operation 13 ...

Page 14: ... operated with an accumulation of dust or dirt on or in the firebox as this can cause a build up of heat and eventual damage Dust and vacuum the firebox as needed Use a damp cloth and a mild detergent to clean painted surfaces of the built in electric firebox Never use abrasive cleaners Clean Reflector Screen The reflector screen is cleaned in the factory during the assembly operation During shipm...

Page 15: ...rdous substances can leak into the ground water polluting the food chain and damaging health and well being Warranty Please refer to the warranty card in the box for warranty information For any troubleshooting advice please contact the relative Customer Care Centre below Glen Dimplex Australia Pty Ltd Glen Dimplex New Zealand Ltd 8 Lakeview Drive 38 Harris Road East Tamaki Scoresby 3179 Victoria ...

Page 16: ...pplied by Glen Dimplex Australia 8 Lakeview Drive Scoresby Victoria 3179 Glen Dimplex Australia All rights reserved Material contained in this publication may not be reproduced in whole or in part without prior permission in writing of Glen Dimplex Australia SWD20 AU HXY20 AU v7 16 ...

Reviews: