Important Safety Advice
When using electrical appliances, basic precautions
should be followed to reduce the risk of fire, electric
shock, and injury to persons, including the following:
If the appliance is damaged, check immediately with the
supplier before installation and operation.
Do not use this heater in the immediate surroundings of
a bath, shower or swimming pool
.
Do not use outdoors.
This heater must not be located immediately above or
below a fixed socket outlet or connection box.
Do not cover or obstruct in any way the heat outlet grille
located underneath the heater. Overheating will result if
the heater is accidentally covered.
In the event of a fault unplug the heater.
Unplug the heater when not required for long periods.
The supply cord must be placed on the right hand side of
the heater away from the heat outlet underneath the
heater.
Although this heater complies with safety standards, we
do not recommend its use on deep pile carpets or on
long hair type of rugs.
This appliance is not intended for use by children or other
persons without assistance or supervision if their
physical, sensory or mental capabilities prevent them
from using it safely. Children should be supervised to
ensure that they do not play with the appliance.
The appliance must be positioned so that the plug is
accessible.
If the supply cord is damaged it must be replaced by the
manufacturer or service agent or similarly qualified
person in order to avoid a hazard.
Caution: In order to avoid a hazard due to inadvertent
resetting of the thermal cut-out, this appliance must not
be supplied through an external switching device, such
as a timer, or connected to a circuit that is regularly
switched on and off by the utility.
The appliance must not to be located beneath a socket
outlet.
Where an appliance is Recessed, necessity to allow
disconnection of the appliance from the electrical supply
is required. Incorporate a switch in the fixed wiring in
accordance with the Wiring regulations.
General
Unpack the heater carefully and retain the packaging for
possible future use, in the event of moving or returning the fire
to your supplier.
The fire incorporates a flame effect, which can be used with or
without heating, so that the comforting effect may be enjoyed at
any time of the year. Using the flame effect on its own only
requires little electricity.
Before connecting the heater
check that the supply voltage is
the same as that stated on the heater.
Please note: Used in an environment where background noise
is very low, it may be possible to hear a sound which is related
to the operation of the flame effect. This is normal and should
not be a cause for concern.
Electrical
WARNING – THIS APPLIANCE MUST BE EARTHED
This heater must be used on an AC ~ supply only and the
voltage marked on the heater must correspond to the supply
voltage.
Do not switch the appliance on until properly installed. Please
read all the safety warnings and operating instructions.
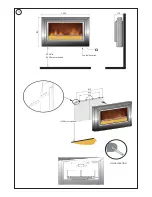
Wall fixing
- see
Fig. 1
The appliance should be securely fixed to the wall using the
wall plugs and screws supplied for block walls.
This model is
designed to be permanently fixed to a wall at a minimum
height of 450mm.
The wall bracket must be fitted horizontally and the cable routed
to the bottom right of the heater (see Fig. 1).Fix the wall bracket
using four plugs and screws provided (see Fig.1).
Note – for studded walls special fasteners are required, see
diagram for recommended position of fixing screws.
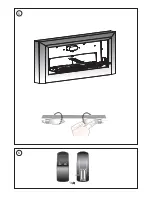
With the fire hung on the wall bracket. Remove the outer frame
(see Fig. 3). Mark 2 of the fixing locations (see Fig. 1), remove
the heater, drill and fix the two plugs. Refit the fire to the wall
and fix final screws.
Controls
- see
Fig. 2
The appliance is in standby mode when the mains lead is
plugged in. This is indicated by the red neon behind the flame
effect screen.
Push button switch (1) Controls the electricity supply to the
heater and flame effect. Press for ‘ON’
and ‘Standby’. If the heat selector
switch is in the OFF position, the
product works on flame effect only.
Selector switch (2)
Provides heat output
The selector switch is in the ON position when the side with
the markings on (i.e. I) are pushed in.
Thermostat (T)
-
see
Fig. 2
In order to maintain a certain room temperature, set the
controller to ‘max.’. Operate the appliance at full power until the
required room temperature is reached. Set back the
thermostatic controller until the appliance switches off with an
audible “click”. This temperature will be kept almost constant
by the thermostatic control switching on and off automatically.
Please note that the appliance can only be switched on when
the thermostat setting is higher than the room temperature.
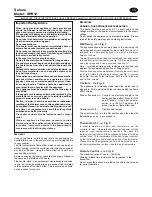
Remote Control
- see
Fig. 6
The maximum range of use is ~ 15metres.
Warning: It takes time for the receiver to respond to the
transmitter.
Do not press the buttons more than once within two seconds
for correct operation.
Sahara
Model: SHR12
IMPORTANT: THESE INSTRUCTIONS SHOULD BE READ CAREFULLY AND RETAINED FOR FUTURE REFERENCE
UK

