background image

12

WARNING: ALWAYS DISCONNECT FROM THE POWER SUPPLY BEFORE CLEANING 

THE HEATER.

Cleaning

Before commencing cleaning, unplug the heater and allow it to cool.The surfaces of the 

heater should be given an occasional wipe with a dry soft cloth. Do not use detergents, 

abrasive cleaning powder or furniture polish as this can damage the surface finish of the 

product.

To remove any accumulation of dust or fluff, the soft brush attachment of a vacuum cleaner 

should occasionally be used to clean the outlet grille of the fan heater located above the 

front glass.

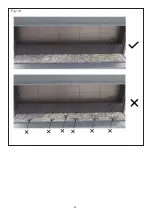
To clean the fuel effect, remove the fuelbed media. The plastic tray should be wiped clean 

with a damp cloth. When dry, replace the logs/crystals onto the fuelbed and arrange for 

best effect.

The front and side glass is cleaned in the factory during the assembly operation. During 

shipment, installation, handling, etc., the front and side glass may collect dust particles; 

these can be removed by dusting lightly with a clean dry cloth.

To remove fingerprints or other marks, the partially reflective glass can be cleaned with a 

damp cloth. The partially reflective glass should be completely dried with a lint free cloth to 

prevent water spots. To prevent scratching, do not use abrasive cleaners.

CAUTION: 

Assembly, installation and repair of this heater must be carried out by Dimplex 

or its authorised agent.

CAUTION: 

We recommend that this heater is checked annually for safety by a qualified 

electrician.

Flame effect themes 

There are different combinations of flame effect available.  Different presets of lighting colour 

combinations are available and can be cycled through using the remote control. 

Further customisation of the effects is accessible through the smart phone app

.

Resetting the Temperature Cutoff Switch

Should the heater overheat, an automatic cut out will turn the whole unit off and it will 

not come back on without being reset. It can be reset by turning the unit off at the main 

power  and waiting 5 minutes before turning the unit back on. See table Fault Codes on the 

previous page for more details. 

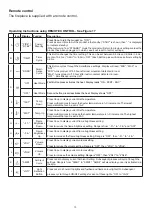
 CAUTION: 

If you need to continuously reset the heater, turn the unit off at the main 

supply, and call technical support.

Maintenance

Summary of Contents for Vivente

Page 1: ...sau utiliz rii ocazionale CZ Tento v robek je vhodn pouze do dob e izolovan ch prostor nebo k p le itostn mu pou it DK Dette produkt er kun egnet til velisolerede rum eller lejlighedsvis brug PT Este...

Page 2: ...pliance or perform user maintenance CAUTION Some parts of this product can become very hot and cause burns Particular attention has to be given where children and vulnerable people are present Do not...

Page 3: ...displaying the fire including Choice of background panel One Two or Three sided installation Materials to be placed onto the fuel bed Please follow these instructions to assist you in the installation...

Page 4: ...panel in the unit If you wish to change this to another back panel design it is advised to do so before installing the product It is possible to fit the back panel after the product has been installed...

Page 5: ...reen Step 3 Installing the Product CAUTION Two people will be required for various steps of this procedure This product is designed to be installed into existing block wall or a custom built studded w...

Page 6: ...arked The following fuel bed media is included Ceramic Logs Ash Dust Crystal pieces We have taken great care to create what we feel is the most authentic fuel bed please follow the steps below for mor...

Page 7: ...ttage to match the requirements of the room based on the thermostat setting Conventional electric heaters work by simply being fully on or off which can result in swings from slightly too warm to slig...

Page 8: ...hours of 5 11pm so if you enter the room during the day the fire will not react However in the evening your Dimplex fire will instantly switch on your flame effect remembering your last setting 24 Hr...

Page 9: ...and VOL FIRE The Flame Brightness Setting can then be adjusted using the or buttons There are seven settings Display shows F1 to F5 for the different levels of brightness F6 for Pulsating Effect and O...

Page 10: ...multiple times to lower the heater temperature in 10 C increments The lowest temperature that can be set is 150 C F 32ST Temp Up Press Once to display current Set Temperature Press multiple times to i...

Page 11: ...n CD20 Room Sensor NTC Error Contact your retailer and reference this error code CD03 The internal NTC is measuring elevated tempera tures within the product Unplug Unit at power supply to reset allow...

Page 12: ...erprints or other marks the partially reflective glass can be cleaned with a damp cloth The partially reflective glass should be completely dried with a lint free cloth to prevent water spots To preve...

Page 13: ...he mains power lead must be replaced by the manufacturer or its authorised dealer Should you require after sales information or assistance with this product please go to www dimplex co uk and select C...

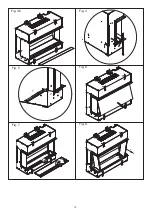
Page 14: ...14 Fig 2 Fig 3a Fig 1a Fig 1b Fig 1c Fig 1d...

Page 15: ...15 Fig 5 Fig 7 Fig 8 Fig 4 Fig 3b Fig 6 1 2 1 2...

Page 16: ...16 Fig 10a Fig 10b Fig 9...

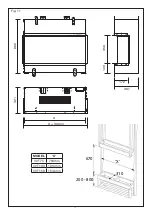
Page 17: ...17 X 310 200 800 670 Fig 11 MODEL X VVT75 764mm VVT100 1014mm VVT150 1514mm X X 30mm 321 666 350 120 172 307...

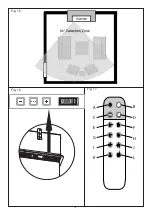
Page 18: ...18 Fig 14 Fig 13a Fig 13c Fig 13b Fig 12 150mm 200 800mm...

Page 19: ...19 Fig 17 Fig 16 A C E G I K B D F H J L Fig 15 I 0...

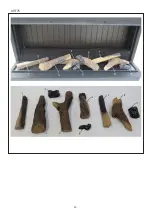
Page 20: ...20 VVT75...

Page 21: ...21 VVT100...

Page 22: ...22 VVT150...

Page 23: ...23 Fig 18...

Page 24: ...plex Millbrook House Grange Drive Hedge End Southampton SO30 2DF Glen Dimplex Heating and Ventilation All rights reserved Material contained in this publication may not be reproduced in whole or in pa...

Reviews: