background image

NEVER 

dispose of batteries in fire. Failure to observe this precaution may 

result in an explosion. Dispose of batteries at your local hazardous material 

processing center.

Remote control battery used depends on the remote control type 

which selected above.

NOTICE

Remote control battery used depends on the remote control type 

which selected above.

NOTICE

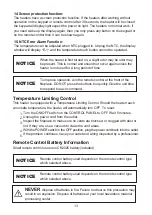
This heater is equipped with a Temperature Limiting Control. Should the heater reach 

an unsafe temperature, the heater will automatically turn OFF. To reset:

Turn the ON/OFF switch on the CONTROL PANEL to OFF. Wait 5 minutes.

Unplug the power cord from the outlet.

Inspect the fireplace to make sure no vents are blocked, or clogged with dust or 

lint. If they are, use a vacuum to clean the vent areas.

With the POWER switch in the OFF position, plug the power cord back into the outlet.

If the problem continues, have your outlet and wiring inspected by a professional.

Temperature Limiting Control

Small remote control uses one CR2025 battery(included)

Remote Control Battery Information

1.

2.

3.

4.

5.

When the heater is first turned on, a slight odor may be odor may 

be present. This is normal and should not occur again unless the 

heater is not used for a long period of time.

NOTICE

To improve operation, aim the remote control at the front of the 

fireplace. DO NOT press the buttons too quickly.Give the unit time 

to respond to each command.

NOTICE

The heaters have a screen protection function, If the heaters after working without 

operation on the keypad or remote control after 30 seconds, the heater will be closed 

the keypad all display light expect the power on light. The heaters on normal work, if 

you need wake up the display again, then you only press any button on the keypad or 

on the remote control then it can be shown again.   

13

14

Screen protection function: 

The temperature can be adjusted when NTC plugged in. Unplug the NTC, the display 

window will display 

"

E-1

"

, and the temperature touch button cannot be operated.

15. NTC Error Alarm Function:

ELM   ELM   ELM   ELM   ELM   ELM   ELM   ELM   ELM   ELM   ELM   ELM   ELM   ELM   ELM

ELM   ELM   ELM   ELM   ELM   ELM   ELM   ELM   ELM   ELM   ELM   ELM   ELM   ELM   ELM
ELM   ELM   ELM   ELM   ELM   ELM   ELM   ELM   ELM   ELM   ELM   ELM   ELM   ELM   ELM
ELM   ELM   ELM   ELM   ELM   ELM   ELM   ELM   ELM   ELM   ELM   ELM   ELM   ELM   ELM

ELM   ELM   ELM   ELM   ELM   ELM   ELM   ELM   ELM   ELM   ELM   ELM   ELM   ELM   ELM

ELM   ELM   ELM   ELM   ELM   ELM   ELM   ELM   ELM   ELM   ELM   ELM   ELM   ELM   ELM

ELM   ELM   ELM   ELM   ELM   ELM   ELM   ELM   ELM   ELM   ELM   ELM   ELM   ELM   ELM

ELM   ELM   ELM   ELM   ELM   ELM   ELM   ELM   ELM

ELM   ELM   ELM   ELM   ELM   ELM   ELM   ELM   ELM

ELM   ELM   ELM   ELM   ELM   ELM   ELM   ELM   ELM   ELM   ELM   ELM   ELM   ELM   ELM

ELM   ELM   ELM   ELM   ELM   ELM   ELM   ELM   ELM   ELM   ELM   ELM   ELM   ELM   ELM

ELM   ELM   ELM   ELM   ELM   ELM   ELM   ELM   ELM   ELM   ELM   ELM   ELM   ELM   ELM

ELM   ELM   ELM   ELM   ELM   ELM   ELM   ELM   ELM   ELM   ELM   ELM   ELM   ELM   ELM

ELM   ELM   ELM   ELM   ELM   ELM   ELM   ELM   ELM   ELM   ELM   ELM   ELM   ELM   ELM

ELM   ELM   ELM   ELM   ELM   ELM   ELM   ELM   ELM   ELM   ELM   ELM   ELM   ELM   ELM

ELM   ELM   ELM   ELM   ELM   ELM   ELM   ELM   ELM

ELM   ELM   ELM   ELM   ELM   ELM   ELM   ELM   ELM

ELM   ELM   ELM   ELM   ELM   ELM   ELM   ELM   ELM   ELM   ELM   ELM   ELM   ELM   ELM

ELM   ELM   ELM   ELM   ELM   ELM   ELM   ELM   ELM   ELM   ELM   ELM   ELM   ELM   ELM

ELM   ELM   ELM   ELM   ELM   ELM   ELM   ELM   ELM   ELM   ELM   ELM   ELM   ELM   ELM

ELM   ELM   ELM   ELM   ELM   ELM   ELM   ELM   ELM   ELM   ELM   ELM   ELM   ELM   ELM

Summary of Contents for X40003BK

Page 1: ...s appliance 1 2 3 E L M E L M E L M E L M E L M E L M M E L M E L M E L M E L M E L M E L M E L M E L M E L M E L M E L M E E L M E L M E L M E L M E L M E L M E L M E L M E L M E L M E L M E L M E E...

Page 2: ...penings may become blocked A heater has hot and arcing or sparking parts inside DO NOT use it in areas where gasoline paint or flammable liquids are used or stored Use this heater only as described in...

Page 3: ...discontinue use immediately and have a qualified electrician inspect and or replace the faulty outlets 2 The power cord supplied with the heater has a plug with two flat blades live and neutral and o...

Page 4: ...y grounded outlet box The adapter should not be used if a three slot grounded receptacle is available NOTE Adaptors are NOT for use in Canada M E L M E L M E L M E L M E L M E L M E L M E L M E L M E...

Page 5: ...E L M E L M E L M E L M E L M E L M E L M E L M E L M E L M M E L M E L M E L M E L M E L M E L M E L M E L M E L M E L M E L M E E L M E L M E L M E L M E L M E L M E L M E L M E L M E L M E L M E L...

Page 6: ...0 Top 11 8 300mm to mantel Back 0 MANTEL FLOOR SIDE VIEW 11 8 300mm MINUMUM MANTEL CLEARANCES E L M E E L M E L M E L M E L M E L M E L M E L M E L M M E L M E L M E L M E L M E L M E L M E L M E L M...

Page 7: ...W H B E L M E E L M E L M E L M E L M E L M E L M E L M E L M M E L M E L M E L M E L M E L M E L M E L M E L M E L M E L M E L M E L M E L M E L M E L M E L M E L M E L M E L M E L M E L M E L M E L...

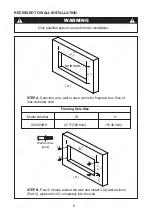
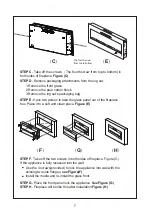
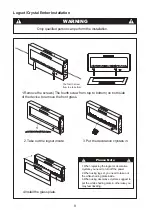
Page 8: ...block 3 Remove the log set s packaging bag STEP E Have two person to take the glass panel out of the fireplace box Place it to a soft and clean place Figure E 7 C F G H E The fourth screw from top to...

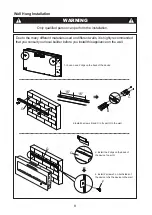
Page 9: ...wall F G Only qualified person can perform the installation WARNING M E L M E L M E L M E L M E L M E L M E L M E L M E L M E L M E L M E L M E L M E E L M E B C G G E L M E E L M E L M E L M E L M E...

Page 10: ...L M E L M E L M E L M E L M E L M E E L M E L M E L M E L M E L M E L M E L M E L M E L M E L M E L M E L M E L M E L M E L M E L M E L M E L M E L M E L M E L M E L M E L M E L M E L M E L M E L M E...

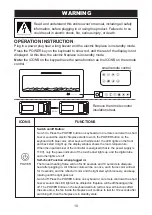
Page 11: ...e and other lights are off Self check Function when plugged in The fan and heating frame will run for 30 seconds and 10 seconds to dissipate heat after plugging in All 9 flame colors will be on once e...

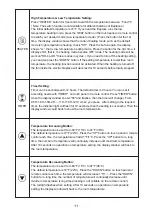
Page 12: ...l flash for 10 seconds then the setting is successful Then the display window could back to show the room temperature Temperature Increasing Button The temperature can be set from 60 F 15 C to 97 F 36...

Page 13: ...the DIMMER button it will be back to the brightest flame again Flame Color Setting The initial flame color is orange Press the COLOR MODE button on the remote control the display window will change f...

Page 14: ...ater is not used for a long period of time NOTICE To improve operation aim the remote control at the front of the fireplace DO NOT press the buttons too quickly Give the unit time to respond to each c...

Page 15: ...ation Electrical components are integrated in the fireplace and are not serviceable by the consumer Risk of electric shock DO NOT OPEN No user serviceable parts inside Maintenance Electrical and Movin...

Page 16: ...connect from power source and inspect wiring for loose connections and repair or replace if necessary 2 Push the flame button to high 1 Disconnect from power source and inspect wiring for loose connec...

Reviews: