background image

ELM   ELM   ELM   ELM   ELM   ELM   ELM   ELM   ELM   ELM   ELM   ELM   ELM   ELM   ELM

ELM   ELM   ELM   ELM   ELM   ELM   ELM   ELM   ELM   ELM   ELM   ELM   ELM   ELM   ELM
ELM   ELM   ELM   ELM   ELM   ELM   ELM   ELM   ELM   ELM   ELM   ELM   ELM   ELM   ELM
ELM   ELM   ELM   ELM   ELM   ELM   ELM   ELM   ELM   ELM   ELM   ELM   ELM   ELM   ELM

Grounding instructions

3

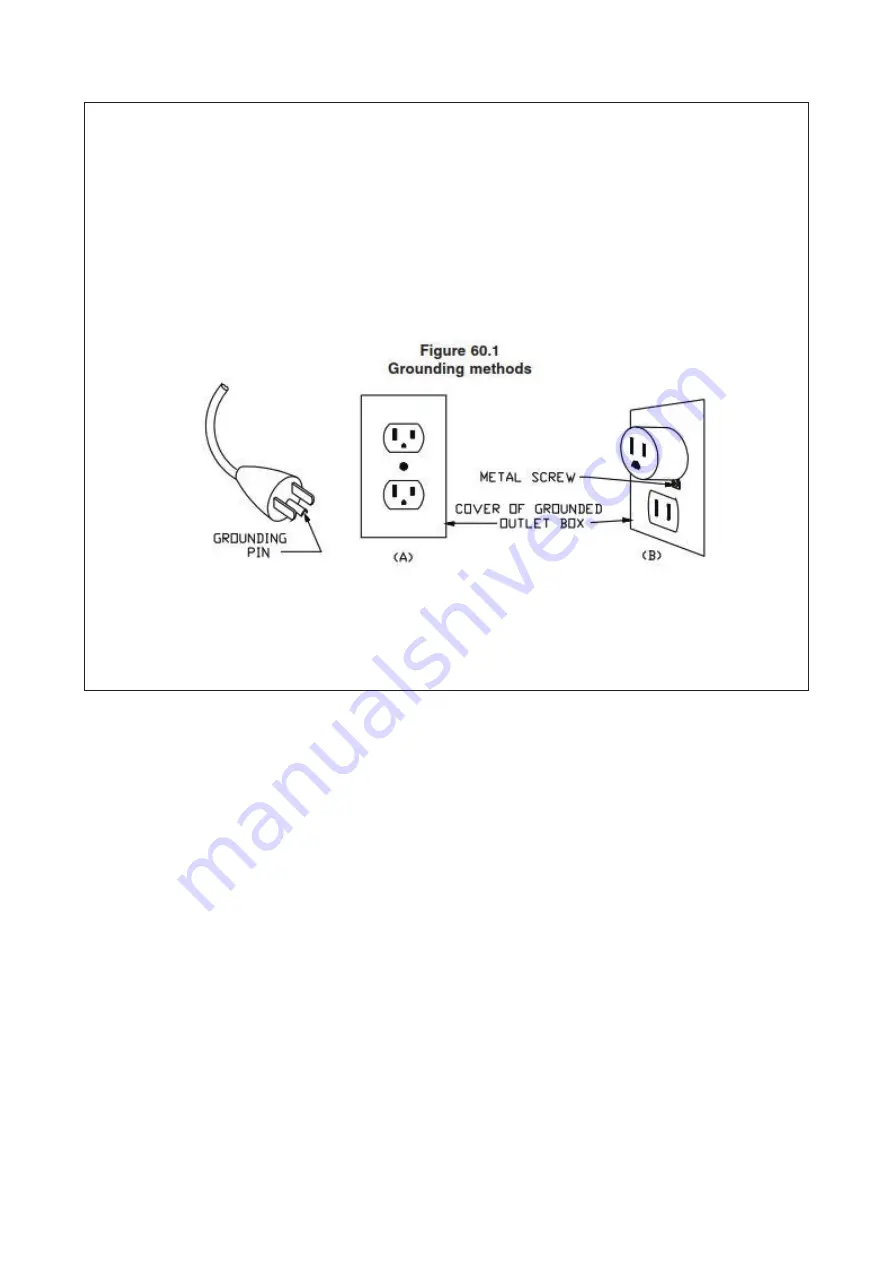
This heater is for use on 120 volts. The cord has a plug as shown at A in Figure 

60.1. An adapter as shown at C is available for connecting three-blade 

grounding-type plugs to two-slot receptacles.

The green grounding lug extending from the adapter must be connected to a 

permanent ground such as a properly grounded outlet box.

The adapter should not be used if a three-slot grounded receptacle is available.

NOTE:  Adaptors are NOT for use in Canada

ELM   ELM   ELM   ELM   ELM   ELM   ELM   ELM   ELM   ELM   ELM   ELM   ELM   ELM   ELM

ELM   ELM   ELM   ELM   ELM   ELM   ELM   ELM   ELM

ELM   ELM   ELM   ELM   ELM   ELM   ELM   ELM   ELM

ELM   ELM   ELM   ELM   ELM   ELM   ELM   ELM   ELM   ELM   ELM   ELM   ELM   ELM   ELM

ELM   ELM   ELM   ELM   ELM   ELM   ELM   ELM   ELM   ELM   ELM   ELM   ELM   ELM   ELM

ELM   ELM   ELM   ELM   ELM   ELM   ELM   ELM   ELM   ELM   ELM   ELM   ELM   ELM   ELM

ELM   ELM   ELM   ELM   ELM   ELM   ELM   ELM   ELM

ELM   ELM   ELM   ELM   ELM   ELM   ELM   ELM   ELM

ELM   ELM   ELM   ELM   ELM   ELM   ELM   ELM   ELM   ELM   ELM   ELM   ELM   ELM   ELM

ELM   ELM   ELM   ELM   ELM   ELM   ELM   ELM   ELM   ELM   ELM   ELM   ELM   ELM   ELM

ELM   ELM   ELM   ELM   ELM   ELM   ELM   ELM   ELM   ELM   ELM   ELM   ELM   ELM   ELM

ELM   ELM   ELM   ELM   ELM   ELM   ELM   ELM   ELM   ELM   ELM   ELM   ELM   ELM   ELM

ELM   ELM   ELM   ELM   ELM   ELM   ELM   ELM   ELM   ELM   ELM   ELM   ELM   ELM   ELM

ELM   ELM   ELM   ELM   ELM   ELM   ELM   ELM   ELM   ELM   ELM   ELM   ELM   ELM   ELM

Summary of Contents for X40003BK

Page 1: ...s appliance 1 2 3 E L M E L M E L M E L M E L M E L M M E L M E L M E L M E L M E L M E L M E L M E L M E L M E L M E L M E E L M E L M E L M E L M E L M E L M E L M E L M E L M E L M E L M E L M E E...

Page 2: ...penings may become blocked A heater has hot and arcing or sparking parts inside DO NOT use it in areas where gasoline paint or flammable liquids are used or stored Use this heater only as described in...

Page 3: ...discontinue use immediately and have a qualified electrician inspect and or replace the faulty outlets 2 The power cord supplied with the heater has a plug with two flat blades live and neutral and o...

Page 4: ...y grounded outlet box The adapter should not be used if a three slot grounded receptacle is available NOTE Adaptors are NOT for use in Canada M E L M E L M E L M E L M E L M E L M E L M E L M E L M E...

Page 5: ...E L M E L M E L M E L M E L M E L M E L M E L M E L M E L M M E L M E L M E L M E L M E L M E L M E L M E L M E L M E L M E L M E E L M E L M E L M E L M E L M E L M E L M E L M E L M E L M E L M E L...

Page 6: ...0 Top 11 8 300mm to mantel Back 0 MANTEL FLOOR SIDE VIEW 11 8 300mm MINUMUM MANTEL CLEARANCES E L M E E L M E L M E L M E L M E L M E L M E L M E L M M E L M E L M E L M E L M E L M E L M E L M E L M...

Page 7: ...W H B E L M E E L M E L M E L M E L M E L M E L M E L M E L M M E L M E L M E L M E L M E L M E L M E L M E L M E L M E L M E L M E L M E L M E L M E L M E L M E L M E L M E L M E L M E L M E L M E L...

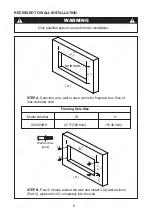
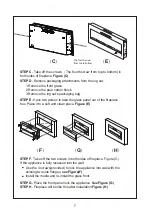
Page 8: ...block 3 Remove the log set s packaging bag STEP E Have two person to take the glass panel out of the fireplace box Place it to a soft and clean place Figure E 7 C F G H E The fourth screw from top to...

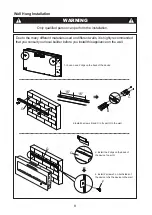
Page 9: ...wall F G Only qualified person can perform the installation WARNING M E L M E L M E L M E L M E L M E L M E L M E L M E L M E L M E L M E L M E L M E E L M E B C G G E L M E E L M E L M E L M E L M E...

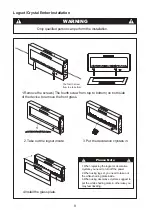
Page 10: ...L M E L M E L M E L M E L M E L M E E L M E L M E L M E L M E L M E L M E L M E L M E L M E L M E L M E L M E L M E L M E L M E L M E L M E L M E L M E L M E L M E L M E L M E L M E L M E L M E L M E...

Page 11: ...e and other lights are off Self check Function when plugged in The fan and heating frame will run for 30 seconds and 10 seconds to dissipate heat after plugging in All 9 flame colors will be on once e...

Page 12: ...l flash for 10 seconds then the setting is successful Then the display window could back to show the room temperature Temperature Increasing Button The temperature can be set from 60 F 15 C to 97 F 36...

Page 13: ...the DIMMER button it will be back to the brightest flame again Flame Color Setting The initial flame color is orange Press the COLOR MODE button on the remote control the display window will change f...

Page 14: ...ater is not used for a long period of time NOTICE To improve operation aim the remote control at the front of the fireplace DO NOT press the buttons too quickly Give the unit time to respond to each c...

Page 15: ...ation Electrical components are integrated in the fireplace and are not serviceable by the consumer Risk of electric shock DO NOT OPEN No user serviceable parts inside Maintenance Electrical and Movin...

Page 16: ...connect from power source and inspect wiring for loose connections and repair or replace if necessary 2 Push the flame button to high 1 Disconnect from power source and inspect wiring for loose connec...

Reviews: