CLM–70
©
Dinel, s.r.o.
22
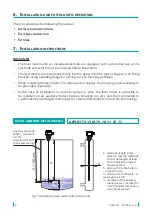
The installation procedure of custom measuring electrode – applies to type 00
1.
Make the custom electrode according to the drawing (see Fig. 14). The length of this
electrode must be by 7 mm shorter than the dimension “E” in
Fig. 30. Stainless steel of the 1.4404 (AISI 316 L) type or similar,
depending on the application, is recommended as the measur
-
ing electrode material.
2. Apply glue on the thread of the prepared electrode made ac
-
cording to the drawing (see Fig. 31) to secure the threaded
joints (the amount of glue is provided by the manufac
-
turer). The glue used must meet specific criteria depending
on the application, e.g. it must resist high temperatures,
corrosion, chemicals, or must be approved, e.g. for use
in the food industry.
3. Screw the electrode tightly into the electrode holder using ap
-
propriate pliers or a wrench (on the electrode side) and a 10-mm
flat spanner (on the electrode holder side).
4. Let the glued joint cure as recommended by the glue manufac
-
turer; after then, the level meter is ready for installation.
5.
Perform the setting of the level meter.
How to replace the measuring electrode – applies only to variants 10, 30, and 31
1.
Heat the place of the threaded joint of the electrode and the electrode holder (see Figs. 15
and 17) using a heat gun to a temperature of approx. 120–150 °C (or 220–250 °C for the high-
temperature variant).
2.
Unscrew the electrode from the electrode holder using suitable pliers (in the case of a rod elec
-
trode) or a 7-mm flat spanner (in the case of a rope electrode) and a 10-mm flat spanner (on
the electrode holder side).
3.
Apply glue on the thread of the new electrode to secure the threaded joints (the amount of glue is
provided by the manufacturer). The glue must meet application-specific requirements, e.g. must
resist high temperatures, corrosion, chemicals, or must be approved for use in the food industry.
Fig. 15: Drawing of the measuring electrode with marked thread for connection and grooving
Fig. 14: Drawing of the level
meter with dimension “E”
Electrode
holder
Electrode
12 .
h
ow
to
install
a
CUstom
measUring
eleCtrode
,
replaCe
or
shorten
the
eleCtrode
Summary of Contents for CLM-70
Page 2: ......

