background image

Dingo K9-2 Operation & Maintenance Manual

11

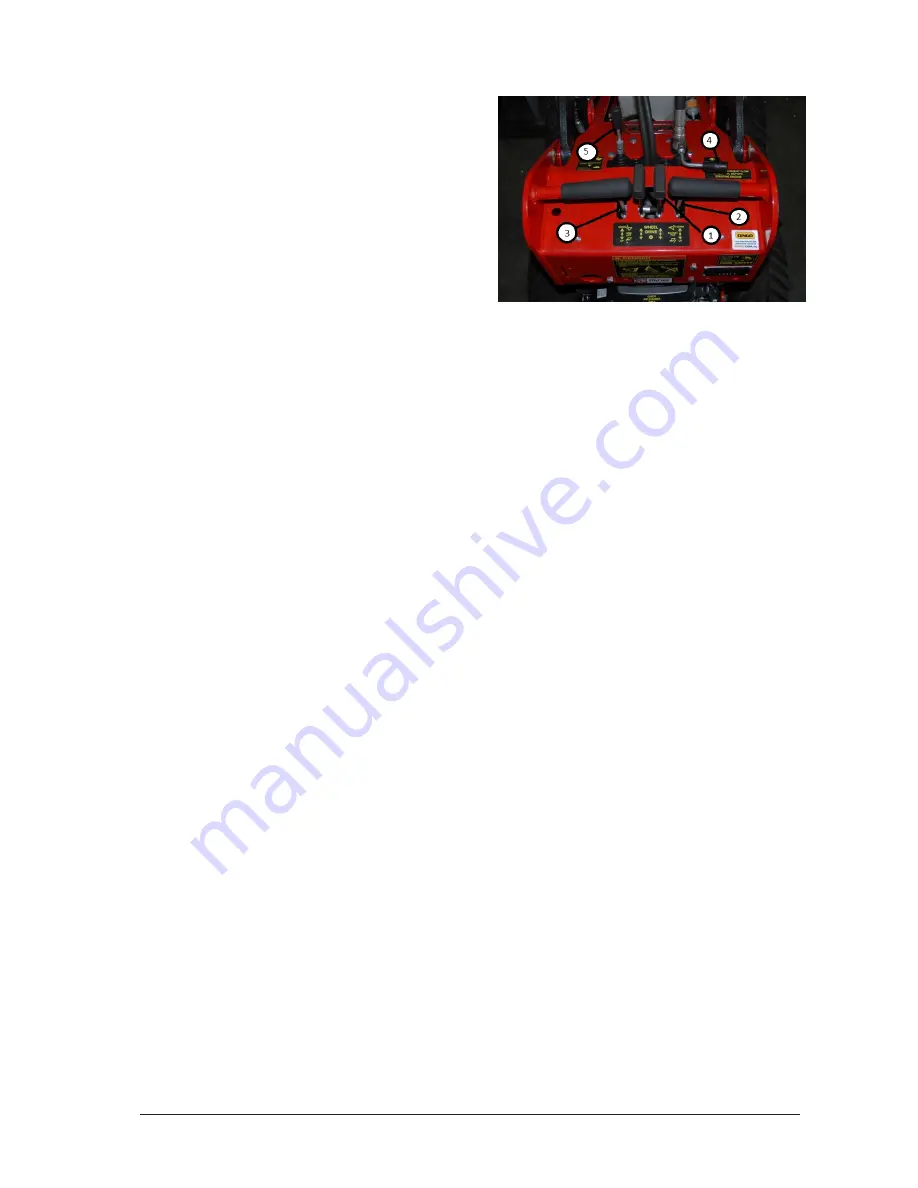
Control Levers / Control 

Panel

Key Switch

The key switch, used to start the engine.  

Check  engine  manufacturer's  manual  for 

starting instructions.  To shut engine off, 

rotate key to OFF position (counter 

clockwise direction).

Throttle

Move control upward to increase engine 

speed and downward to decrease engine 

speed.

Choke

For instructions regarding use of the choke 

(petrol models) refer to the engine 

manufacturers manual.

Drive Control Levers

To go forward, slowly push the right and left 

drive control levers forward.

To go backward, slowly pull the right and left 

drive control levers backward.

To go straight, apply equal pressure to both 

drive control levers.

To turn, decrease pressure on the drive 

control lever closest to the direction you 

want to turn.

The farther you move the drive control levers 

in either direction, the faster the machine will 

move in that direction.

To slow or stop, move or release the drive 

control levers into neutral.  (If released the 

control levers will  automatically return to 

neutral).

The Dingo is capable of turning on the spot 

by applying equal power to each drive lever 

in opposite directions.

Attachment Tilt Lever

To tilt/crowd attachment forward, slowly 

push the tilt lever forward.

To tilt attachment backward, slowly pull the 

tilt lever backward.

Loader Arms Lever

To lower Dingo arms, slowly push arm lever 

Drive Control Levers

Attachment Tilt Lever

Loader Arms Lever

Auxiliary Hydraulic Lever

Pump Selector V

alve


Auxiliary Hydraulic lever

The auxiliary hydraulics lever allows you to 

alter the direction of rotation of 

hydraulically driven attachments or stop 

them completely.

ATTENTION:

 Ensure  auxiliary  hydraulic 

lever is in neutral position before starting 

engine.  Aside from starting difficulties the 

attachment may move during starting.

To operate attachment in forward direction, 

slowly pull auxiliary lever rearward.  To 

operate attachment in reverse direction, 

slowly push auxiliary lever forward.

Pump Selector Lever

When faster ground speed and lifting speed 

is required (bucket work) more than 

attachment speed and power, push the 

pump selector lever to the forward position 

(Hare).  

When faster attachment speed and power 

is required (trenching, post hole digging etc) 

more than ground speed and lifting power, 

pull the pump selector lever to the rearward 

position (Turtle).

Control Panel Diagram

Summary of Contents for K9-2

Page 1: ...NUAL IMPORTANT Become familiar with the contents of this manual before operating the Dingo This Manual contains Safety Operation and Warranty Information Also become familiar with the controls their proper use before operating the Dingo JUNE 2012 ...

Page 2: ...Debris from the Machine 10 Tyres and Traction 10 Operating Instructions 10 Control Levers Control Panel 10 Key Switch 11 Throttle 11 Choke 11 Drive Control Levers 11 Attachment Tilt Lever 11 Loader Arms Lever 11 Control Panel Diagram 11 Auxiliary Hydraulic lever 11 Pump Selector Lever 11 Starting the Engine 12 Stopping the Engine 12 Stopping the Dingo 12 Moving a Non Functioning Dingo 12 Using Cyl...

Page 3: ...anual 3 Maintenance 13 Air Filter 14 Bushes Pins 14 Engine Oil 14 Changing Oil Filter 14 Spark Plugs 14 Changing Tyres 14 Hydraulic System 14 Battery 15 Cleaning and Long Term Storage 15 Troubleshooting 16 Warranty Statement 17 Contents ...

Page 4: ... information you may require The information in this manual is current as of June 2012 As Dingo Australia continuously improves products Dingo Australia reserves the right to change specifications without notice For any further information contact you nearest Dingo Australia branch on 1300 4DINGO or www dingo com au When contacting us please have your Dingo Chassis and Model numbers These details ...

Page 5: ...on Monoxide which is an odourless deadly poison Carbon Monoxide can kill you Do not run engine indoors or in a confined space Always lower Dingo arms and or place attachment on the ground when parking or leaving the Dingo unattended Always stop the engine if leaving the operators platform IMPORTANT Do not carry a load or heavy attachment with the Dingo arms in a raised position Do not step off the...

Page 6: ...ion so that you will not have to stop or shift while on the uneven ground If parking on uneven ground or hillsides always lower the Dingo arms and attachment to the ground and chock the wheels If machine becomes unstable jump clear Never try to stabilise the machine by putting your foot on the ground Children Be wary of the presence of children when operating a Dingo Keep children out of the work ...

Page 7: ...equipment if you strike anything or hear any strange noise coming from the machine If necessary repair machine before starting again Use only genuine replacement parts to ensure that original standards are maintained This machine is provided with a maintenance free battery Do not attempt to service or adjust battery fluid levels If battery will not hold charge replace with a battery of the same ty...

Page 8: ...tlets 1 Dimensions A Overall Width 780 940mm B Overall Length 1400mm C Overall Height 1200mm D Maximum Operating Height 1902mm E Turning Radius 1160mm F Angle of Departure 27 G Wheel Base 650mm H Ground Clearance 150mm I Dump Height Std Bucket 840mm J Height to Hinge Pin 1350mm K Petrol Resevior 14L Hydraulic Reservoir 34 l Machine Mass 540kg approx Warranty Engine Warranty 2 Years 1000 Hours Prod...

Page 9: ... identified and isolated Embankments have been marked Tree stumps rocks and other hazards have been identified Water courses dams creeks rivers have been clearly marked Underground and aboveground services have been identified and isolated if necessary Site physical hazards have been identified Dust noise traffic and other adverse conditions have been controlled Persons not involved in the work ha...

Page 10: ...Dingo Tyres should be filled with water Failure to do so will affect weight distribution and can drastically reduce the stability and carrying capacity of the machine Use of incorrect tyre pressure will also reduce the stability and carrying capacity of the Dingo The correct tyre pressure is usually between 25 to 35 PSI Various types of equipment are available for filling tyres with water Filling ...

Page 11: ...he spot by applying equal power to each drive lever in opposite directions Attachment Tilt Lever To tilt crowd attachment forward slowly push the tilt lever forward To tilt attachment backward slowly pull the tilt lever backward Loader Arms Lever To lower Dingo arms slowly push arm lever 1 Drive Control Levers 2 Attachment Tilt Lever 3 Loader Arms Lever 4 Auxiliary Hydraulic Lever 5 Pump Selector ...

Page 12: ...e completed with the Dingo arms lowered Attachments Connecting IMPORTANT Use only Dingo approved attachments Attachments can change stability and operating characteristics of the machine The warranty of the machine may be voided if used with unapproved attachments IMPORTANT Before connecting any attachments to the machine make sure mount plates are free of any dirt and debris 1 Move pump control l...

Page 13: ...n trailer always use the following procedure Maintenance It is essential to maintain the engine as detailed in the engine manual Refer to your log book service manual for this information Refer to the Pre Start Up section for maintenance that should be completed before starting the Dingo each and every time 1 Never load or unload the Dingo on the trailer unless the trailer is attached to the vehic...

Page 14: ... the arms and wriggle up and down to detect any movements in joints in the arms If bushes show signs of any wear contact your Dingo Australia Authorised Service Agent A little wear quickly becomes a big and expensive problem if not attended to It is a simple job and is easily fixed if detected in time Bushes Pins Your Dingo has duralon bushes and chrome pins in the arm joints These bushes bearings...

Page 15: ...o reduce corrosion Voltage 8 5 AMP 130 CCA motorbike type battery If battery becomes flat or machine is not used for a long period charge the battery using an external battery charger Disconnect battery terminals before charging the battery Do not rely on the engines charging system to recharge a bat tery It is only meant to maintain charge in a good battery To pull start see engine manual ...

Page 16: ...2 Clean or replace air cleaner element 3 Oil level in crankcase is low 3 Add oil to crankcase 4 Cooling fins and air passages under engine blower housing are blocked 4 Remove obstruction from cooling fins and air passages 5 Spark plugs are pitted fowled or gap is incorrect petrol Models 5 Install new correctly gapped spark plugs 6 Dirt in fuel filter 6 Replace fuel filter 7 Dirt water or stale fue...

Page 17: ...rs premises for warranty work are the owners responsibility WARRANTY EXCLUSIONS This warranty does not cover 1 Tyres track components or other consumables or service parts nuts and bolts trencher teeth etc replaced as part of a normal maintenance service as opposed to manufacturing defects 2 Damage resulting from abuse negligence accidents alterations air flow obstructions or failure to maintain o...

Page 18: ...or default of Dingo Mini Diggers Pty Ltd PARTS INSTALLED DURING MACHINE WARRANTY Components installed during a machines warranty period shall have warranty coverage for the duration of the machine warranty period or ninety 90 days which ever is greater provided the warranty installation is performed by Dingo Mini Diggers Pty Ltd or an authorised Dingo Mini Digger dealer ENGINE POLICY The engine in...

Page 19: ...Dingo K9 2 Operation Maintenance Manual 19 Notes ...

Page 20: ...LOCATED THROUGHOUT AUSTRALIA 1300 4 DINGO NEW ZEALAND 0011 64 7378 9840 Proudly manufactured by Dingo Mini Diggers Pty Ltd 9 Owen Street East Dalby Qld 4405 Australia DINGO COM AU ...

Reviews: