background image

Dingo K9-4 Operation & Maintenance Manual

6

Dingo K9-4 Operation & Maintenance Manual

7

Operating on Slopes

All slopes require extra caution.

Do not

 operate on slopes exceeding 15 

degrees.  If a slope is greater than 5 degrees, only 
go up and down (not across).

Always  have  the  heavy  end  of  the 

machine  uphill

.    Weight  distribution  will 

change.  An empty bucket will make the rear 
of the machine heaviest, a loaded bucket will 
make the front of the machine heaviest.  Various 
attachments will change which end is heaviest.  
If  you  are  unsure,  phone  us  and  ask.    These 
same rules apply when loading and unloading 
the Dingo onto a trailer or truck.

Avoid turning on slopes.

 If you must 

turn, turn slowly keeping the heavy end of the 
machine uphill.

Do  not  operate  near  ditches  or 

embankments,  the machine could turn over if 
a wheel goes over the edge of a cliff or ditch or 
the edge caves in.

Do  not  operate  on  wet  grass,  reduced 

traction could cause wheel slip.

Remove  obstacles  such  as  rocks,  tree 

limbs, etc from the work area.  Watch for ruts 
or bumps as uneven terrain could overturn the 
machine.  Tall grass can hide obstacles.  

Operate in slow speed.  Put pump selector 

valve in slow (turtle) position so that you will 
not have to stop or shift while on the slope.

If parking on slopes or hillsides always 

lower  the  Dingo  arms  and  attachment  to  the 
ground and chock the wheels.

If machine becomes unstable, jump clear.  

Never  try  to  stabilise  the  machine  by  putting 
your foot on the ground.

Children

Be wary of the presence of children when 

operating a Dingo.  Children are often attracted 
to the Dingo and the work activity.

Keep children out of the work site and 

under the watchful care of a responsible adult.

Be  alert  and  turn  the  machine  off  if 

children enter the area.

Never carry children (or anyone) on the 

Dingo or any of its attachments.

Do  not  allow  children  to  play  on  the 

Dingo or within the Dingo work site (aside from 
the danger of working machinery there may be 
holes into which a child could fall or various 
other dangers).

Do  not  allow  children  to  use  the 

machine.

Before reversing look behind and down 

for small children.  Be aware of blind corners, 
shrubs, trees, or ends of fences that may obscure 
vision.

Service

Before performing any service, repairs, 

maintenance or adjustment, stop the engine and 
remove the key.

Never run the machine in an enclosed 

area.

Perform all maintenance with the Dingo 

arms fully lowered.  If Dingo arms need to be 
raised to perform tasks, secure them in the raised 
position  by  using  cylinder  locks  or  a  safety 
stand.  (Contact a Dingo representative if you 
are unsure)

Look  after  the  Dingo.  Keep  nuts  and 

bolts tight.

Do not tamper with safety devices.  Before 

each use check safety systems properly.

Summary of Contents for K9-4

Page 1: ...T Become familiar with the con tents of this manual before operating the Dingo This Manual contains Safety Opera tion and Warranty Information Also become familiar with the controls their proper use before operating the Dingo Modified September 2007 ...

Page 2: ... current as at September 2007 In the effort to continually improve our products Dingo reserves the right to change specifications without notice Please for critical information contact you nearest Dingo branch When contacting us please have your Dingo Chassis and Model numbers handy These details enable us to know the specifications of your Dingo Best Wishes Gary Briggs And the entire Dingo Pack T...

Page 3: ...10 Operating Instructions 10 Control Levers Control Panel 10 Key Switch 10 Throttle 10 Choke 10 Drive Control Levers 10 Attachment Tilt Lever 11 Loader Arms Lever 11 Control Panel Diagram 11 Auxiliary Hydraulic lever 11 Pump Selector Lever 11 Flow Divider Control 11 4in1 Bucket Lever 12 Hydraulic Immobiliser 12 Warning Light 12 Auxiliary Power Socket 12 Starting the Engine 12 Stopping the Engine 1...

Page 4: ...17 Check Hydraulic Lines 17 Battery 17 Cleaning and Long Term Storage 18 Transporting and Securing 18 Spare parts diagrams 19 Grill Assembly 19 Chassis Assembly 20 Hydraulic Bank Assembly 21 Inner Tank Assembly 22 Main Control Bank Assembly 24 Remote Control Bank Assembly 26 Tank Top Assembly 28 Diesel Dash Assembly 30 Petrol Dash Assembly 32 Mount Plate Assemblies 33 Load Arm Assembly 34 Panel As...

Page 5: ...Always lower Dingo arms and or place attachment on the ground when parking or leaving the Dingo unattended Always stop the engine if leaving the operators platform n IMPORTANT Do not carry a load or heavy attachment with the Dingo arms in a raised position Do not step off the platform with a load raised n Never jerk the control levers Use a steady motion Slow down before turning Sharp turns may ca...

Page 6: ...ways lower the Dingo arms and attachment to the ground and chock the wheels n If machine becomes unstable jump clear Never try to stabilise the machine by putting your foot on the ground Children n Be wary of the presence of children when operating a Dingo Children are often attracted to the Dingo and the work activity n Keep children out of the work site and under the watchful care of a responsib...

Page 7: ...u strike anything or hear any strange noise coming from the machine If necessary repair machine before starting again n Use only genuine replacement parts to ensure that original standards are maintained n Battery acid is poisonous and can cause burns Avoid contact with skin eyes and clothing Your face eyes and clothing should be protected when working with a battery n Battery gases can explode Ke...

Page 8: ...7hp 3100 RPM Engine Kohler Petrol Power 18 6 kW 25hp 3600 RPM Dimensional Specifications A Overall Width 970mm 38 B Overall Length 1550mm 61 C Overall Height 1200mm 47 D Maximum Operating Height 4 in 1 Bucket 2650mm 104 E Turning Radius with 4 in 1 Bkt 1300mm 51 F Angle of Departure 25 G Wheel Base 800mm 31 H Ground Clearance 135mm 5 3 I Dump Height with Std Bkt 1450mm 57 J Reach Fully Raised Std ...

Page 9: ... allow the fuel room to expand Do not fill the fuel tank completely full 4 Replace the fuel cap securely Clean away any fuel that may have spilt DANGER Petroleum can be extremely flammable and highly explosive To avoid a fire or explosion that may burn yourself other or cause property damage Use a funnel and fill the fuel tank outdoors in an open area Allow the engine to cool before refuelling Cle...

Page 10: ...n suitable for mud sand and slush Solid fill all of the tyres mentioned above excluding the 3 solids can be supplied by Dingo Australia filled with a puncture proof solid foam For more information on our range of traction products please speak to your nearest Dingo representative Operating Instructions Read all the safety instructions and the pre start up section of this manual and the engine manu...

Page 11: ...ion of rotation of hydraulically driven attachments or stop them completely ATTENTION Ensure auxiliary hydraulic lever is in neutral position before starting engine Aside from starting difficulties the attachment may move during starting To operate attachment in forward direction slowly pull auxiliary lever rearward To operate attachment in reverse direction slowly push auxiliary lever forward Pum...

Page 12: ...ivider 3 Move the flow divider lever back to the drive position Warning Light The warning light indicates low engine oil pressure and high engine temperature Ensure you stop the engine immediately this light comes on Operating with the warning light on may cause serious engine damage Auxiliary Power Socket The auxiliary power socket is a 12 volt power outletforrunninglights portableaircompressors ...

Page 13: ...ny dirt and debris 1 Move pump control lever to slow turtle position 2 Slowly push the attachment tilt lever forward to tilt the attachment mount plate forward 3 Position mount plate into the upper lip of the attachment s receiver plate 4 Raise the Dingo arms while tilting back the mount plate at the same time 5 IMPORTANT The attachment should be raised enough to clear the ground and the mount pla...

Page 14: ...functions of operation Every 100 Hours Petrol Change engine oil filter Engine Manual Replace fuel filter Engine Manual All Replace air cleaner element 1 Page 15 Check battery electrolyte fluid level Engine Manual Diesel Check fan belt tension Clean radiator fins radiator hoses Change Engine Oil Filter Engine Manual Replace fuel filter Engine Manual Every 500 Hours All Change Hydraulic Oil clean hy...

Page 15: ... 4DDRIFT to punch bush from joint 4 Use bush drift to insert new bush Careful not to damage teflon inner coating of bush 5 Use emery paper or similar to clean joint surfaces allows pin to slide in easier 6 Slide pin back into place Avoid using hammer to force pin back into position This can damage the bush 7 Replace locking bolt Bushes Bearings Pins Your Dingo has 9 bushes bearings and 10 pins The...

Page 16: ...amount of oil refer to engine manual into the filler tube Now check the oil level Slowly add additional oil to bring to FULL mark on dipstick 1 Hydraulic Filter 2 Gasket O Ring 3 Adapter Hydraulic System Replacing the Hydraulic Filter Change the hydraulic filter after every 500 oper ating hours IMPORTANT Do not substitute with automotive oil filter or severe hydraulic damage may result 1 Position ...

Page 17: ...w the top of the tank DO NOT OVER FILL Note Dispose of used oil in accordance with local authority regulations Only use HVI 68 oil Use of other oil grades can cause loss of hydraulic power or damage to machine Check Hydraulic Lines After every 100 operating hours check hydraulic lines and hoses for leaks loose fittings kinked lines loose mounting supports wear weather and chemical deterioration Re...

Page 18: ...perate or drive Dingo on roadways IMPORTANT When transporting your Dingo on a trailer always use the following procedure 1 Never load or unload the Dingo on the trailer unless the trailer is attached to the vehicle 2 Always climb the ramps with the heavy end of the machine up hill E g With heavy attachments like the trencher or backhoe attached to the Dingo climb the ramps in the forward direction...

Page 19: ...itted With The Current Style Item Qty Dingo Part No Description 1 1 K94078 Grill Bottom 2 1 K94079 Grill Top 3 2 K94084 Grill Nylon Washer 4 4 131 211 002 Plain Washer 1 4 x 1 2 5 2 122 121 000 Nyloc Nut M6 6 2 111 211 025 Hex Bolt M6 x 25 7 2 100 000 053 Spring Pin Ø1 8 x 3 4 8 4 131 131 000 Plain Washer M8 9 4 111 311 016 Hex Bolt M8 x 16 ...

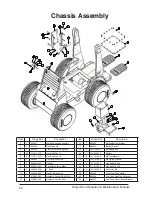
Page 20: ...attery 5 3 111 311 016 Hex Bolt M8 x 16 17 12 131 131 000 M8 Flat Washer 6 1 K94085 Full Grille Assembly 18 6 132 131 000 M8 Spring Washer 7 2 043 000 045 Rubber 19 3 111 311 020 Hex Bolt M8 x 20 8 4 043 300 020 Foot Plate Plastic Blank 20 5 111 311 025 Hex Bolt M8 x 25 9 2 043 000 056 1 Bush 21 5 122 131 000 Nyloc Nut M8 10 1 300 000 006 Hose Clamp 34mm 22 1 K94050 Front Fuel Tank Catch 11 1 319 ...

Page 21: ...3 051 Main remote bank 4 1 330 003 035 Pump Selector SD4 5 1 330 003 052 Flow Control K94 6 1 331 203 002 In line Check Valve 7 1 K94411 Flow Control To Remote Bank 8 1 K94412 Pipe FP Flow Control To Pump Selector 9 1 K94413 Pipe CD Main Bank To Dump 10 1 K94414 Pipe AP Pump Selector To Remote Bank 11 1 K94033 Immobiliser Assembly Hydraulic Bank Assembly ...

Page 22: ...Dingo K9 4 Operation Maintenance Manual 22 Inner Tank Assemblies From 01 01 2004 With Relief Valves Up To 01 01 2004 Without Relief Valves ...

Page 23: ... 4 316 757 500 Hydraulic Fitting ZC2 1414 11 2 K94419 Pipe Wheel Motor Front To Rear C5 12 1 K94416 Pipe Wheel Motor Front Right Top C2 13 1 K94418 Pipe Wheel Motor Front Left Top No Relief C4 14 1 K94417 Pipe Wheel Motor Rear Left Top No Relief C3 15 1 K94415 Pipe Wheel Motor Rear Right Top C1 16 16 113 522 032 Socket Head Cap Screw UNC 1 2 x 2 17 2 310 797 600 Hydraulic Fitting C26 1414 18 2 330...

Page 24: ...Dingo K9 4 Operation Maintenance Manual 24 Main Control Bank Assembly ...

Page 25: ... Short Hose T1 31 1 K94430 Pipe Main Bank To Crowd Ram Long Hose T2 32 4 316 555 500 Hydraulic Fitting C2 0909 33 1 K94481 Remote Handle straight 34 2 330 000 018 15mm Hose Clamp Block 35 1 330 000 016 15mm Hose Guide Plate 36 1 K94411 Pipe Flow Control To Remote Bank EX 37 1 K94412 Pipe Pump Selector To Flow Control FP 38 2 317 565 555 Hydraulic Fitting C64 090909 39 2 316 477 501 Hydraulic Fitti...

Page 26: ...Dingo K9 4 Operation Maintenance Manual 26 Remote Control Bank Assembly ...

Page 27: ...700 Hydraulic Fitting CR1 0604 15 3 111 311 060 Hex Bolt M8 x 60 16 3 122 131 000 Nyloc Nut M8 17 1 K94414 Pipe Pump Selector To Remote Bank AP 18 1 K94413 Pipe Main Bank To Dump CD 19 1 317 769 575 Hydraulic Fitting C64 141714 20 1 K94428 Pipe Remote Bank to 3 8 Aux A4 21 1 K94427 Pipe Remote Bank to 3 8 Aux A3 22 1 K94426 Pipe Remote Bank To 1 2 Aux A2 23 1 K94425 Pipe Remote Bank To 1 2 Aux A1 ...

Page 28: ...4 427 A3 Remote to Small Aux 1 a a a a 1 K94 428 A4 Remote to Small Aux 2 a a a a 1 K94 429 T1 Control Bank to Crowd Hose 1 a a a a 1 K94 430 T2 Control Bank to Crowd Hose 2 a a a a 1 K94 431 DD Diesel Dump Pipe External Filter Current r a r r 1 K94 436 C3 L Rear Wheel Motor with Relief a a a a 1 K94 437 C4 L Front Wheel Motor with Relief a a a a 1 K94 438 DDA Diesel Dump Pipe Internal Filter Curr...

Page 29: ...1 000 Spring Washer M8 8 2 111 311 016 Hex Bolt M8 x 16 9 1 315 367 950 Hydraulic Fitting CP56 1217 10 1 K94083 Hydraulic Tank Breather K94 11 1 Hyd Breather Hose Diesel 260mm 11 1 Hyd Breather Hose Petrol 310mm 12 1 316 679 500 Hydraulic Fitting CR2 1217 13 1 315 368 950 Hydraulic Fitting BSBP 2JH33 14 1 K94476 Steel Pipe F1 15 1 319 167 600 Hose Tail Straight Fitting LMP1212 16 2 100 000 057 Hos...

Page 30: ...Dingo K9 4 Operation Maintenance Manual 30 With Rubber Dump Hose With Filter Breather Line Tank Top Assembly Any combination of the 2 pictures could be on your machine ...

Page 31: ...1 K94107 In Tank Filter Tank Top 2 12 111 311 016 Hex Bolt M8 x 16 3 1 330 000 025 Dip Stick Filler Cap 4 1 Hyd Breather Hose Diesel 260mm 5 1 K94083 Hydraulic Tank Breather K94 6 1 316 879 500 Hydraulic Fitting Nipple CR2 1617 7 1 330 004 019 In Tank Filter Assembly See Page 17 ...

Page 32: ...Dingo K9 4 Operation Maintenance Manual 32 Yanmar Dash Assembly ...

Page 33: ...le Cable Assembly 12 4 132 151 000 Spring Lock Washer M12 13 4 111 511 025 Hex Bolt M12 x 25 14 7 131 121 001 Plain Washer 1 4 15 7 132 211 000 Spring Lock Washer M6 16 3 111 211 012 Hex Bolt M6 x 12 17 1 121 121 000 Nut Hexagonal M6 18 5 111 211 020 Hex Bolt M6 x 20 19 2 122 121 000 Nyloc Nut M6 20 1 021 000 024 K94 Compliance Plate 21 4 100 000 027 Type U Drive Screws 6 x 1 4 ZP 22 1 410 000 119...

Page 34: ...Dingo K9 4 Operation Maintenance Manual 34 Perkins Dash Assembly ...

Page 35: ...2 4 132 151 000 Spring Lock Washer M12 13 4 111 511 025 Hex Bolt M12 x 25 14 5 131 121 001 Plain Washer M6 15 5 132 211 000 Spring Lock Washer M6 16 1 111 211 012 Hex Bolt M6 x 12 17 1 121 121 000 Nut Hexagonal M6 18 5 111 211 020 Hex Bolt M6 x 20 19 2 122 121 000 Nyloc Nut M6 20 1 021 000 024 K94 Compliance Plate 21 4 100 000 027 Type U Drive Screws 6 x 1 4 ZP 22 1 410 000 154 Fuse Block 4 Blade ...

Page 36: ...511 025 Hex Bolt M12 x 25 10 4 111 211 020 Hex Bolt M6 x 20 11 2 122 121 000 Nyloc Nut M6 12 1 021 000 024 Compliance Plate 13 4 100 000 027 Type U Drive Screws 6 x 1 4 ZP 14 1 K94355 Pre Cleaner Assembly 15 1 111 311 060 Hex Bolt M8 x 60 16 1 122 131 000 Nyloc Nut M8 17 1 410 000 119 Fuse Block 4 Blade With Cover Early 17 1 410 000 154 Fuse Block 4 Blade With Buzz Bar Late 18 1 Fuse Block Top 19 ...

Page 37: ...ing 6 2 100 000 025 ROLL PIN 5 32 X 1 B1114 7 2 D95211 Locking Pin 8 3 043 000 057 1 1 2 OD 1 1 4 ID Duralon Bush 9 1 K94213 Steel Bush 1 5 ID1 75 OD 32mm K94214 Mount Plate Only 10 1 K94105 Clevis Pin 1 1 4 x 63mm 50mm Tag Chrome 11 2 K94105 Clevis Pin 1 1 4 x 63mm 50mm Tag Chrome 12 3 132 221 000 5 16 8mm Spring Washer 13 3 111 311 016 Hex Bolt M8x16 14 3 K94105 Clevis Pin 1 1 4 x 63mm 50mm Tag ...

Page 38: ...Dingo K9 4 Operation Maintenance Manual 38 K9 4 Arm Assembly ...

Page 39: ...le Quick Release Coupling NV12GASM 23 1 318 122 000 3 8 Female Quick Release Coupling NV38GASM 24 1 318 121 000 3 8 Male Quick Release Coupling NV38GASF 25 1 310 400 002 1 2 Male Coupling Plug 26 1 310 400 001 1 2 Female Coupling Plug 27 1 310 300 000 3 8 Female Coupling Plug 28 1 310 300 001 3 8 Male Coupling Plug 29 2 316 754 700 Hydraulic Fitting ZCR2 1408 30 2 316 753 700 Hydraulic Fitting ZCR...

Page 40: ...onnet Clip 8 2 043 300 012 Relief Valve Blanking Grommet 9 1 Not Applicable 10 1 410 000 116 12 Volt Auxiliary Power 11 1 Not Applicable 12 1 410 000 089 Engine Warning Light Bulb 420 000 111 13 1 043 000 044 Kohler Ignition Barrel 13 1 518 000 045 Yanmar Ignition Barrel 14 1 043 000 047 Kohler Key 14 1 518 000 046 Yanmar Key 15 1 043 300 013 Immobilizer Grommet 16 3 043 300 017 Bonnet Rest Lugs 1...

Page 41: ...0 026 Fuel Tank Fitting Bungs 20 1 516 000 029 Petrol Fuel Brass Fitting 21 1 K94 380 Petrol Fuel Tank Blanking Bung 22 2 516 000 030 Diesel Fuel Brass Fitting Plastic Fuel Tank January 2005 Onwards Item Qty Dingo Part No Description 1 1 043 300 002 Fibre Glass L H Panel 2 1 043 300 003 Fibre Glass R H Panel 3 1 K94 520 Fuel Tank Plastic After 01 2005 4 1 043 300 001 Dash Panel Fibre Glass 5 1 043...

Page 42: ...ht 12 1 410 000 089 Engine Warning Light Bulb 420 000 111 13 1 043 000 044 Kohler Ignition Barrel 13 1 518 000 045 Yanmar Ignition Barrel TNE 13 1 Yanmar Ignition Barrel TNV 13 1 Perkins Ignition Barrel 14 1 043 000 047 Kohler Key 14 1 518 000 046 Yanmar Key TNE 14 1 Yanmar Key TNV 14 1 Perkins Key 15 1 043 300 013 Immobilizer Grommet 16 3 K94 141 Aluminium Panels L H Electrics Bracket 17 1 516 00...

Page 43: ...Dingo K9 4 Operation Maintenance Manual 43 Yanmar Engine Assembly Series I ...

Page 44: ... 040 Oil Filler Cap O ring 18 2 K94 300a ENG MOUNT REAR REAR OF ENG TO CHASSIS 19 1 K94 301b ENG MOUNT REAR RH LOWER CHASSIS TO ENG 20 1 K94 302b ENG MOUNT REAR LH LOWER CHASSIS TO ENG 21 1 518 000 068 Fuel Filter Assembly 22 1 518 000 018 Fuel Filter Element 1 518 000 016 Fuel Filter Bowl O ring 1 518 000 015 Fuel Filter Bowl 23 1 515 000 036 Full Air Cleaner Assembly 24 1 515 000 045 Air Cleaner...

Page 45: ...asher M8 60 3 132 131 000 Spring Lock Washer M8 61 11 111 311 020 Hex Bolt M8 x 20 62 3 111 522 030 Socket Head Cap Screw M12 x 30 Locktited 63 4 111 311 030 Hex Bolt M8 x 30 64 4 518 000 032 M10 x 50mm Stud 65 4 121 142 000 Hex Nut M10 66 4 122 141 000 Nyloc Nut M10 67 1 111 311 070 Hex Bolt M8 x 70 68 7 122 131 000 Nyloc Nut M8 69 8 131 141 000 Plain Washer M10 70 4 518 000 021 M8 x 60mm Stud 71...

Page 46: ...y Series II Item Qty Dingo Part No Description 1 1 K94 310 Front Engine Mount Engine Bracket TNE 1 K94 810 Front Engine Mount Engine Bracket TNV 2 1 K94 306 Front Engine Mount Assembly 3 4 518 000 004 Rubber Mount 4 1 518 000 000 Yanmar Motor TNE Standard 4 518 000 062 Yanmar Motor TNE USA Spec 4 Yanmar Motor TNV ...

Page 47: ...CHASSIS TO ENG 21 1 518 000 068 Fuel Filter Assembly 22 1 518 000 018 Fuel Filter Element 1 518 000 016 Fuel Filter Bowl O ring 1 518 000 015 Fuel Filter Bowl 23 1 515 000 036 Full Air Cleaner Assembly 24 1 515 000 045 Air Cleaner Ring Assembly 25 1 515 000 034 Small Air Cleaner Element Inner 26 1 515 000 033 Large Air Cleaner Element Outer 27 1 Plastic Outer Casing For Air Cleaner 28 1 550 000 03...

Page 48: ... 000 Spring Lock Washer M8 61 13 111 311 020 Hex Bolt M8 x 20 62 3 111 522 030 Socket Head Cap Screw M12 x 30 Loctited 63 4 111 311 030 Hex Bolt M8 x 30 64 4 518 000 032 M10 x 50mm Stud 65 4 121 142 000 Hex Nut M10 66 4 122 141 000 Nyloc Nut M10 67 1 111 311 070 Hex Bolt M8 x 70 68 9 122 131 000 Nyloc Nut M8 69 8 131 141 000 Plain Washer M10 70 4 M8 x 35mm Stud 71 6 120 121 000 M6 Speed Nut Short ...

Page 49: ...Dingo K9 4 Operation Maintenance Manual 49 K9 4 Perkins Engine Diagram And Part List ...

Page 50: ...Engine Mount 19 1 K94 816 Perkins Bottom Radiator Hose Pipe To Motor 20 1 K94 814 Bottom Radiator Pipe 21 1 Fuel Filter Assembly 22 1 519 000 010 Fuel Filter Element 1 Fuel Filter Bowl O ring 1 Fuel Filter Bowl 23 1 515 000 036 Full Air Cleaner Assembly 24 1 515 000 045 Air Cleaner Ring Assembly 25 1 515 000 034 Small Air Cleaner Element 26 1 515 000 033 Large Air Cleaner Element 27 1 Plastic Oute...

Page 51: ...le Extension Link 58 1 K94 346 Radiator Overflow Hose 59 1 Small hose clamp 60 61 62 6 113 222 012 Socket Head Cap Screw 5 16 UNC x 3 4 63 4 113 222 016 Socket Head Cap Screw 5 16 UNC x 1 64 4 3 8 x Stud 65 4 Hex Nut 3 8 UNC 66 4 Nyloc Nut 3 8 UNC 67 68 69 70 4 Exhaust Stud M8 x 35 71 4 120 121 000 M6 Speed Nut 72 2 120 122 000 M8 Speed Nut 73 74 4 513 000 073 Hex Flange Nut M8 75 2 Hose Clamp 11 ...

Page 52: ...r s responsibility WARRANTY EXCLUSIONS This warranty does not cover 1 Tyres or other consumables or service parts nuts and bolts trencher teeth etc replaced as part of a normal maintenance service as opposed to manufacturing defects 2 Damage resulting from abuse negligence accidents alterations air flow obstructions or failure to maintain or use the machine according to the instructions given 3 Do...

Page 53: ...TY Components installed during a machines warranty period shall have warranty coverage for the duration of the machine warranty period or ninety 90 days which ever is greater provided the warranty installation is performed by Dingo Mini Diggers Pty Ltd or an authorised Dingo Mini Digger dealer ENGINE POLICY The engine in a new Dingo Mini Digger is covered by the manufacturer of that specific engin...

Page 54: ...evel Moving parts Unusual Occasional Serious Mod Substantial Pinch points Unusual Occasional First aid Acceptable Movement of load carried by unit Unusual Occasional Serious Mod Substantial Tip over Unusual Occasional Serious Mod Substantial Hot parts Unusual Occasional First aid Acceptable Fire and explosion Possible Occasional Casualty Mod Acceptable Electricity Unusual Occasional First aid Acce...

Page 55: ... diesel models blows hot air away from the operator Safety decals in appropriate positions Auxiliary power socket for extra lighting if required for better visibility Weight of the Dingo increases the stability and lifting ability Electrical cables enclosed and sealed Cylinder lock to prevent accidental release of arms and possible attachment Hot parts enclosed within fibreglass casing Pinch point...

Page 56: ...eet East Dalby Qld 4405 Australia PO Box 721 Dalby 4405 Dalby Head Office 07 4672 5400 Brisbane 07 3272 7088 Sydney 02 9833 8222 Melbourne 03 9334 0300 www dingo ws Adelaide 08 8262 2022 Perth 08 9311 9811 Nth Queensland 07 4796 0555 New Zealand 0011 64 7378 9840 ...

Reviews: