background image

Dino Digital Microscope User’s Manual


18

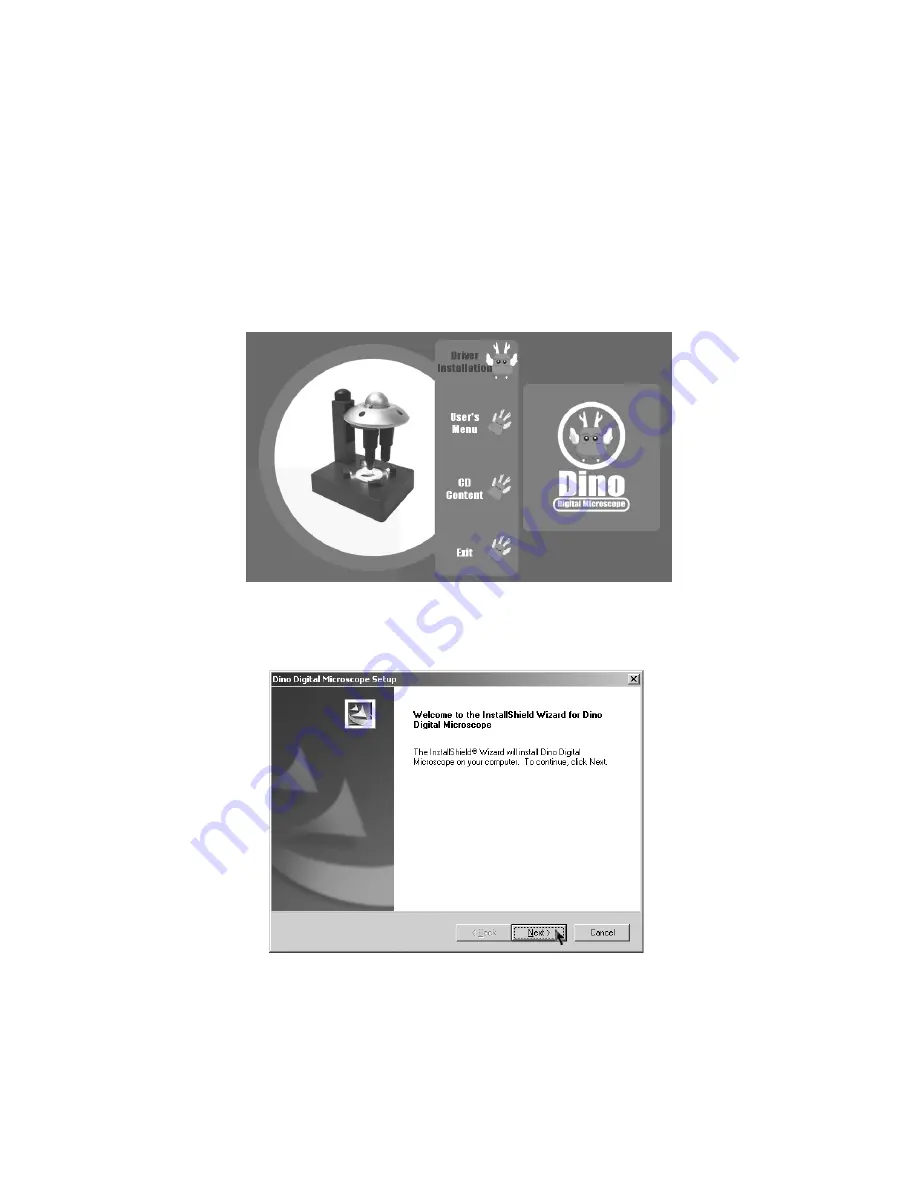
Windows 2000   

1.


Place the installation CD into CD-ROM driver, the installation program should be 
started automatically. Otherwise, please execute the AUTORUN.EXE directly 
from the CD. 

2.


Select “Driver Installation” from Dino digital Microscope Installation menu 
screen as shown. 


3.


Click “Next” to continue, as shown. 


Summary of Contents for AM-351

Page 1: ...ed view from pollen to butterfly wings via PC and TV You can also take picture or video from what you have seen on the computer by using included application software DinoCapture Not only ideal for sc...

Page 2: ...nnecting to PC 12 System Requirements 12 Driver Installation Procedure 13 Windows XP 13 Windows 2000 18 Windows 98se 21 Connecting Procedure 27 Operate Dino Digital Microscope 29 DinoCapture Applicati...

Page 3: ...plug in any other cables not belong to Dino Digital Microscope 5 Avoid using or storing Dino Digital Microscope at the environments with high vibration 6 Do not use any detergent or volatile solution...

Page 4: ...own 13 To avoid electric shock remove all electricity source before moving PC or TV Contents and Name of Parts 1 Dino Digital Microscope Device 2 Rack 3 CD user s manual included 4 5V AC Adaptor Input...

Page 5: ...e User s Manual 5 Objective Lens Normal Lens 10x Low Power Objective Lens 100x 200x High Power Objective Lens 400x 600x Remark The magnification is subject to the ratio of the object size to be showed...

Page 6: ...tem Requirement z TV with AV input function Remark The TV s video format NTSC or PAL has to be matched with the video format NTSC or PAL of Dino Digital Microscope z Device needed Dino Digital Microsc...

Page 7: ...icroscope Device and Device Holder Notice The device holder s screw has to be faced down otherwise the digital microscope device will not be able to well fit into the device holder Buckle Dino Digital...

Page 8: ...AV cable to the red socket Audio and yellow one to the yellow socket Video respectively And plug the other end of AV cable to the Video Audio Input socket on TV monitor Step 4 Connect DC cable from th...

Page 9: ...ug 5V AC adapter to the power socket of 100 240V AC Step 6 Power on TV and select the channel for in put AV signal Operate Dino Microscope The following procedure will show you how to operate Dino Dig...

Page 10: ...tly 3 Place the inspection plate onto the Inspection Stage and then put the to be observed object near the center position 4 Select the lens to be used by pulling the Lens Assembly downward and rotati...

Page 11: ...you are interested with It is suggested to hold the Lens Holder s top by another hand while pulling the Lens Holder downward or upward Remark Before changing the lens it is suggested to heighten the l...

Page 12: ...l be a black bar on TV screen top as shown Connecting to PC System Requirements PC s system requirements 9 OS Windows 98se 2000 XP 9 CPU Pentium IV 1 5G Celeron AMD Athlon or above 9 Memory 128MB 9 HD...

Page 13: ...connect USB Cable from Dino Digital Microscope to PC before driver installation Select driver installation and follow the instructions to complete installation As driver installation completed and if...

Page 14: ...Dino Digital Microscope User s Manual 14 3 Click Next to continue as shown...

Page 15: ...Dino Digital Microscope User s Manual 15 4 When the Software Installation warning message appears click Continue Anyway 5 Click Finish to complete the installation...

Page 16: ...Dino Digital Microscope User s Manual 16 6 Plug USB Cable to Dino Digital Microscope to connect with PC a Found New Hardware Wizard will then appear Click Next to continue...

Page 17: ...Dino Digital Microscope User s Manual 17...

Page 18: ...ation CD into CD ROM driver the installation program should be started automatically Otherwise please execute the AUTORUN EXE directly from the CD 2 Select Driver Installation from Dino digital Micros...

Page 19: ...Dino Digital Microscope User s Manual 19...

Page 20: ...ser s Manual 20 4 When the Digital Signature Not Found warning message appears click Yes to continue the installation 5 Click Finish to complete the installation 6 Plug USB Cable to Dino Digital Micro...

Page 21: ...Place the installation CD into CD ROM driver the installation program should be started automatically Otherwise please execute the AUTORUN EXE directly from the CD 2 Select Driver Installation from Di...

Page 22: ...Dino Digital Microscope User s Manual 22 3 Click Next to continue as shown...

Page 23: ...Dino Digital Microscope User s Manual 23 4 Click Finish to complete the installation 5 Plug USB Cable to Dino Digital Microscope to connect with PC...

Page 24: ...Dino Digital Microscope User s Manual 24...

Page 25: ...Dino Digital Microscope User s Manual 25 6 When the following message appears please insert the Windows 98 Second Edition CD ROM...

Page 26: ...Dino Digital Microscope User s Manual 26...

Page 27: ...B C locations on Dino Digital Microscope Device and Device Holder Notice The device holder s screw has to be faced down otherwise the digital microscope device will not be able to well fit into the d...

Page 28: ...SB Cable to the mini USB socket on Microscope Device and the other end to PC USB port Step 4 Connect AV to Microphone Jack Cable to the red Audio socket on Microscope Device and to the microphone jack...

Page 29: ...right image suggest placing Dino Digital Microscope with rack s arm on the left side as shown up right image position 2 Switch on the LED light with your choice There are two sets of LED light backsid...

Page 30: ...is to adjust the Lens Holder s length by pulling the Lens Holder downward or upward The Lens Holder is pulling downward the magnification is higher Adjust the Focus Adjustment Knob until the image bec...

Page 31: ...fer to page 38 7 When using microphone it s not necessary to turn the microphone toward the user Remark Connect to notebook be sure to mark mute for notebook microphone to avoid interrupting Dino Digi...

Page 32: ...hand side display the real time image under the microscope If Dino Digital Microscope has not been found while opening the DinoCapture the message will be prompted as below Tool Bar Description Take...

Page 33: ...ed to save the picture or video and keep the folder clean for file security and program s performance concern Thumbnail Notation Grey shadow The picture or video has not yet been saved Orange shadow T...

Page 34: ...deo The Video can be taken either by clicking the icon on Tool Bar or by selecting Video under Capture Menu Take Time Lapsed Video The Time Lapsed Video can be taken either by clicking the icon on Too...

Page 35: ...by either clicking in the Tool Bar or by selecting Save as under the File Menu The selected file in the folder will then be saved as prompted below Mail Click Mail The file name is same as system s Th...

Page 36: ...w To return from full screen mode please click Esc Menu Function List 1 File Menu Open To open the selected picture or video Save As To save the selected picture or video Share Save the picture or vid...

Page 37: ...ete All To delete all the files in selected folder picture or video On display thumbnail picture click mouse right key the functions showed are same as file s 2 Setting Audio Setting The user can sele...

Page 38: ...Video Setting The user can set the parameter of video Note The resolution setting is not useful Video Compression Setting The user can select the compressor for video recording Note The video quality...

Page 39: ...f If thumbnail auto play is enabled the video will play when cursor move over 3 Capture The picture video and frame functions in Capture have the same functions as the buttons of in the Tool Bar 4 Hel...

Page 40: ...al Microscope User s Manual 40 Open The Picture The saved picture can be displayed in full screen by clicking To return from full screen mode just click the mouse left key Function Description Save as...

Page 41: ...cope User s Manual 41 Previous Picture Next Picture Share the Picture by sending the file to DinoShare under the Shared Document Enlarge Shrinkage Open The Video Or Time Lapsed Video Function Descript...

Page 42: ...lation completed can use Dino Digital Microscope as PC Camera Step 1 Complete driver installation in PC and connect Dino Digital Microscope to PC Step 2 Select the normal lens by rotating the lens ass...

Page 43: ...he lens assembly downward it means the lens assembly is not on the right position e Recommend to inspect the object from lower power lens Q2 Why cannot work when connect to PC A a Check driver install...

Page 44: ...pplication and restart your system to release the memory c Probably your system has being attacked by virus which may dramatically degrade your system s performance Q8 What should we do if Dino Digita...

Page 45: ...Q12 Why the image is not clear A Make sure Dino Microscope s device is properly installed on the device holder Q13 Adjust focus adjustment knob why sometimes the image is not fixed at screen center A...

Page 46: ...ows 98se Windows 2000 and Windows XP are Microsoft company s trademark Certification CE FCC Limited Liability The manufacturer importer and the dealer cannot be held responsible for accidental damage...

Reviews: