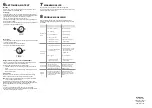
Technical Specifications
· Power supply: 230V
AC
±10% ~50 Hz
· Power consumption: <1W
· Output: 1 free-voltage contact
· Load: 16A cosφ= 1
- LED lamps: 400W
- Incandescence and 230V Halogen: 3.000W
- LV Halogen with Electronic transfo: 3.000W
- LV Halogen with Ferromagnetic transfo: 2.400W
- Fluorescent: 1.300W (130µF)
- PL lamps: 18x7W, 12x11W, 10x15W, 10x20W or 10x23W
· Coverage: 360º, max. Ø7 at 2,5m high and 18ºC
· Settings: Via Potentiometer or Remote Control EM MAN DM0 (optional)
· Level of luminosity: 3 ~ 100Lux
· Timing: 6 seconds ~ 12 minutes
· Dimensions (mounted): Ø80mm x 18,5mm
· Environmental protection: IP40, Class II
· Operating temperature: –10ºC ~ +45ºC
1
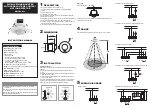
DESCRIPTION
3
INSTALLATION
2
DIMENSIONS
5
WIRING DIAGRAMS
· Installation with a load supplied to 230V:
· Installation of 2 detectors in parallel:
· Installation with a load supplied to 230V and Switch for permanent ON:
· Installation with staircase timer (e. g.: MI EL3 003):
· Simple installation:
· Installation with a load supplied to a different voltage of 230V:
63,5mm
45mm
80mm
63,5mm
Ø3m
Ø7m
2,5m
INSTRUCTIONS MANUAL
FLUSH-CEILING MOUNTED
WITH FREE-VOLTAGE CONTACT
MOTION DETECTOR
DM TEC 011
L
N
S
2
N L
S
1
230V~ 50Hz
Load
L
N
S
2
N L
S
1
230V~ 50Hz
Load
L
N
S
2
N L
S
1
+ -
230V~ 50Hz
L
N
S
2
N L
S
1
S
2
N L
S
1
230V~ 50Hz
Switch
Load
L
N
S
2
N L
S
1
230V~ 50Hz
L
N
S
2
N L
S
1
MI EL3 003
1
3
2
4
230V~ 50Hz
CAUTION
Installation of electric equipment must be carried out by qualified
professionals.
Before you start making any connections, disconnect the power supply
to avoid any risk.
When some kinds of lamps blow, they can produce a very high current
which could damage the detector.
· Indoor motion detector for flush-ceiling mounting.
· Focus type assembly allows its installation in ceilings with different
thickness.
· Circular detection area, 360º.
· One switching free-voltage output.
· High capacity relay with “zero crossing” control, which allows switching
practically any type of load.
· Natural light measurement, allowing condition its operation to daylight level.
· High sensitivity PIR sensor, which detects very small movements.
· Possibility to connect several detectors in parallel to expand the area to be
covered in a single line of lighting.
· Optional IR remote control for easy and quick setting: EM MAN DM0.
A. Setting the device:
Given that the sensor responds to movement and to heat, avoid the following
situations:
· Pointing the detector towards objects with reflective surfaces such as
mirrors.
· Positioning the sensor near heat sources such as ventilation systems, air
conditioning devices or lamps.
· Pointing te detector towards objects which could be moved by draughts,
such as curtains, plants...
Take into account the walking direction when installing. It is less sensitive to
movement across the detector and more sensitive to movement directly
toward the sensor, which will reduce the detection coverage.
Walking across:
More sensitive
Walking towards:
Less sensitive
B. Mounting:
Drill a hole of Ø65mm in the ceiling:
Make the wiring connections following the installation diagrams and set the
desired values of Lux and Time.
The optimal height for its assembly is 2,5m, which can cover up to Ø7m.
4
RANGE


