14
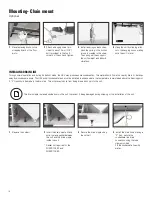
Mounting- Chain mount
Optional
1
Place fastening hooks on the
strapping board or the floor
joists
.
2
Attach a hanging chain (pro-
vided) to each 19 mm (3/4")
bolt (provided) in the top 4
corners of the unit and tighten.
4
Hang the unit by slipping a link
onto the hanging hooks, making
sure the unit is level.
3
Install a spring on each chan.
Hook the spring in the links so
a loop is created in the chain.
The spring will then support
the unit's weight and absorb
vibrations.
1
Remove the nutsert.
INSTALLING DRAIN LINE
Through normal operation and during its defrost mode, the HRV may produce some condensation. This water should flow into a nearby drain, or be taken
away by a condensate pump. The HRV and all condensate lines must be installed in a space where the temperature is maintained above the freezing point.
A “P” trap should be made in the drain line. This will prevent odors from being drawn back up into the unit.
2
Invert the drain nipple. Make
sure to place gasket between
the unit and the drain nipple
inside the unit.
* Gasket not required for the
PHRVR104 ES and
PHRVR100 ES.
3
Secure the drain nipple using
the nutsert.
4
Install the drain hose making a
"P" trap, secure the
condensate line drain
connection using the tube
clamp provided.
Fill the condensate line with
water.
The drain nipple is placed upside down in the unit to prevent it being damaged during shipping or the installation of the unit.


