background image


1 | 

P a g e


Smart-Pad Operation Manual 


Direct National’s:  

Smart-Pad Interactive Touch Screen Operation 

Manual 

Summary of Contents for Smart-Pad

Page 1: ...1 P a g e Smart Pad Operation Manual Direct National s Smart Pad Interactive Touch Screen Operation Manual...

Page 2: ...allation Notice 7 How to choose source channel 18 20 INSTALLATION INSTRUCTION 8 Introduction of menu 21 CONTROL PANEL 11 Source menu 21 Interface panel Picture Menu 22 Back ports 11 Sound Menu 23 REMO...

Page 3: ...r station etc When abnormal sound and smell appear cut off the power supply and unplug the device immediately Stop using it and ask professional staff to resolve the problems until they are fixed If t...

Page 4: ...e in normal cement wall solid wall and wood wall which can withstand three times the weight or more Please ensure good ventilation conditions For the mounting on special walls such as steel structure...

Page 5: ...lligent control write modify delete arbitrary functions by using a finger or any nontransparent object SMART PAD Customised for teaching meetings and conference systems Equipped with high brightness h...

Page 6: ...6 P a g e Smart Pad Operation Manual MAIN VIEW OF MONITOR ACCESSORIES INCLUDED USER MANUAL POWER CABLE TOUCH USB CABLE AUDIO CABLE REMOTE TOUCH PENS VGA CABLE WALL MOUNT KIT...

Page 7: ...e wall or rooftop of buildings it must be solid brick concrete or other strength equivalent mounting surface If the mounting surface is made of loose materials old building brick wall woodiness solid...

Page 8: ...ad Operation Manual STEP ONE Install the holder onto the back of the mount STEP TWO Install the wall holder parts to the wall STEP THREE Install interactive Smart Pad panel to mount and secure with bo...

Page 9: ...ce Go to the source menu C Menu Display exit back to previous level OSD menu D VOL Increase the volume E VOL Decrease the volume F CH Choosing the next channel G CH Choosing the previous channel H PC...

Page 10: ...ystem support playing Q PC USB Multimedia USB input of OPS support playing documents pictures audios and videos directly R HDMI 3 HDMI 3 S TOUCH USB External PC Touch port need PC connect to HDMI 3 M...

Page 11: ...onal For external PC USB port transfer to frontPCUSBport ifhaveBulit inPC this one will be not exit 2 SPDIF Coaxial output 3 RS232 serial communication transmission of data control 4 SD CARD SD card s...

Page 12: ...RJ45 Wired network port 3 TOUCH USB Touch port 4 HDMI 1 HD multimedia signal input 1 5 HDMI 2 HD multimedia signal input 2 6 VGA1 External computer video input 7 AUDIO1 External computer audio input...

Page 13: ...13 P a g e Smart Pad Operation Manual REMOTE CONTROLLER SPECIFICATIONS BATTERY INSTALLATION...

Page 14: ...enter or select source channel 7 MENU enter or exit from the menu 8 up down left right and OK select up down left right and the selection sleep Sets a timer to turn off the interactive flat pane Exit...

Page 15: ...le 21 Forward Rewind Forward or Rewind the audio video PRSRN screen shot button save the picture in SCREENSHOOT file CHLLS N A Home back to Android Home page 25 L S N A 26 Zoom display ratio selection...

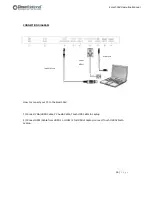
Page 16: ...IAGRAM How to connect your PC to the Smart Pad 1 Connect VGA HDMI Cable PC Audio Cable Touch USB Cable to Laptop 2 Connect HDMI Cable from HDMI 1 or HDMI 2 to HDMI of Laptop connect Touch USB Cable to...

Page 17: ...low steps Turn on the Power key on the touch screen or standby key on the remote to power the touchscreen the index light will be in green then press PC key on the touchscreen to turn on the PC Only a...

Page 18: ...mart Pad Operation Manual HOW TO CHOOSE SOURCE CHANNEL Three ways as follows to choose the source channel touch the source you want and already connect on the screen Step 1 touch the source you want s...

Page 19: ...19 P a g e Smart Pad Operation Manual Step 2 touch the source screen Press slip menu to select Step 1 touch screen bottom and slip up some distance there will be menu show as below...

Page 20: ...20 P a g e Smart Pad Operation Manual...

Page 21: ...the touch screen to show the menu then press to choose sub menu press to enter the sub menu picture menu voice menu channel menu setting menu time menu SOURCE MENU 1 Entering submenu by pressing 2 Ent...

Page 22: ...channel Press to adjust Press OK or EXIT to save or back to the previous menu Picture Mode includes standard soft user game auto PC vivid nature sport bright When in the PC channel please choose PC M...

Page 23: ...AD AUTO HOH surround sound SRS SPDIF output and single sound Choosing submenu by pressing Entering into option by pressing OK Adjusting by pressing After finishing adjust and setting save by pressing...

Page 24: ...nt Set Menu Including Menu Time No signal shutdown time Boot setting Restore To Default Entering sub menu by pressing Entering into option by pressing OK Adjusting by pressing After finishing adjust a...

Page 25: ...usic boot logo boot volume SUPPORTED FORMATS Mode Format File Extension Name Picture JPEG BMP PNG Jpg Jpeg Bmp png Movie MPEG1 MPEG2 MPEG4 H264 RV8 RV9 RV10 MJPEG Divx Xvid avi mpg dat Vob mov mkv rmv...

Page 26: ...te control to make the picture in full screen mode and do the calibration again with equipped pens Writing is vibrant jump Writing in a wrong way It is better to write with pens as much as possible Ho...

Page 27: ...other drawing color Hands or other objects are on the screen when you are writing It is better to write with pens as much as possible Hold the pen far enough away from the penpoint The angle between P...

Page 28: ...is pressed 3 Check if the audio cable between the computer and the touch screen monitor is connected correctly No image or just black and white image 1 Adjust color settings 2 Check color standards In...

Page 29: ...product around touch screen monitor Check if the touch screen monitor share 1 power socket with too many other devices No TV signal Check if the cable is connected properly and check TV signal with r...

Page 30: ...e electrode of the battery are installed correctly Check if the battery power too low Check if there is any obstacle between the remote control and touch screen monitor Check if it is effected by any...

Reviews: