background image

© 2007 Directed Electronics. All rights reserved.

1

Audio Setup

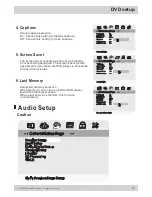
4.Captions

Adjust caption selection.

On: Choose this setting to display captions.

Off: Choose this setting to close captions.

Caution

5.Screen Saver

The screen saver is useful to prevent your display

from becoming damaged. The screen saver picture

appears when you leave the DVD player in stop mode

for about two minutes.

6.Last Memory

Adjust last memory selection.

When start your car or turn on/off the DVD player,

search the last player scene.

When eject and close the disc, this function

is not working.

Angle Mark          
OSD Lang             

Screen Saver       
Last Memory        

On          
ENG           

On       
On       

Closed Gaption      

General Setup Page

TV Display              PS             

Angle Mark          
OSD Lang             
Captions              

Last Memory        

On          
ENG           
On             

On       

Screen Saver      

General Setup Page

TV Display              PS             

Angle Mark          
OSD Lang             
Captions              
Screen Saver       

On          
ENG           
On             
On       

Set Last Memory State      

General Setup Page

TV Display              PS             

Go To Speaker Setup Setup      

Genaral Setup Page

Speaker Setup

Spdif Setup

Dolby Digital Setup

Channel Delay

Equalier

3D Prosessing

HDCD

Off          

Captions              

On              On            

Off          

Screen Saver       

On       

On            

Off          

Last Memory         On       

On            

DISPLAY

Pressing button DISPLAY on the 

remote control changes the play mode as

follows:

[DVD]

OSD

CONDITION

Title Elapsed

Title Remain

Chapter Elapsed

Display the Title Elapsed

Display the Title Remain

Display the Chapter Elapsed

[VCD]

Whenever press the button,title chapter

will be displayer as follows:

Pressing display button displays

information about the current CD on the

screen as follows:

[AUDIO]

OSD

CONDITION

Single Elapsed

Single Remain

Display the single elapsed

Display the single remain

Display the total elapsed

[Mp3]

Your DVD player will display the counter

automatically when you play the Mp3 disc.

NUMBER BUTTONS

The 0 through 9 number buttons are used to enter the number of the track,the number

of the DVD chapter,time date,etc.

OSD

CONDITION

Single Elapsed

Single Remain

Display time

Left display time
No sign

Chapter Remain

Display Off

Display the Chapter Remain

No sign

Display Off

Total Elapsed

Total Remain

Display the total remain

[DVD]

You can select a track by pressing the

corresponding number button.

[AUDIO]

You can select a track in the folder by

pressing the corresponding number button.

[DVD]

OSD

CONDITION

Select Track:__

Select track no

OSD

CONDITION

__:__

Select track no

DVD setup

Summary of Contents for OHD 1020B

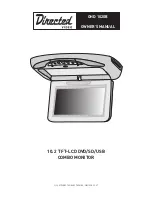
Page 1: ...OHD 1020B OWNER S MANUAL 10 2 TFT LCD DVD SD USB COMBO MONITOR 2007 DIRECTED ELECTRONICS N83102B 02 07 POWER AV MENU...

Page 2: ......

Page 3: ...udio Setup 15 Dolby Digital Setup 16 Equalizer 16 Video Setup 18 Quality 18 Preference 21 TV type 21 PBC 21 Audio 21 Subtitle 21 Disc menu 22 Parental 22 Country region 22 Default 22 Password setup 23...

Page 4: ...RU FRQWDFW LUHFWHG OHFWURQLFV H FDUHIXO QRW WR GURS RU DSSO XQGHU SUHVVXUH WR WKH IURQW SDQHO RI RXU YLGHR PRQLWRU I WKH VFUHHQ FUDFNV GXH WR PLVXVH RXU ZDUUDQW ZLOO EH YRLG R QRW PRXQW WKH SURGXFW ZK...

Page 5: ...WHPSHUDWXUH RI WKLV SURGXFW LV OLPLWHG WR a URP WLPH WR WLPH ZKHQ RXU YHKLFOH LV H WUHPHO KRW RU FROG RX PXVW DOORZ WLPH IRU RXU DLU FRQGLWLRQHU RU KHDWHU WR FRRO RU KHDW WKH YHKLFOH DQG IRU RSHUDWLQJ...

Page 6: ...7 25 0HQ X 68 7 7LWO H 32 5 087 9 XWR 0HQX 02 3 1 6 3 79 8QLW 03 5HPRWH RQWURO H 7KLV DOORZV WUDQVPLWWLQJ RI WKH UHPRWH FRQWURO V 5 VLJQDOV IRU FRQWUROOLQJ DOO IXQFWLRQV RI RXU PRQLWRU LUHOHVV QIUDUH...

Page 7: ...U WKH PRQLWRU 6 QSXW 86 QSXW 7 XWWRQ LVF ORDGLQJ VORW 8 QSXW DFN 32 5 9 0 18 5220 03 XWWRQ 32 5 XWWRQ 32 5 21 2 EXWWRQ 02 XWWRQ 9 79 9 9 81 7 21 XWWRQ 26 GLVSOD EXWWRQ 92 XWWRQ 9ROXPH FRQWURO DQG DGMX...

Page 8: ...KH 9 3OD HU 8QLW RQ RU RII XWR 79 8VH WR PRYH WR WKH GHVLUHG PHQX 9 9 9 9 021 725 3 1 7KLV EXWWRQ SHUPLWV RX WR FKRRVH DPRQJ 0XOWL 3 DQG 176 8VH WR PRYH WR WKH GHVLUHG PHQX 63 6KRZ LQIRUPDWLRQ RI HODS...

Page 9: ...2007 Directed Electronics All rights reserved 92 EXWWRQ HFUHDVH WKH YROXPH QFUHDVH WKH YROXPH 272 8VH WR VHDUFK D WLWOH RU D FKDSWHU RI RXU 9 GLVF Remote control...

Page 10: ...HOHDVLQJ 7KH 0RQLWRU 3XVK WKH RSHQ EXWWRQ ORFDWHG RQ WKH IURQW RI RXU VFUHHQ DQG ORZHU WKH PRQLWRU WR WKH GHVLUHG OHYHO RX FDQ DOVR DGMXVW WKH VZLYHO DQJOH RZ 7R DWFK 0RQLWRU 32 5 32 5 81 7 5 027 2175...

Page 11: ...icture on the right Refer Connection Diagram 2 Turn the power ON the unit and external devices 3 Select the DVD AV1 AV2 mode by pressing the AVC button on the unit or on the remote control 4 Play the...

Page 12: ...6HOHFW WKH GHVLUHG PHQX E SUHVVLQJ WKH 0 18 EXWWRQ RQ WKH XQLW RU WKH UHPRWH FRQWURO RI PRQLWRU 2175 67 5 71 66 2 25 6HOHFW WKH GHVLUHG PHQX E SUHVVLQJ WKH 0 18 EXWWRQ RQ WKH XQLW RU WKH UHPRWH FRQWUR...

Page 13: ...ndividual preference An invalid button press 1 Press the STOP button if the disc is playing 2 Press the SETUP button to display setup menu 2 Use the button to select and set desired setting and items...

Page 14: ...ratio Caution This option is available only when the disc has the function 2 Angle Mark You can set up so that the angle mark appears on scenes On When selected the screen will be shown with angle ma...

Page 15: ...or turn on off the DVD player search the last player scene When eject and close the disc this function is not working Angle Mark OSD Lang Screen Saver Last Memory On ENG On On Closed Gaption General S...

Page 16: ...Digital Setup L Mono R Mono Dual Mone Mix Stereo Mix Mono Q RUGHU WR XQGHUVWDQG DOO WKH 81 7 216 ZHOO ZH VHOHFW WZR ROE LJLWDO 6HWXS DQG TXDOL HU RI WKHP Go To Dolby Digital Setup Genaral Setup Page...

Page 17: ...s without distorting other frequencies Treble Boost This function is enhanced at high levels without distorting other frequencies Bass Boost Super Bass Treble Boost Off Off Off Select Equalizer Type E...

Page 18: ...ity Setup Medium Low Sharpness Low High Hue Saturation Luma Delay 00 00 1 T Brightness Contrast Gamma 00 00 None Sharpness Video Quality Setup Medium Low Sharpness Low High Hue Saturation Luma Delay 0...

Page 19: ...rast using the direction buttons and press the ENTER button Contrast adjusts the image quality by increasing or decreasing the ratio of bright and dark screen section Brightness Contrast Gamma 00 00 N...

Page 20: ...ay Select the Luma Delay menu and select the preferred video image quality Brightness Contrast 00 00 Gamma Video Quality Setup Medium Low Sharpness Low Hue Saturation Luma Delay 00 00 1 T None Gamma N...

Page 21: ...ve to Preference 3 Press the buttons to move to Audio 4 Press the ENTER button 5 Press the buttons to select desired audio language 4 Subtitle Use the subtitle language menu to select the subtitle lan...

Page 22: ...TUP button when stop mode 2 Press the buttons to move to Preference 3 Press the buttons to move to Country Region 4 Press the ENTER button 5 Press the buttons to select desired Country Region 7 Countr...

Page 23: ...d and new password in 6 digits The default password code is 000000 3 Re enter new password for confirmation then press the ENTER button 2 Password Change Password Password Mode Password Setup Page Off...

Page 24: ...ur DVD disc into the DVD player LOADING will appear on the screen Then the DVD disc is player automatically VOL VOL To adjust the audio output level of the speaker from 0 to 20 MUTE Pressing of the MU...

Page 25: ...D 3DXVH EXWWRQ DQG ZLOO GLVSOD WKH ILUVW ILOH RI WKH LVF 0S 0 18 7KH PHQX RI D 9 GLVF YDULHV 7KH FRQWHQW RI WKH PHQX RQ WKH VFUHHQ LV GHSHQGHQW RQ WKH SDUWLFXODU 9 9 Q LQYDOLG EXWWRQ SUHVV 8 2 03 26 2...

Page 26: ...the single remain Display the total elapsed Mp3 Your DVD player will display the counter automatically when you play the Mp3 disc NUMBER BUTTONS The 0 through 9 number buttons are used to enter the n...

Page 27: ...unction is disc dependent DVD AUDIO MP3 An invalid button press Used to play a disc in slow forward or slow reverse This allows you to search forward three steps to reverse three steps Slow forward pl...

Page 28: ...8X 2X rewind search 4X rewind search FR 16X FR 32X PLAY 8X rewind search 16X rewind search 32X rewind search Play FAST FORWORD SEARCHING Pressing FR button changes the play mode as follow DVD OSD CON...

Page 29: ...to move to the next chapter from the current chapter DVD VCD AUDIO MP3 Used to move to the next track from the current track REPEAT A B Press this button to repeat the selected segment The selected s...

Page 30: ...as follow AUDIO OSD CONDITION Track All Repeat single All Repeat off Mp3 Use to change the play mode Pressing REPEAT button changes the play mode as follows OSD CONDITION Repeat One Repeat Folder Fol...

Page 31: ...DQJHV WKH SOD PRGH DV WKH WH W WR WKH ULJKW LOOXVWUDWHV 9 8 2 03 Q LQYDOLG EXWWRQ SUHVV 272 KHQ DWFKLQJ 9 DYDLODEOH WR FRQWURO WKH 0HQX 7LWOH 0RYH WR WKH GHVLUHG WLWOH KDSWHU 0RYH WR WKH GHVLUHG FKDSW...

Page 32: ...tronics All rights reserved 0 25 5 0 KLWH 8 2 5HG 8 2 5 HOORZ 9 2 0 25 5 0 KLWH 8 2 5HG 8 2 5 HOORZ 9 2 9 QSXW 9 9 KLWH 8 2 5HG 8 2 5 HOORZ 9 2 9 2XWSXW 03 0 18 32 5 92 92 9 021 725 79 0 17 11 9 QSXW...

Page 33: ...ck the contents INSTALLATION PLATE SCREW A SCREW B 2 Connect the external devices RCA cable or AV output refer the connection diagram 3 Match the position of installation bracket and installation plat...

Page 34: ...ology that is protected by methods claims of certain U S Patents and other intellectual property rights owned by the Macrovision Corporation and other rights Owner s use of this copyright protection t...

Page 35: ...elect the correct input mode for the audio receiver Connect the audio cable into the jacks securely Turn on the monitor connected with the audio cable Set the Digital Audio Output to the correct posit...

Page 36: ...the FCC Rules These limits are designed to provide reasonable protection against harmful interference when the equipment is operated in a commercial environment This equipment generates uses and can...

Page 37: ...or unrea sonable use negligence acts of God neglect improper service or other causes not arising out of defect in materials or construction This warranty does not cover the elimination of externally...

Page 38: ...N83102B 02 07...

Reviews: