background image

2

26

6

© 2004 Directed Electronics, Inc.  

T

TIIN

NT

T

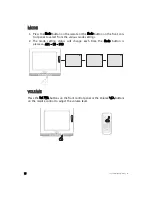
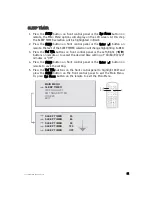
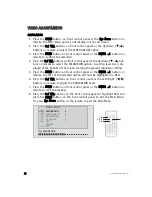
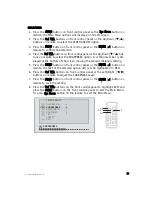
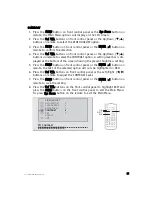
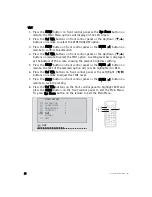
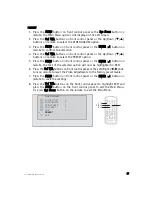
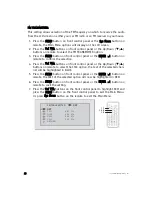
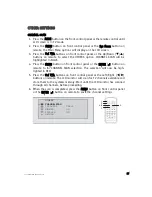
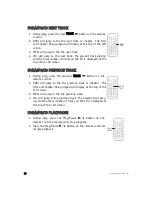
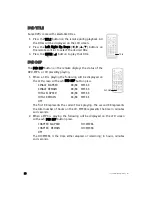
1. Press the M

MEEN

NU

U button on front control panel or the SSyyss  M

Meen

nu

u button on

remote, the Main Menu options will display on the LCD screen.

2. Press the V

Vo

oll  

//

buttons on front control panel or the Up/Down (

T

/

S

)

buttons on remote to select the VIDEO ADJUST option.

3. Press the M

MEEN

NU

U button on front control panel or the EEN

NTTEER

R (

) button on

remote to confirm the selection.

4. Press the V

Vo

oll  

//

buttons on front control panel or the Up/Down (

T

/

S

)

buttons on remote to select the TINT option. A setting level bar is displayed
at the bottom of the screen showing the present brightness setting.

5. Press the M

MEEN

NU

U button on front control panel or the EEN

NTTEER

R (

) button on

remote, the text of the selected option will now be highlighted in RED.

6. Press the V

Vo

oll  

//

buttons on front control panel or the Left/Right (

W

/

X

)

buttons on remote to adjust the TINT Level.

7. Press the M

MEEN

NU

U button on front control panel or the EEN

NTTEER

R (

) button on

remote to save the setting.

8. Press the V

Vo

oll  

//

buttons on the front control panel to highlight EXIT and

press the M

MEEN

NU

U button on the front control panel to exit the Main Menu.

Or, press SSyyss M

Meen

nu

u button on the remote to exit the Main Menu.

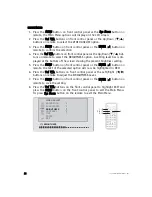
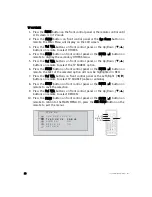
1./8.

3./5./7.

2./4.

6.

VIDEO ADJU

S

T

S

HARPENE

SS

BRIGHTNE

SS

CONTRA

S

T

TINT

PRE

S

ET

EXIT

TINT

4
7
4

7

S

ATURATION

8

Summary of Contents for PB1040

Page 1: ...yw wh he er re e D DV VD D T TV V S Sy ys st te em m M MO OD DE EL L P PB B1 10 04 40 0 O O W W N N E E R R S S G G U U I I D D E E I IN NS ST TA AL LL LA AT TI IO ON N G GU UI ID DE E 2004 Directed Electronics Inc N90104 07 04 ...

Page 2: ...amcorders discs speakers accessories or vehicle electrical systems cosmetic damage or damage due to negligence mis use abuse failure to follow operating instructions accidental spills or customer applied cleaners damage due to environmental causes such as floods airborne fallout chemicals salt hail windstorms lightning or extreme temperatures damage due to accidents road hazards fire theft loss or...

Page 3: ... RCA AV 13 Power Connection AC 13 Power Connection DC In Vehicle 14 Basic Functions 15 Power On Off 15 Mode 16 Volume 16 Mute 17 Channel Change 17 Playing DVD CD MP3 18 Ejecting DVD CD MP3 19 TV Station Memory Mode 19 Operations 20 Menu Setting 20 Sleep Timer 21 Video Adjustments 22 Other Settings 29 DVD Operation 33 Fast Forward DVD MP3 CD 33 Fast Backward DVD MP3 CD 33 DVD MP3 CD Next Track 34 D...

Page 4: ... Angle 36 DVD MTS 37 DVD Subtitle 37 DVD Menu 37 DVD Title 38 DVD DSP 38 DVD Setup 40 Setup Menu 40 General Setup 40 aUDIO Setup 41 PREFERENCES 41 Regional Setting 43 Appendix A Cleaning 44 Cleaning the LCD Screen 44 cleaning the Enclosure 44 Appendix B Troubleshooting 44 Specifications 46 ...

Page 5: ... properly 11 Ensure the plugs are properly plugged in before operating the unit 12 Should the LCD panel break avoid contact with the broken glass or fluid leak ing out from the enclosure If you come into contact flush and clean the affected areas with plenty of water Seek medical attention immediately 13 When operating the display unit avoid touching or pressing on the LCD screen Excessive force w...

Page 6: ...ing pleasure The 10 4 Go Anywhere DVD TV system provides all the functions of a television as well as the functionality of a DVD player for your viewing pleasure in the car in the home or in your RV This system incorporates the use of on screen display menu controls that allows you to configure the system to suit your own personal preferences For your lis tening flexibility audio can be heard by f...

Page 7: ...layer DVD VCD CD MP3 JPEG formats 3 CATV Tuner 2 125 Channels VHF UHF 4 IR transmitter 5 Built in left and right stereo speakers 6 Wireless FM Transmitter 7 Two wired headphone jacks 8 AC DC power adapters 9 Built in counter top stand 10 Built in wall mounting capability 11 Carrying Case In vehicle mounting case with straps ...

Page 8: ... the plug from the main socket for safety 4 Use accessories only from the unit manufacturer In case of the following remove power from the unit immediately 1 Plugs or cables are damaged 2 Foreign objects dropped inside the CD DVD slot 3 Unit is exposed to rain and or other liquids 4 Unit is unable to normally operate 5 The LCD screen is cracked or broken CAUTION RISK OF ELECTRIC SHOCK DO NOT OPEN ...

Page 9: ...en nt ts s A Ac cc ce es ss so or ri ie es s The following items are included with your system Remote Control User Manual 10 4 Bag Straps Wireless Headphone x 2 AC DC Adaptor AC Cable DC Power Plug AV Cable Battery x 4 BATTERY BATTERY BATTERY BATTERY ...

Page 10: ...nput 21 Audio R Input 22 Video Input 23 TV ANT 20 21 22 23 16 17 18 19 1 LCD Monitor 2 DVD CD MP3 Slot 3 Remote Sensor 4 IR Transmitter Sensor 5 Speakers 6 Volume Menu Up button 7 Volume Menu Down button 8 Mode button 9 On Off button 10 TV channel up button DVD Eject Button 11 TV channel down button DVD Play Pause Button 12 On Screen Display OSD menu button 13 Power Standby LED 14 Earphone jack 15...

Page 11: ...VD Zoom Button SETUP DVD Setting Button 1 2 3 4 5 6 7 8 9 10 11 12 13 19 20 21 22 23 24 25 26 27 28 29 30 31 32 33 34 35 14 15 16 17 18 POWER Power On Off MUTE Turn Off Volume MODE Selection Button Up Up Button SYS MENU System Main Menu Selection Button ENTER Enter save Button Left Left Button Down Down Button EJECT DVD Eject Button STOP DVD Stop Play Button PLAY PAUSE Play and Pause Button 1 2 3 ...

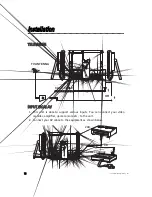
Page 12: ...EL LE EV VI IS SI IO ON N I IN NP PU UT T R RC CA A A AV V 1 This unit is able to support various inputs You can connect your video recorder amplifier game console etc to the unit 2 Connect your AV cable to the equipment as shown below VCR OR GAME CONSOLE TV ANTENNA CATV CABLE OR ...

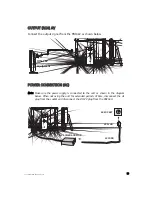
Page 13: ... ON NN NE EC CT TI IO ON N A AC C N No ot te e Make sure the power supply is connected to the unit as shown in the diagram below When not using the unit for extended periods of time disconnect the AC plug from the socket and disconnect the DC12V plug from the PB1040 AC SOCKET AC PLUG AC CORD AC POWER ADAPTOR 12VDC POWER INPUT Other AV equipment PB1040 ...

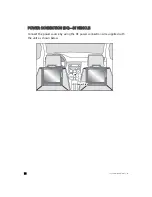
Page 14: ...cs Inc P PO OW WE ER R C CO ON NN NE EC CT TI IO ON N D DC C I IN N V VE EH HI IC CL LE E Connect the power source by using the DC power connection wire supplied with the unit as shown below DC Power Plug DC Power Plug DC Power Plug ...

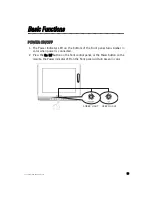
Page 15: ...R O ON N O OF FF F 1 The Power indicator LED on the bottom of the front panel turns Amber in color when power is connected 2 Press the O On n O Of ff f button on the front control panel or the Power button on the remote the Power indicator LED on the front panel will turn Green in color 4 6 4 0 6 ...

Page 16: ...e front con trol panel to select from the various mode settings 2 The mode setting status will change each time the M Mo od de e button is pressed A AV V1 1 C CH H D DV VD D V VO OL LU UM ME E Press the V Vo ol l buttons on the front control panel or the Volume buttons on the remote control to adjust the volume level AV1 CH DVD ...

Page 17: ...ns on the front panel or the V Vo ol lu um me e buttons on the remote control to restore sound to the speakers C CH HA AN NN NE EL L C CH HA AN NG GE E 1 Press the C CH H S SE ET T T S button on the remote control or the T S button front control panel to change television channels 2 Press the N Nu um me er ri ic ca al l buttons on the remote control to change select channels ...

Page 18: ...e shown on the screen press the L Le ef ft t R Ri ig gh ht t U Up p D Do ow wn n W X S T buttons on the remote control to select the chapter for playing press the E En nt te er r button on the remote to begin play If the message NO DISC is displayed on the screen check the format of the disc being used and ensure that the disc is being loaded with the label facing you see illustration above If the...

Page 19: ...ontrol 3 Press the E EN NT TE ER R button on the remote control the main menu option will display on the screen as shown below This allows you to memorize the stations into the LCD monitor 3 Use the Up Down T S buttons on the remote to select the memory num ber to be set maximum 15 4 Press the E EN NT TE ER R button on the remote control to return to viewing the TV channel This memory slot has now...

Page 20: ...which enables cus tomized settings for the following Press M ME EN NU U button on front control panel or the S Sy ys s M Me en nu u button on remote main menu options will to display the above menu on the TV screen The menu will remain displayed for 10 seconds unless there is a menu selection made SLEEP TIMER VIDEO ADJUST FM TRANSMITTER OTHERS EXIT MAIN MENU ...

Page 21: ...3 Press the V Vo ol l buttons on front control panel or the Left Right W X buttons on remote or to select the desired time setting of 30 60 90 120 minutes or OFF 4 Press the M ME EN NU U button on front control panel or the E En nt te er r button on remote to save the setting 5 Press the V Vo ol l buttons on the front control panel to highlight EXIT and press the M ME EN NU U button on the front c...

Page 22: ... A setting level bar is dis played at the bottom of the screen showing the present saturation setting 5 Press the M ME EN NU U button on front control panel or the E EN NT TE ER R button on remote the text of the selected option will now be highlighted in RED 6 Press the V Vo ol l buttons on front control panel or the Left Right W X buttons on remote to adjust the SATURATION Level 7 Press the M ME...

Page 23: ...is played at the bottom of the screen showing the present sharpness setting 5 Press the M ME EN NU U button on front control panel or the E EN NT TE ER R button on remote the text of the selected option will now be highlighted in RED 6 Press the V Vo ol l buttons on front control panel or the Left Right W X buttons on remote to adjust the SHARPNESS Level 7 Press the M ME EN NU U button on front co...

Page 24: ...is played at the bottom of the screen showing the present brightness setting 5 Press the M ME EN NU U button on front control panel or the E EN NT TE ER R button on remote the text of the selected option will now be highlighted in RED 6 Press the V Vo ol l buttons on front control panel or the Left Right W X buttons on remote to adjust the BRIGHTNESS Level 7 Press the M ME EN NU U button on front ...

Page 25: ... played at the bottom of the screen showing the present brightness setting 5 Press the M ME EN NU U button on front control panel or the E EN NT TE ER R button on remote the text of the selected option will now be highlighted in RED 6 Press the V Vo ol l buttons on front control panel or the Left Right W X buttons on remote to adjust the CONTRAST Level 7 Press the M ME EN NU U button on front cont...

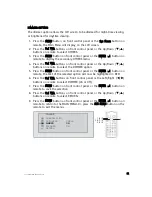
Page 26: ...ed at the bottom of the screen showing the present brightness setting 5 Press the M ME EN NU U button on front control panel or the E EN NT TE ER R button on remote the text of the selected option will now be highlighted in RED 6 Press the V Vo ol l buttons on front control panel or the Left Right W X buttons on remote to adjust the TINT Level 7 Press the M ME EN NU U button on front control panel...

Page 27: ...T option 5 Press the M ME EN NU U button on front control panel or the E EN NT TE ER R button on remote the text of the selected option will now be highlighted in RED 6 Press the V Vo ol l buttons on front control panel or the Left Right W X but tons on remote to reset the Video Adjustments to the factory preset levels 7 Press the M ME EN NU U button on front control panel or the E EN NT TE ER R b...

Page 28: ...emote to confirm the selection 4 Press the V Vo ol l buttons on front control panel or the Up Down T S buttons on remote to select the CH X option the text of the selected chan nel will be highlighted in BLUE 5 Press the M ME EN NU U button on front control panel or the E EN NT TE ER R button on remote the text of the selected option will now be highlighted in RED 6 Press the M ME EN NU U button o...

Page 29: ... CHANNEL SCAN will be highlighted in BLUE 4 Press the M ME EN NU U button on front control panel or the E EN NT TE ER R button on remote to for CHANNEL SCAN selection The selection will now be high lighted in RED 5 Press the V Vo ol l buttons on front control panel or the Left Right W X buttons on remote The LCD monitor will scan for TV channels available and store them to the systems memory Wait ...

Page 30: ...t the TV SOURCE option 6 Press the M ME EN NU U button on front control panel or the E EN NT TE ER R button on remote the text of the selected option will now be highlighted in RED 7 Press the V Vo ol l buttons on front control panel or the Left Right W X buttons on remote to select TV SOURCE cable or antenna 8 Press the M ME EN NU U button on front control panel or the E EN NT TE ER R button on r...

Page 31: ...Down T S buttons on remote to select the DIMMER option 5 Press the M ME EN NU U button on front control panel or the E EN NT TE ER R button on remote the text of the selected option will now be highlighted in RED 6 Press the V Vo ol l buttons on front control panel or the Left Right W X buttons on remote to select DIMMER On or Off 7 Press the M ME EN NU U button on front control panel or the E EN ...

Page 32: ...ote to select the SPEAKER option 5 Press the M ME EN NU U button on front control panel or the E EN NT TE ER R button on remote the text of the selected option will now be highlighted in RED 6 Press the V Vo ol l buttons on front control panel or the Left Right W X buttons on remote to select SPEAKER On or Off 7 Press the M ME EN NU U button on front control panel or the E EN NT TE ER R button on ...

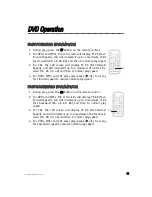
Page 33: ... 4X and then to normal play speed 4 For DVDs MP3s and CDs press play pause X from any fast forward speed to resume normal play speed F FA AS ST T B BA AC CK KW WA AR RD D D DV VD D M MP P3 3 C CD D 1 During play press the F FB B button on the remote control 2 For DVDs and MP3s the LCD screen will display FR XX Fast Forward Speed and will increment up to a maximum of 8X fast backward 2X 4X 6X 8X an...

Page 34: ... CD D P PR RE EV VI IO OU US S T TR RA AC CK K 1 During play press the previous T TR RA AC CK K button on the remote control 2 DVDs will jump to the the previous track or chapter The Title and Chapter being played will display at the top of the LCD screen 3 MP3s will jump to the the previous track 4 CDs will jump to the previous track The present track play ing and the total number of tracks on th...

Page 35: ...ton is pressed the DVD will start at the beginning N No ot te e Storage of the current location when stopped is not supported for MP3s or CDs D DV VD D M MP P3 3 C CD D S SE EA AR RC CH H N No ot te e Search is not supported for MP3s 1 Allows search for a particular Time Track Chapter 2 Press the SEARCH button on the remote control to go to a selected part of the DVD CD 1 TITLE xx xx CHAPTER xxx x...

Page 36: ...P FOLDER DISC DISC repeat DISC SCAN SINGLE or FOLDER are selectable by multiple presses of the R RE EP PE EA AT T 1 1 A AL LL L button 3 For DVDs press the R RE EP PE EA AT T 1 1 A AL LL L button on the remote control CHAPTER REPEAT TITLE REPEAT or REPEAT OFF are selectable by multiple presses of the R RE EP PE EA AT T 1 1 A AL LL L button Pressing the S SE EA AR RC CH H button on the remote contr...

Page 37: ...the LCD screen The first XX represents is the current subtitle playing The second XX is the total number of subtitles available along with the current subtitle language to be displayed 2 Continue to press the S SU UB BT TI IT TL LE E button to advance to the other subtitle languages 3 When the S SU UB BT TI IT TL LE E button is pressed beyond the maxi mum number of subtitles SUBTITLE OFF will disp...

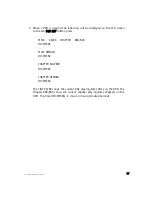
Page 38: ...the DVD MP3 or CD presently playing 1 When a CD is playing the following will be displayed on the LCD screen with each D DV VD D D DS SP P button press SINGLE ELAPSED XX XX MM SS SINGLE REMAIN XX XX MM SS TOTAL ELAPSED XX XX MM SS TOTAL REMAIN XX XX MM SS OFF The first XX represents the current track playing The second XX represents the total number of tracks on the CD MM SS represents the time in...

Page 39: ...D DS SP P button press TITLE XX XX CHAPTER XXX XXX HH MM SS TITLE REMAIN HH MM SS CHAPTER ELAPSED HH MM SS CHAPTER REMAIN HH MM SS The Title XX XX shows the current title playing total titles on the DVD The Chapter XXX XXX shows the current chapter playing total chapters on the DVD The time HH MM SS is shown in hours minutes seconds ...

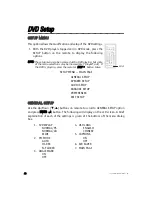
Page 40: ...he DVD is playing press the remote s S ST TO OP P button twice SETUP MENU MAIN PAGE GENERAL SETUP SPEAKER SETUP AUDIO SETUP KARAOKE SETUP PREFERENCES EXIT SETUP G GE EN NE ER RA AL L S SE ET TU UP P Use the Up Down T S buttons on remote to scroll to GENERAL SETUP option and press E EN NT TE ER R button The following will display on the LCD screen A brief explaination of each of the settings is giv...

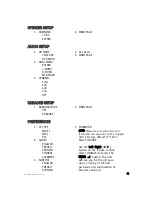
Page 41: ... PAGE OFF KARAOKE P PR RE EF FE ER RE EN NC CE ES S 1 TV TYPE 7 PASSWORD MULTI N NO OT TE E Make sure you write down and NTSC retain the new password Unit is shipped PAL with a factory default of 1234 2 AUDIO Select CHANGE ENGLISH FRENCH Use the L Le ef ft t R Ri ig gh ht t W X SPANISH button on the remote control CHINESE select CHANGE and press the JAPANESE E EN NT TE ER R button The unit 3 SUBTI...

Page 42: ...ith HONG KONG MP3s JAPAN 1 NO MENU TAIWAN 2 WITH MENU GBR 10 MAIN PAGE USA Return to SETUP MENU 6 PARENTAL 11 EXIT SETUP Use the Up Down T S buttons on remote to scroll to the parental restriction desired and press the E EN NT TE ER R button A dialog box will appear requesting the pass word The default password is 1234 Enter the password and press the E EN NT TE ER R but ton The parental levels ar...

Page 43: ...force when cleaning the enclosure A Ap pp pe en nd di ix x B B T Tr ro ou ub bl le es sh ho oo ot ti in ng g I If f t th he e u un ni it t f fa ai il ls s t to o o op pe er ra at te e n no or rm ma al ll ly y t tr ry y s so ol lv vi in ng g t th he e p pr ro ob bl le em ms s u us si in ng g t th he e p pr ro oc ce e d du ur re es s b be el lo ow w I If f t th he e p pr ro ob bl le em m p pe er rs ...

Page 44: ...s a Check that the power coming from the main socket is sufficient b Check that unit is not placed too near speakers or magnetic objects c Check to see that the unit settings are correct 5 Color patch on LCD screen Unevenness Ensure connections are correct 6 Horizontal dots on LCD screen Ensure connections are correct 7 No sound a Ensure that the mute function is off b Volume set too low increase ...

Page 45: ...inese Operating Voltage AC 110 230 VAC 50 60 Hz DC 9 14 VDC 4A IR Transmitter L 2 3 MHz R 2 8 MHz Effective angle of use 45 Effective range of use 13 feet 4 meters Remote Range 16 feet 5 meters TV Specification NTSC NTSC Japan PAL BG PAL I PAL DK DVD Player Single disc vertical loading DVD player supporting DVD MP3 CD JPEG VCD formats Accessories 1 10 4 carrying bag 2 User s manual 3 Remote contro...

Page 46: ...4 46 6 2004 Directed Electronics Inc ...

Page 47: ... 2004 Directed Electronics Inc 4 47 7 ...

Page 48: ...onsumers with the finest vehicle security car stereo products rear seat entertainment and accessories available The recipient of more than 20 patents in the field of advanced electronic technology Directed is ISO 9001 registered Quality Directed Electronics products are sold and serviced throughout North America and around the world Call 8 80 00 0 2 27 74 4 0 02 20 00 0 for more information about ...

Reviews: