background image

Operating Instructions

6. Installation instructions

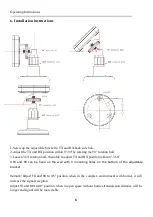
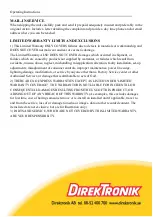
1.Screw up the adjustable bracket to TX and RX back side hole.
2.Adjust the TX and RX position within 0°-90°by rotating the 90° rotation ball.
3.Loosen 360° rotation ball, then able to adjust TX and RX position within 0°-360°

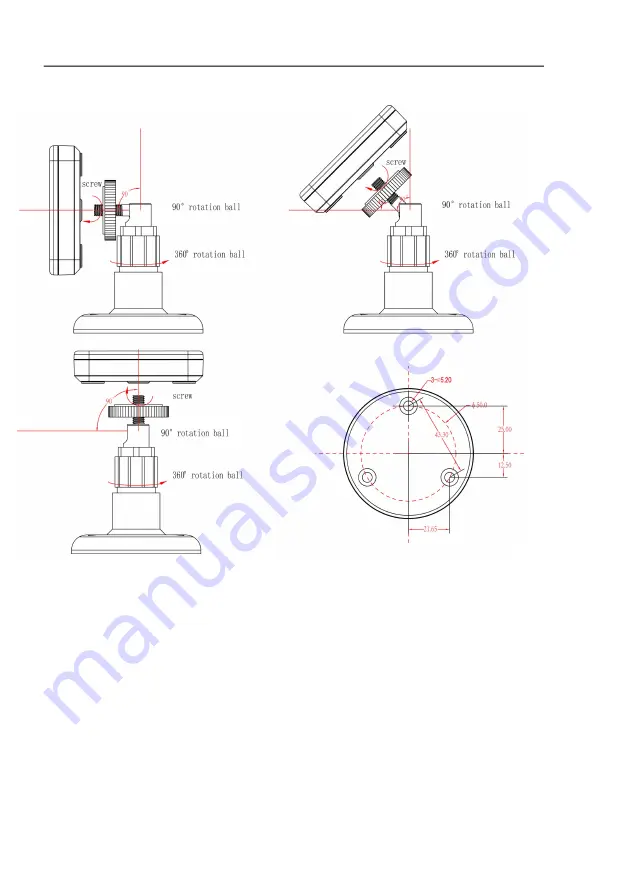
4.TX and RX can be fixed on the wall with 3 mounting holes on the bottom of the adjustable
bracket

Remark: Adjust TX and RX to 45

° position when in the complex environment with barrier, it will

increase the signal reception.

Adjust TX and RX to 90

° position when in open space without barrier,transmission distance will be

longer and signal will be more stable

6

Summary of Contents for 20102099

Page 1: ...30M HDMI Extender over 60GHz WIRELESS Support 4K 30Hz YUV 4 4 4 8Bit Best nr 20102099 ...

Page 2: ... recommendations in this document do not constitute the warranty of any kind express or implied 1 Features 60Ghz wireless extender Support the highest Resolution up to 4K 30Hz YUV 4 4 4 8bit Support the longest transmission distance to 10M wireless under 4K30HZ 30m under 1080P 60Hz with certain conditions like open space horizontal height of equipment etc Support HDCP1 4 compatible with HDCP2 2 Bl...

Page 3: ... Resolution outputs 4k 30hz 1080p 720p 480p Frequency 60GHz Frequency width 100MHz RF power 10dBm MAX Antenna Matrix style Antenna Audio format supported PCM 2 0 Dolby True HD DTS HD master audio Latency 3ms Power supply DC 5V 1A Power supply Power consumption 3 5W MAX Transmission Distance 10m under 4K 30Hz 30m under 1080P 60Hz Dimension L W H TX L80xW68xH16 5mm RX L80xW68xH16 5mm Net Weight TX 5...

Page 4: ...Instructions 4 PANEL DESCRIPTIONS Transmitter Panel HDMI input port DC 5V port Reset button Pairing button Signal indicator Receiver Panel HDMI input port DC 5V port Reset button Pairing button Signal indicator 4 ...

Page 5: ...uch as a Blu Ray Player game console STB etc to the HDMI input on the transmitter 2 Connect 1 display such as an HDTV or HD Projector to the HDMI output on the receiver 3 Power on the transmitter and receiver pairing TX and RX first then start working Connection Diagram 5 ...

Page 6: ...ball then able to adjust TX and RX position within 0 360 4 TX and RX can be fixed on the wall with 3 mounting holes on the bottom of the adjustable bracket Remark Adjust TX and RX to 45 position when in the complex environment with barrier it will increase the signal reception Adjust TX and RX to 90 position when in open space without barrier transmission distance will be longer and signal will be...

Page 7: ...n long press the reset button 5S to reset the device 3 Pairing button long press the pairing button on both TX and RX simultaneously about 6S until the data transmission indicator located in the middle of the panel goes out under one to many or many to one application able to switch between input and output by short press pairing button NOTED Under one to many mode when one channel output signal i...

Page 8: ...tes may result in fire electric shock or other hazards 4 Safety check After repairs or service ask the servicer to perform safety checks to confirm that the unit is in proper working condition WARRANTY If your product does not work properly because of a defect in materials or workmanship our Company referred to as the warrantor will for the length of the period indicated as below Parts 2 Year Labo...

Page 9: ...tion faulty installation set up adjustments misadjustment of consumer controls improper maintenance power line surge lightning damage modification or service by anyone other than a Factory Service center or other Authorized Servicer or damage that is attributable to acts of God 2 THERE ARE NO EXPRESS WARRANTIES EXCEPT AS LISTED UNDER LIMITED WARRANTY COVERAGE THE WARRANTOR IS NOT LIABLE FOR INCIDE...

Reviews: