background image

2

3

Inspired by

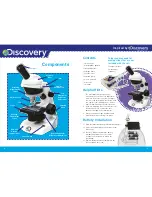
1 x microscope
1 x smartphone adapter
2 x prepared slides
10 x blank slides
12 x slide covers
12 x blank labels
2 x collecting vials
1 x tweezers
1 x manual

Contents

1.  The most important parts of your 

microscope are the lenses. Handle them 

with care. If the lenses are dirty or dusty 

you can clean them with a soft cotton cloth 

or a special lens-cleaning tissue. Do not 

wipe them with a finger or a facial tissue.

2.   If you are not going to use your microscope 

for a week or more, remove the three 

batteries that power the illuminators.

3.   Protect your microscope from dust and 

moisture by always storing it in its box.

Helpful Hints

1)   Read the important battery information on page 7.
2)  Unscrew the battery door on the base of the 

microscope.

3)  Insert 3 x AAA as shown in the battery 

compartment. Make sure the + and – 

terminals on the batteries match the 

illustration.

4)  Replace the battery door, taking care not 

to over-tighten the screw. 

Battery Installation

Transparent glue
Coloured dye 

(optional)

Things you may need for 

making slides that are not 

included with this set:

Components

Eyepiece

Eyepiece

Base

Eyepiece

Position Lock

Top

Illuminator

Brightness

Adjustment

Bottom Illuminator

Brightness Adjustment

Focusing

Knob

Power Switch

Base with

Battery

Compartment

Rotating

Colour/Light

Filter

Stage

Clip

Objective Lens

Revolving

Magnification

Turret

Arm

Summary of Contents for TDK26

Page 1: ...ssed out wheelie bin symbol is to remind us that most electrical product and batteries contain trace elements which could be harmful to our environment and therefore our health We must all be careful to dispose of them responsibly in a specifically designated way either using a collection scheme or into the correctly labelled civic amenity NOT into general waste this will help your local authority...

Page 2: ...dust and moisture by always storing it in its box Helpful Hints 1 Read the important battery information on page 7 2 Unscrew the battery door on the base of the microscope 3 Insert 3 x AAA as shown in the battery compartment Make sure the and terminals on the batteries match the illustration 4 Replace the battery door taking care not to over tighten the screw Battery Installation Transparent glue ...

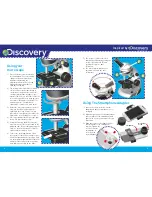
Page 3: ...slide A coloured filter heightens the contrast of colour prepared slides A range of light aperture hole sizes is available to alter the focus of the light When the large aperture is used the slide appears very bright The smallest aperture is helpful when examining a certain area in more detail 3 Rotate the lens turret until the shortest objective lens 60X aligns with the opening in the stage it wi...

Page 4: ...TRUCTIONS ON DYE BOTTLES WHEN USING DYES ADULT SUPERVISION IS ESSENTIAL more clearly Methylene blue dye not included can be obtained from an aquarium supply store How To Prepare A Slide Using The Smartphone Adaptor cont 1 Start with a clean slide and slide cover Make sure your hands are clean and dry when handling the slide covers 2 Follow Steps 2 and 3 as before 3 Before placing the slide cover o...

Reviews: