background image

Do not drop an object on or apply impact to the product. Do not throw any toys or

objects at the product.

It can cause injury to humans, problems to the product and damage the

display.

Keep out of reach of children and do not place toys near the product.

Make sure the product ventilation hole is not blocked. Install the product more than

100 mm (3.9 inches)  from the wall.

If you install the product too close to the wall,

it may be deformed or fire can break out due to internal heat build-up.

Do not cover the product with cloth or other material (e.g., plastic) while plugged

in.

The product can be deformed or fire can break out due to internal

overheating.

Place the product on a flat and stable surface that is large enough to support the

product.

If the product is dropped, you may be injured or the product may be broken.

Install the product where no electromagnetic interference occurs.

Keep the product away from direct sunlight.

The product can be damaged.

Do not place the product on the floor.

Small children and others may trip over it.

Do not install this product on a wall if it could be exposed to oil or oil mist.

This may damage the product and cause it to fall.

For displays with glossy bezels the user should consider the placement of the

display as the bezel may cause disturbing reflections from surrounding light and

bright surfaces.

Precautions

 in Moving the Product

Make sure to turn off the product.

You may be electrocuted or the product can be damaged.

Make sure to remove all cables before moving the product.

You may be electrocuted or the product can be damaged.

When lifting or moving the product, do not hold it upside down while holding only

the stand.

This may cause the product to fall resulting in damage or injury.

Do not shock the product when moving it.

You may be electrocuted or the product can be damaged

Make sure the panel faces forward and hold it with both hands to move.

If you drop the product, the damaged product can cause electric shock or fire.

Do not place the product face down.

This may damage the TFT-LCD screen.

6

Summary of Contents for VW22WL49

Page 1: ... Manual Displays2Go Part Numbers VWTV49PL Single Screen VW22WL49 2x2 Bundle Ver 08 18 Scan QR code to visit the product page If you have any questions regarding our products please visit us at www displays2go com or contact D2G customer service at 844 221 3393 ...

Page 2: ...andard 3 2 3 Electrified inspection 9 3 Installation 10 3 1 Attentions 10 3 2 Video Wall Unit Installation 11 4 Display System 13 4 1 Screen Splicing Setting 13 4 1 1 Control cable connection 13 4 1 2 Remote Control Setting 14 5 Cleaning Instruction 17 5 1 Cleaning screen 17 5 2 Cleaning housing 17 6 Maintenance and troubleshooting 18 7 Technical Specifications 22 ...
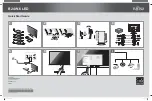
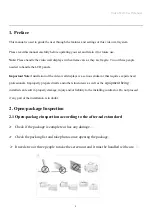
Page 3: ...wall displays is a serious endeavor that requires experienced professionals Improperly prepared walls and other structuresw as well as the equipment being installed can result in property damage injury and or liability to the installing contractor Do not proceed if any part of the installation is in doubt 2 Open package Inspection 2 1 Open package inspection according to the after sale standard Ch...

Page 4: ...therwise the product can be damaged fire can occur or you may be electrocuted If you are not sure what type of power supply you have consult a certified electrician In the presence of thunder and lightning never touch the power cord and signal cable because it can be very dangerous It can cause electric shock Do not connect several extension cords electrical appliances or electrical heaters to a s...

Page 5: ...cal shock fire malfunction or deformation may occur Keep the packing anti moisture material or vinyl packing out of the reach of children Anti moisture material is harmful if swallowed If swallowed by mistake force the patient to vomit and visit the nearest hospital Additionally vinyl packing can cause suffocation Keep it out of the reach of children Do not put heavy objects on the product on sit ...

Page 6: ...ight The product can be damaged Do not place the product on the floor Small children and others may trip over it Do not install this product on a wall if it could be exposed to oil or oil mist This may damage the product and cause it to fall For displays with glossy bezels the user should consider the placement of the display as the bezel may cause disturbing reflections from surrounding light and...

Page 7: ...is a danger of explosion or fire Keep the product clean at all times Take a comfortable and natural position when working with the product Take a regular break when working with the product for a long time Do not press on the panel with a hand or sharp object such as nail pencil or pen or make a scratch on it Keep proper distance from the product and rest from time to time Your vision may be impai...

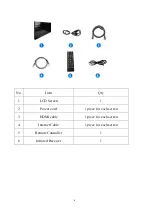
Page 8: ...No Item Qty 1 LCD Screen 1 2 Power cord 1 piece for each screen 3 HDMI cable 1 piece for each screen 4 Internet Cable 1 piece for each screen 5 Remote Controller 1 6 Infrared Receiver 1 8 ...

Page 9: ...carry on the electrified inspection Note Put the screen on a protected flat surface with the screen facing upwards The inspection steps are as follows Step 1 Press the Menu on the remote control then press 8202 to enter the factory menu Step 2 Select other setting to enter the white pattern Step 3 Select the RGB to check if the screen works well ...

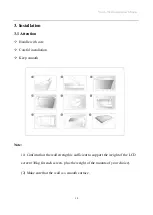
Page 10: ...ntion Handle with care Careful installation Keep smooth Note 1 Confirm that the wall strength is sufficient to support the weight of the LCD screen 30kg for each screen plus the weight of the mounts of your choice 2 Make sure that the wall is a smooth surface ...

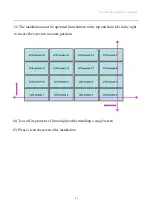
Page 11: ...t Please refer to the instruction sheet of the video wall mount of your choice to install 3 2 1 Video Wall Unit Installation It needs two or three people to lift the screen up to the bracket and one person to install the screen 2 Prevent the screen from hard objects and ensure that the gap between both screens is about 0 5mm ...

Page 12: ... installation must be operated from bottom to the top and from left to the right to ensure the screen in accurate position 4 Tear off its protective film and glue after installing a single screen 5 Please clean the screen after installation ...

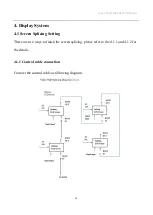
Page 13: ...al 13 4 Display System 4 1 Screen Splicing Setting There are two ways to finish the screen splicing please refer to the 4 1 1 and 4 1 2 for the details 4 1 1 Control cable connection Connect the control cable as following diagram ...

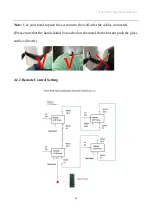
Page 14: ...on Manual 14 Note Use your hand to push the screen into the wall after the cables connected Please note that the hand should be touched on the metal frame but not push the glass surface directly 4 1 2 Remote Control Setting ...

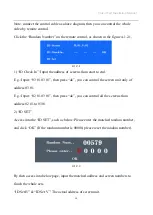
Page 15: ... E g Input 02 01 03 01 then press ok you can control all the screens from address 02 01 to 03 01 2 ID SET Access into the ID SET such as below Please enter the matched random number and click OK If the random number is 00000 please reset the random number 4 1 2 2 By then access into below page input the matched address and screen numbers to finish the whole sets ID Set H ID Set V The actual addres...

Page 16: ...l amounts of the video wall ID Set H Setting the horizontal position of the current screen ID Set V Setting the vertical position of the current screen Wall H Units Setting the total number of rows of LCD Wall Wall V Units Setting the total number of columns of LCD Wall ...

Page 17: ... use spray cleaner This may remove the coating or cause the device failure 5 2 Cleaning housing Do not use benzene thinner and other chemical products to wipe the housing Do not spray volatile solutions on the housing such as pesticides Do not use chemical fiber cloth detergent or wax the composition may cause the housing cracking and deformation Use a non shrink cloth to clean the screen housing ...

Page 18: ...line to ensure that the connection is reasonable 2 Ensure that the relevant peripheral power is turned on 3 Make sure that the selected input option matches the input signal Remote control Failure Solution 1 Ensure that the battery is without leakage 2 Ensure that the remote control is in the operating range 3 Make sure the remote control points to the remote control window of the display 4 Make s...

Page 19: ... all settings such as brightness contrast color etc are adjusted properly 2 For more information on video settings please refer to the product manual introduction The screen position or size is incorrect Solution 1 Make sure to adjust the screen position and size to a reasonable extent 2 According to automatic phase adjustment Image or color is incorrect Solution 1 Make sure the signal cable is co...

Page 20: ...t signal Cannot display the entire screen Solution 1 Address code error 2 Check RS232 control cable connection 3 Check digital DVI video cable connection 4 Check if the signal cable connection is wrong Blue screen Solution 1 Check if the video channel is correct 2 Check if the signal cable is well connected 3 NO Signal Input Blurred screen Solution ...

Page 21: ...ell connected 2 LCD screen failure LCD unit has no power black screen Solution 1 Check if the power plug socket and cable are well connected 2 Check if the switch OSD button or remote control is in the state of power on 3 Check if the drive board is in good condition ...

Page 22: ...ply Voltage 100V 240V 50 60Hz 180W Standby power Watt TBD Environment Operating temperature C 0 40 C Storage temperature C 10 60 C Storage humidity 10 60 RH Non condensing Operating humidity 20 85 RH Non condensing Maximum operating time hrs day 24 hours Functions Operating system N A Processor N A N A Built in memory N A Decoding resolution 1080P FHD compatible Playback mode N A Compatible networ...

Page 23: ... RJ45 HDMI 1 VGA DVI 1 USB 1 SIM 0 Structure Net weight 24 Gross weight Unit dimensions W D H Package dimensions W D H Shell material SPCC Shell color Black Language OSD English 32 1077 6 115 5 607 8 1270 250 900 23 ...

Reviews: