Chapter 2: Installation
Operation Manual: VIP 4400 Vessel Washer
2-2
Unpacking
The VIP 4400 is shipped on a pallet. The unit and cardboard box are strapped
to the pallet. The following steps describe how to unpack the instrument:
1.
Cut the straps holding the box to the pallet.
2.
Lift the box straight off the unit.
3.
Cut the strap holding the unit to the pallet.
4.
Unlock the two rear casters.
5.
Lift unit off the pallet.
System Setup
After the instrument has been removed from its shipping box, follow these
remaining steps:
1.
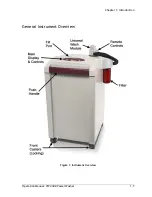
Open the top cover by removing the two front screws.
2.
Insert the overflow vessel into the top of the waste tank. The waste
tank is the larger tank located in the back of the unit. There is a black
gasket on the right hand side. Insert the overflow vessel into the hole in
the gasket.
3.
Remove the wash handle, shaft rinse (if applicable) from inside the
instrument and close the top cover.
4.
Insert the wash handle into the holder located on the top cover.
5.
Insert the shaft rinse handle into the clip located on the right hand side
panel.
6.
Re-insert the 2 screws for the top cover.
Installation Checkout
Your instrument has been tested thoroughly prior to shipment. To detect any
problems caused by shipping and handling, Distek recommends a careful check
of all crucial operating functions after completing the installation of the VIP
4400.
This check should include, at a minimum:
•
Filling up the rinse tank
•
Testing the heater, if applicable
•
Performing a light, medium & heavy wash
•
Emptying the waste tank


