background image

Instruções de Montagem

Assembly Instructions / Instrucciones de Montaje

BBI-41

01

02

03

01

02

02

01

01

A

A

G

G

H

H

G

G

H

H

A

A

01

L

L

L

L

L

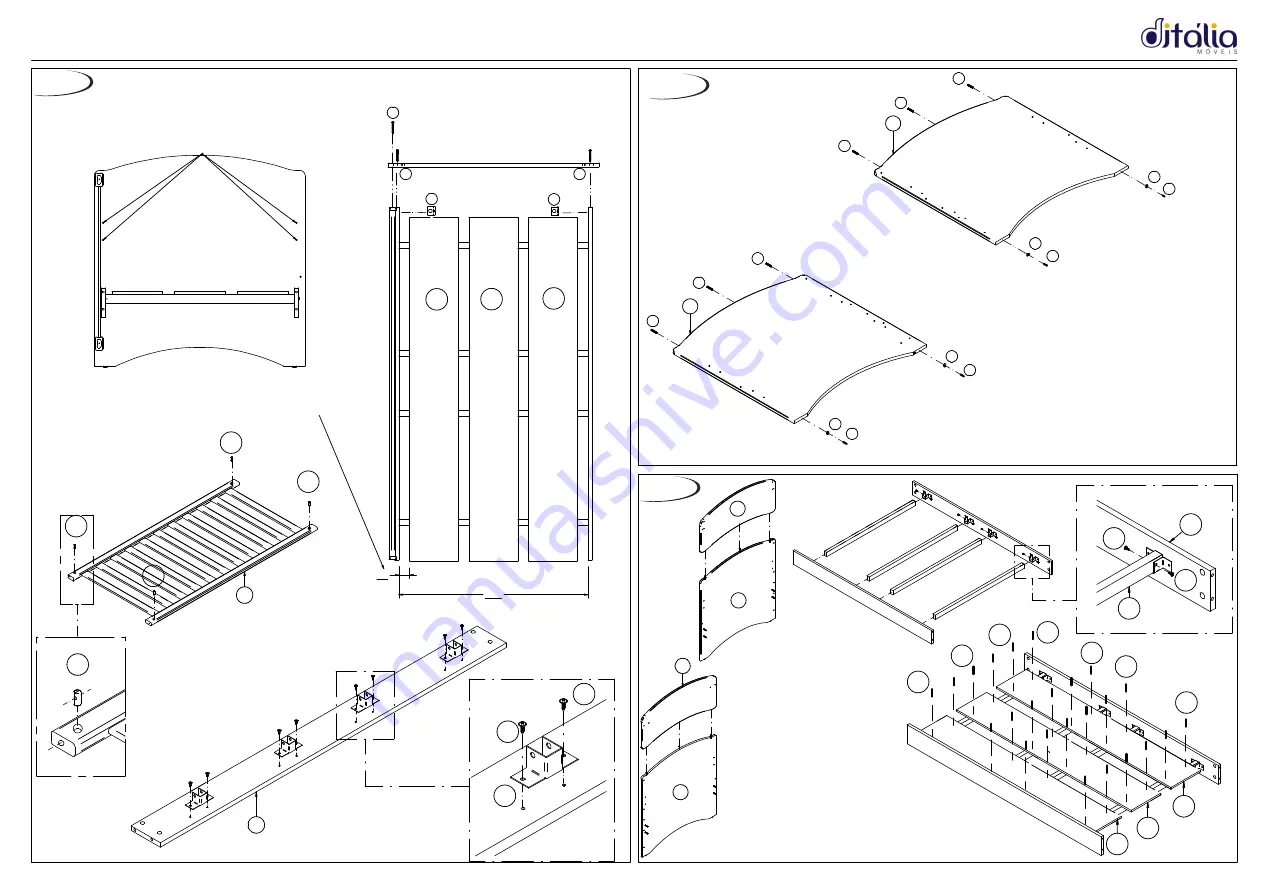
Obs.: Escolher opção de altura do
lastro a partir das furações indicadas.

Alinhar furação da porca "L"
com furação da grade "4"

Junção das cabeceiras.

Fixar sapatas "G" com pregos "H"na
parte inferior das cabeceiras "01".

Fixar cavilhas "A"

Deixar espaçamento de, no máximo 20mm entre lastros e

extremidades do berço.

D

D

K

D

D

05

03

A

A

04

03

Obs.: Elija la opción altura del lastre de los
agujeros indicados.

Obs.: Choose option height of the ballast
from the holes indicated.

Leave 20mm spacing between ballasts and ends of the crib.

Deje espacio entre 20mm entre lastres y los extremos de la cuna

Align hole nut "L"
with drilling grid "4".

Alinear tuerca agujero "L"
con perforación grid "4".

Attach feet "G" to the headboards 01
using nail "H"

Fijar zapatos "G" con clavo "H" en la parte
inferior de la cabecera del "01".

Fasten peg "A"
Fijar clavija "A"

Junction of headboards.

Unión de cabecera.

I

I

J

J

690

I

20

06

06

06

H

H

H

H

H

H

H

06

06

06

Summary of Contents for BBI-41

Page 1: ... b Only use the cradle when fully assembled in accordance with the Manual guidelines and instructions after certifying that their locking systems are properly operated c The cradle DVE be placed on a horizontal floor d The lowest position is the safest and the base must always be used nesa position as soon as the baby is old enough to sit e mounting connections must always be properly tightened an...

Page 2: ...tremidades do berço D D K D D 05 03 A A 04 03 Obs Elija la opción altura del lastre de los agujeros indicados Obs Choose option height of the ballast from the holes indicated Leave 20mm spacing between ballasts and ends of the crib Deje espacio entre 20mm entre lastres y los extremos de la cuna Align hole nut L with drilling grid 4 Alinear tuerca agujero L con perforación grid 4 Attach feet G to t...

Page 3: ...e de colchón Attach on both sides using screws I Coloque en ambos lados con tornillos I Mosquito net support option M Opción Mosquito M Mini Bed assembly option Opción de montaje de la Mini Cama Baby Sofa assembly option Opción de montaje del Sofá Utilizar colchão de 130x70x12cm Densidade Mínima D18 Montar o berço de modo que o selo de conformidade do produto fique na parte externa do berço 02 J J...

Page 4: ...ence of external agents that are able to influence its conservation may affect the warranty termination Exposure to sunlight or excessive heat may cause alterations to the original color of the product this is the reason why the color alteration of the original product is not covered by any warranty Closing Remarks The warranty must be requested during the period indicated in item 2 1 herein state...

Reviews: