background image

2015006.1

USER’S MANUAL

Revision: 1

VersaGateway

Covered Models:

VCG-E-C-G

VCG-E-C-X

VCG-E-X-G

VCG-E-X-X

Divelbiss Corporation

9778 Mt. Gilead Road, 

Fredericktown, Ohio 43019

Toll Free:  1-800-245-2327

Web:  http://www.divelbiss.com

E-mail: sales@divelbiss.com

Based on P-Series PLC on a Chip

VCG-W-C-G 

VCG-W-C-X

VCG-W-X-G

VCG-W-X-X

Summary of Contents for VCG-E-C-G

Page 1: ...els VCG E C G VCG E C X VCG E X G VCG E X X Divelbiss Corporation 9778 Mt Gilead Road Fredericktown Ohio 43019 Toll Free 1 800 245 2327 Web http www divelbiss com E mail sales divelbiss com Based on P Series PLC on a Chip VCG W C G VCG W C X VCG W X G VCG W X X ...

Page 2: ...ng 9 Configuration Jumpers Switches 9 Device Features Input Power 12 Programming Port 12 User Programmable Switch 12 Status LED Indicators 13 Programmable LED Indicators 13 CAN Port 0 13 CAN Port 1 NMEA COMPLIANT 16 Ethernet Port 19 Modbus TCP 21 WI FI Option 22 Serial Ports COM 2 COM 3 23 Modbus Master Slave COM Port 26 Serial Print Option COM Port 27 SD Card Features 28 EEPROM Memory ON CHIP 30 ...

Page 3: ... and con trol from any smart device such as computer smartphone or tablet This VersaGateway User Manual is intended to provide the basics and information for accessing the VersaGateway hardware specific features As the VersaGateway programs using EZ LADDER Toolkit as the programming platform ladder diagram function block and Structured Text the VersaGateway User Manual should be used in conjunctio...

Page 4: ...ct to Change without Notice WARNING The VersaGateway must not be used in applications which could be hazardous to personnel in the event of failure of this device Precautions must be taken by the user to provide mechanical and or electrical safeguards external to this device This device is NOT APPROVED for domestic or human medical use This section explains how to read this manual and understand t...

Page 5: ...ble RS232 RS485 Support Custom drivers and Modbus Master Slave 1 Analog Input for monitoring the on board battery voltage Five Programmable LEDs Power Monitor LED and Status Watchdog LED Real Time Clock Retentive Memory and EEPROM Storage Quick Connect Terminal Blocks WI FI supporting Modbus TCP and VersaCloud M2M Cellular Modem Data using VersaCloud M2M GPS Locations 512K Battery Backed S RAM Som...

Page 6: ...he Devices pane will update with the currently selected features for the VersaGateway The ADD DE VICE button is used to install and configure additional features such as Modbus or J1939 that are not automatically loaded and configured For this example we will not add additional features at this time These features may be installed and configured by re visiting this window 4 Click OK This will clos...

Page 7: ...re existing program for the VersaGateway Device EZ LADDER Toolkit includes a sub directory EZ LADDER Kernel Install Start Programs which has starter programs for each target to load the kernel Choose GetStarted_VCG X X X dld where X X X is the model of VersaGateway device 4 Click the Compile button 5 Click the Monitor button to change from the Edit to Monitor Mode 6 Click the Connect button to con...

Page 8: ...Manual Document 2015006 1 pdf PAGE 7 of 44 Divelbiss Corporation 9778 Mt Gilead Road Fredericktown Ohio 43019 1 800 245 2327 www divelbiss com Getting Started Figure 1 4 Bootloader Update Target Figure 1 3 Browse to Kernel ...

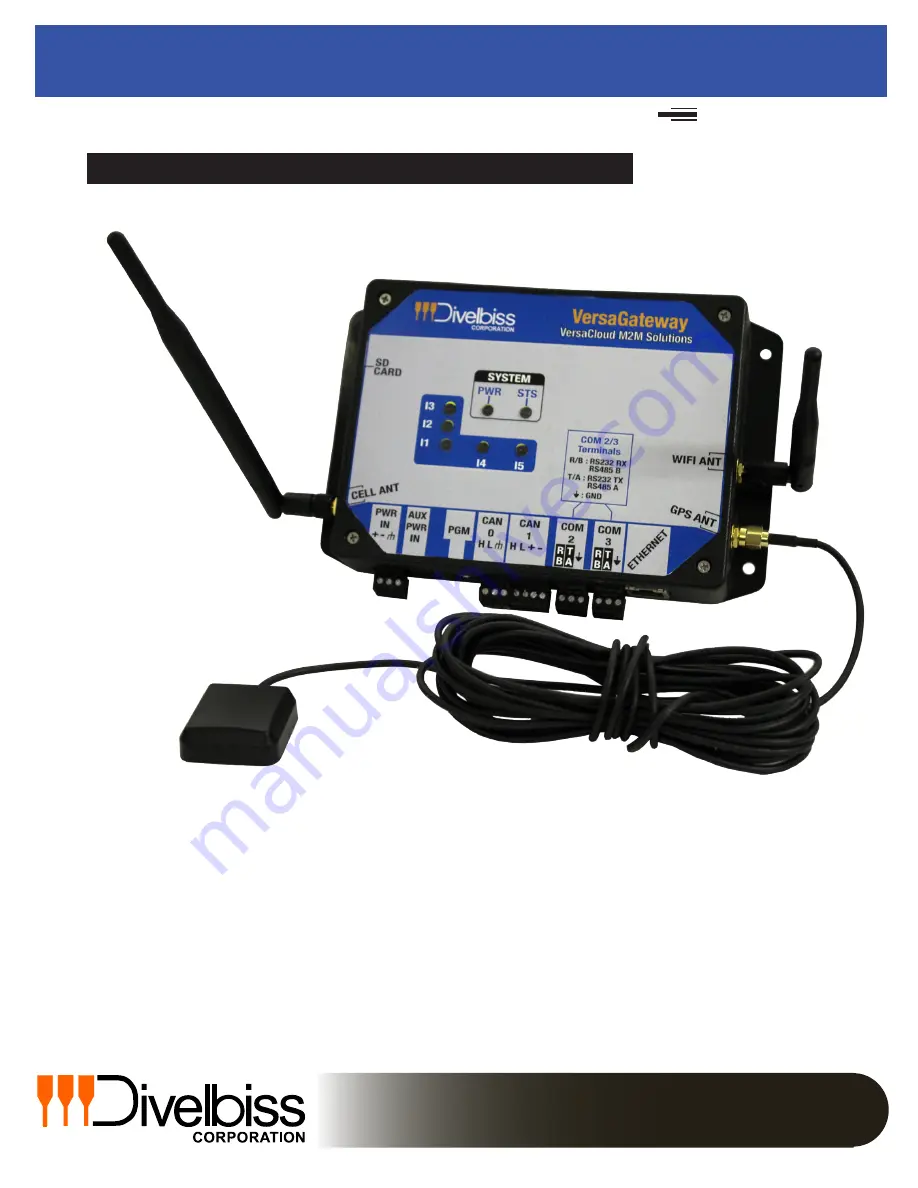
Page 9: ...on jumpers Figure 1 5 illustrates the VersaGateway device and it s standard features shown with cover removed 1 Main Input Power Terminal Block 2 Aux Input Power Jack 3 EZ LADDER Toolkit Programming Port 4 Watchdog Status LED Power Status LEDs 5 Ethernet Port model dependent 6 User Programmable LED Indicators x 5 7 CAN 0 Port Terminal Block 8 CAN 1 NMEA Compliant Port Terminal Block 9 COM2 Serial ...

Page 10: ...on board switches and jumpers shunts Refer to Figure 1 5 for general switch and jumper locations Each of these switches and jumpers with their specific operational characteristics is detailed in later sections of this manual Please refer to these sections before changing switch or jumper settings CONFIGURATION SWITCHES SUMMARY SWITCH ID SWITCH to ON Position 2 Positions SWITCH to OFF Position 2 Po...

Page 11: ...talled Pin 3 5 COM2 Configured for RS485 Shunt installed Pin 2 4 COM3 Configured for RS232 Shunt installed Pin 4 6 COM3 Configured for RS485 CP1 Shunt installed Pins 1 2 CAN Port 1 External Power Source 9 32VDC Shunt installed Pins 2 3 CAN Port 1 External Power Source 5VDC Shunts installed Pin 1 2 3 4 CAN Port 1 Internal on board Power Source CP2 Shunt installed Pins 1 2 CAN Port 1 Internal Power ...

Page 12: ...This sections explains the VersaGateway Device features and functions and provides hints and important information for configuring and using the VersaGateway Device Features ...

Page 13: ...m MATING PLUG Jack Insertion Depth 9 0 mm Programming Port As the VersaGateway must be programmed with a ladder diagram function block and structured text program to operate it must be programmed using EZ LADDER Toolkit via the programming port Item 3 The VersaGateway require a programming cable to connect the device to a computer with EZ LADDER Toolkit The programming cable is a standard 9 pin d ...

Page 14: ...ault indication would be required There are five 5 user programmable LED indicators 4 Green 1 Red on the VersaGateway These LED indicators are available for use in the ladder diagram program for any purpose Refer to Figure 1 5 for the LED indicator locations When the VersaGateway is selected as the target in EZ LADDER Toolkit the programmable user LED indicators are automatically added and boolean...

Page 15: ...nated using the terminat ing resistors The terminator is configured using an on board configuration Jumper JMP14 Refer to Figure 1 5 for general location of the JMP14 configuration jumper Refer to Figure 2 2 for JMP 14 Pin 1 location CAN PORT 0 TERMINATOR JUMPER Jumper ID Shunt Installation Description JMP14 Shunt installed Pins 1 2 CAN Port 0 Terminating Resistor Disabled Shunt installed Pins 2 3...

Page 16: ... the Project Settings Window Select VersaGateway as the target from the choices 2 Click the PROPERTIES button to the right side of the window The VersaGateway Properties Window will open Make sure the proper model VCG X X X is selected in the drop down menu 3 If CAN0 were installed it would appear under the Bus CAN heading as CAN0 Click the ADD DEVICE button The PLCHIP PXX Devices window will open...

Page 17: ...ice of external supply voltage These options are all configured using on board jumpers Refer to Figure 1 5 for the location of the configuration jumpers Refer to the JUMPER CONFIGURATION SETTINGS later in this section CAN PORT 1 CONNECTIONS CAN port 1 is connected using the terminal block labeled CAN1 Item 8 Refer to Figure 2 6 for an example CAN bus connected to CAN 1 and termination locations CA...

Page 18: ... if configured for external power These options are all configured using on board jumpers Refer to Figure 1 5 for the location of the configuration jumpers Refer to Figure 1 5 for CAN Port Jumpers CP1 CP2 Refer to Figure 2 7 for Pin 1 Locations of CP1 and CP2 Both CP1 and CP2 Jumper blocks must be configured for CAN port 1 to be completely configured CAN PORT 1 CONFIGURATION JUMPERS Jumper ID Shun...

Page 19: ...ide of the window The VersaGateway Properties Window will open Make sure the proper model VCG X X X is selected in the drop down menu 3 If CAN1 were installed it would appear under the Bus CAN heading as CAN1 Click the ADD DEVICE button The PLCHIP PXX Devices window will open 4 Locate CAN1 in the Devices pane Click to select highlight CAN1 Refer to Figure 2 8 Click OK 5 You will now see CAN1 liste...

Page 20: ...ess the Bootloader 1 Verify the target has been configured see Configuring the VersaGateway Target in EZ LADDER Toolkit 2 Connect the Programming cable SI PGM from the computer to the VersaGateway s programming port PGM See Programming Port in the Devices Features section 3 Create a small one rung program with a normally open direct contact and an output tied together You may also open a pre exist...

Page 21: ...ired In addition to Modbus TCP and Programming the Ethernet port may operate as a VersaCloud connection Refer to the VersaCloud M2M Connectivity section of this manual for more details With the Ethernet Bootloader configuration complete to use Modbus TCP or VersaCloud connections over Ethernet the Ethernet Device must be installed in the EZ LADDER diagram project and configured In EZ LADDER Toolki...

Page 22: ... Set the Number of TCP Sockets The default is 1 For Modbus Master set the Response Timeout ms Click OK the number of times required to save the Modbus Settings and return to the EDIT workspace Remember to Save your lad der diagram using the menu FILE and SAVE or SAVE AS Modbus TCP Figure 2 12 Add Modbus Master Slave The Ethernet is now configured in the Project Settings It is ready to be used in t...

Page 23: ... the antenna in this method will require additional cables and a bulk head fitting not included Refer to Figure 2 15 for mounting method examples When mounting antennas Antennas must be electrically isolated from panel ground common If not isolated damage to the VersaGateway device will result When using multiple communication antennas Wi Fi Cellular sufficient spacing must be kept between them to...

Page 24: ...ectivity over Wi Fi see the VersaCloud M2M Connectivity Section of this manual Serial Ports COM 2 COM 3 The VersaGateway includes two general purpose RS232 RS485 Serial Ports COM2 and COM3 These port are each individually configurable as either RS232 or RS485 and are used for general communications including Modbus Master Modbus Slave or com munications to other devices using customized drivers st...

Page 25: ...ting resistor is disabled When the switch is on or closed the terminating resistor is enabled The terminating resistor should only be enabled on the ends of the communications bus and only for RS485 Failure to terminate the ends or incorrect terminations may result in communications loss or communications errors CONFIGURING SERIAL PORTS COM2 COM3 IN EZ LADDER TOOLKIT The Serial Ports must be insta...

Page 26: ...and enter the transmit and receive buffer size Refer to Figure 2 18 Click OK The UARTx Properties dialog will close 6 You will now see UART2 listed under the Bus Uart heading Click OK to close the VersaGateway s Properties 7 Click OK to close the Project Settings window 8 Save your ladder diagram using the menu FILE and SAVE or SAVE AS to save the current settings in your program Repeat these step...

Page 27: ...s Master or Modbus Slave from the choices Click OK The Modbus Slave or Modbus Master Properties window will open depending on the type of Modbus port you selected See Figure 2 20 Click the ADD button to open the Add Interface window For Modbus Slave see Figure 2 21 Select UART from the Interface Drop down select box Set the Slave ID This should be the network ID for this VersaGateway on the Modbus...

Page 28: ...s manual for details on installing the Serial Ports To use the VersaGateway Serial Ports for Serial Printing in EZ LADDER Toolkit from the File Menu at the top click PROJECT then SETTINGS This will open the Project Settings Window The VCG X X X was previously selected Click the PROPERTIES button The VersaGateway s Properties Window will open Under the Devices Internal section if Serial Print is in...

Page 29: ...gured to do so This configuration must be done in the Bootloader screen The Bootloader screen will only operate if EZ LADDER is connected to an actual VersaGateway Device The kernel will only update from the SD Card when the kernel name dat matches the unit to update and the version of the kernel on the SD CARD is newer The ladder diagram program will only update from the SD Card when the name hex...

Page 30: ...use the kernel to be updated to the kernel on the SD card if present This only occurs on the controller s power up Allow LD Updates When selected this box will cause the compiled Ladder Diagram Project to be updated to the Ladder Diagram Project on the SD card if present This only occurs on the device s power up 10 When all the SD Card features are configured click OK to save the settings of the S...

Page 31: ...KIT Before the PLC on a Chip on board EEPROM may be used in the ladder diagram it must be added to the program s target settings using the EZ LADDER Toolkit s Project Settings Menu 1 In EZ LADDER from the File Menu at the top click PROJECT then SETTINGS This will open the Project Settings Window Select VersaGateway as the target from the choices 2 Click the PROPERTIES button to the right side of t...

Page 32: ...ial care must be taken when mapping and using the EEPROM on board memory Refer to the P Series EZ LADDER Toolkit manual EEPROM MEMORY section for details on using the function blocks and how the memory is mapped including recommendations for controller where values are stored Figure 2 29 PLCHIP Pxx_eeprom Properties FRAM Retentive Memory The VersaGateway Devices support two types of on board non v...

Page 33: ...tes defaulted to 100 bytes Refer to Figure 2 30 Any bytes not configured for retentive may be used as EEPROM memory bytes displayed as Num User Bytes Do not select a different Part Number Verify it is configured for FM24CL04 only 5 Click OK to close the FM24xxx Properties dialog 6 Click OK to close the VersaGateway Properties 7 Save your ladder diagram using the menu FILE and SAVE or SAVE AS to sa...

Page 34: ...n on board analog input that monitors the on board battery voltage This analog input is provided for applications that wish to monitor the on board battery and optionally display or communicate its status The battery analog input is automatically installed when the VersaGateway device target is selected in the Project Settings Menu The analog input is represented as an integer with a range of 0 40...

Page 35: ... in configuring J1939 NMEA communications is a sample only Refer to the P Series EZ LADDER Toolkit Manual for more in depth information on configuring and using SAE J1939 and NMEA 2000 6 Click ADD From the drop down menu select the CAN port to use must have been installed prior to this step Refer to Figure 2 32 All the configuration parameters for the J1939 NMEA 2000 communications must be configu...

Page 36: ... integer boolean real and timer The OptiCAN network provides communications with error and status moni toring of the connected devices As OptiCAN utilizes the CAN port a CAN port must be installed prior to the installation and configuration OptiCAN For CAN port installation refer to the CAN Port 0 and CAN Port 1 NMEA Compliant Sections of this manual With a CAN port installed OptiCAN network must ...

Page 37: ...l for details on how the OptiCAN network functions how to implement it and how to use it 6 Enter the setup information for the OptiCAN network Refer to Figure 2 34 CAN Port Select the CAN Port to use the OptiCAN network on Node ID Network address ID for identify this equipment on the OptiCAN network Broadcast Rate Rate at which network registers are transmitted across the network when based on int...

Page 38: ...stalled before the GPS will be able to function Refer to Figure 1 5 Item 11 for the location of the Antenna plug in connection on the VersaGate way If the VersaGateway will be installed in an open air environment or an plastic fiberglass enclosure the antenna may be directly mounted to the VersaGateway Screw the antenna into position See Figure 1 5 Item 11 If the VersaGateway is to mounted in a me...

Page 39: ...X RS485 B T A RS232 TX RS485 A GND Terminals COM 2 3 R B T A R T B A Mounted in Metal Enclosure External Mounted Antenna Free Mounted Directly Mounted Antenna Use ISOLATED BULKHEAD ANTENNA CONNECTION CONFIGURING GPS IN EZ LADDER TOOLKIT 1 In EZ LADDER from the File Menu at the top click PROJECT then SETTINGS This will open the Project Settings Window Select VersaGateway as the target from the choi...

Page 40: ... and a bulk head fitting not included Refer to Figure 2 37 for mounting method examples When mounting antennas Antennas must be electrically isolated from panel ground common If not isolated damage to the VersaGateway device will result When using multiple communication antennas Wi Fi Cellular sufficient spacing must be kept between them to prevent interference between them If interference is susp...

Page 41: ... These are used in Structured text to control the cellular modems functionality turn on off etc Refer to the P Series EZ LADDER Toolkit for more detailed information regarding the Cellular data option and Structured Text Cellular Data functionality Structured text examples are available for download Figure 2 38 PLCHIP PXX Devices Cellular Figure 2 37 Antenna Mounting Options VersaCloud M2M Solutio...

Page 42: ...ng to local devices and systems using Modbus TCP Modbus Slave Modbus Master J1939 or NMEA 2000 it supports communication directly to VersaCloud M2M Portals Using VersaCloud connectivity the VersaGateway can communicate to VersaCloud Portals using the previously covered communications features including Ethernet Wi Fi and Cellular data Additional portal device and data charges may apply VersaCloud ...

Page 43: ... the Selected Interfaces Pane and clicking REMOVE will remove an interface from being available for VersaCloud communications Ethernet would be selected for Wi Fi models Generally the available interfaces are based on the model of the VersaGateway and they must have been previously installed Ethernet etc before they will be available here Refer to other sections of this manual for installing speci...

Page 44: ...information including available hardware portals and communications packages including availability and pricing Figure 2 41 VCLOUD Function Block Properties C Battery Backed up S RAM Memory The VersaGateway supports 4 1 Mbit Static RAM 512K integrated circuits S RAM ICs These four individual chips hold data on power loss as they alternately powered by the on board lithium battery This RAM is suite...

Page 45: ... 4095 LED Indicators 1 Power 1 Status Watchdog 5 User Programmable 4 Green 1 Red Communications Ports 1 Programming Port PGM 1 Ethernet Port RJ45 Programming Modbus TCP VersaCloud Model Dependent 2 Serial Ports Configurable RS232 RS485 Structured Text Modbus Master Modbus Slave 1 Wi Fi Connection Programming Modbus TCP VersaCloud Model Dependent 1 Cellular Data Modem VersaCloud Model Dependent 1 G...

Reviews: