MAIntenAnCe
38
V-belts
Check every 100 hours of operation. Check for severe
cracking and large nicks.
NOTE: The belt will show some small cracks in normal
operation.
The belts are not adjustable. Replace belts if they
begin to slip from wear.
Deck Belt
Park on a level surface. Apply parking brake.
1.
Lower the deck into the lowest cutting position.
2.
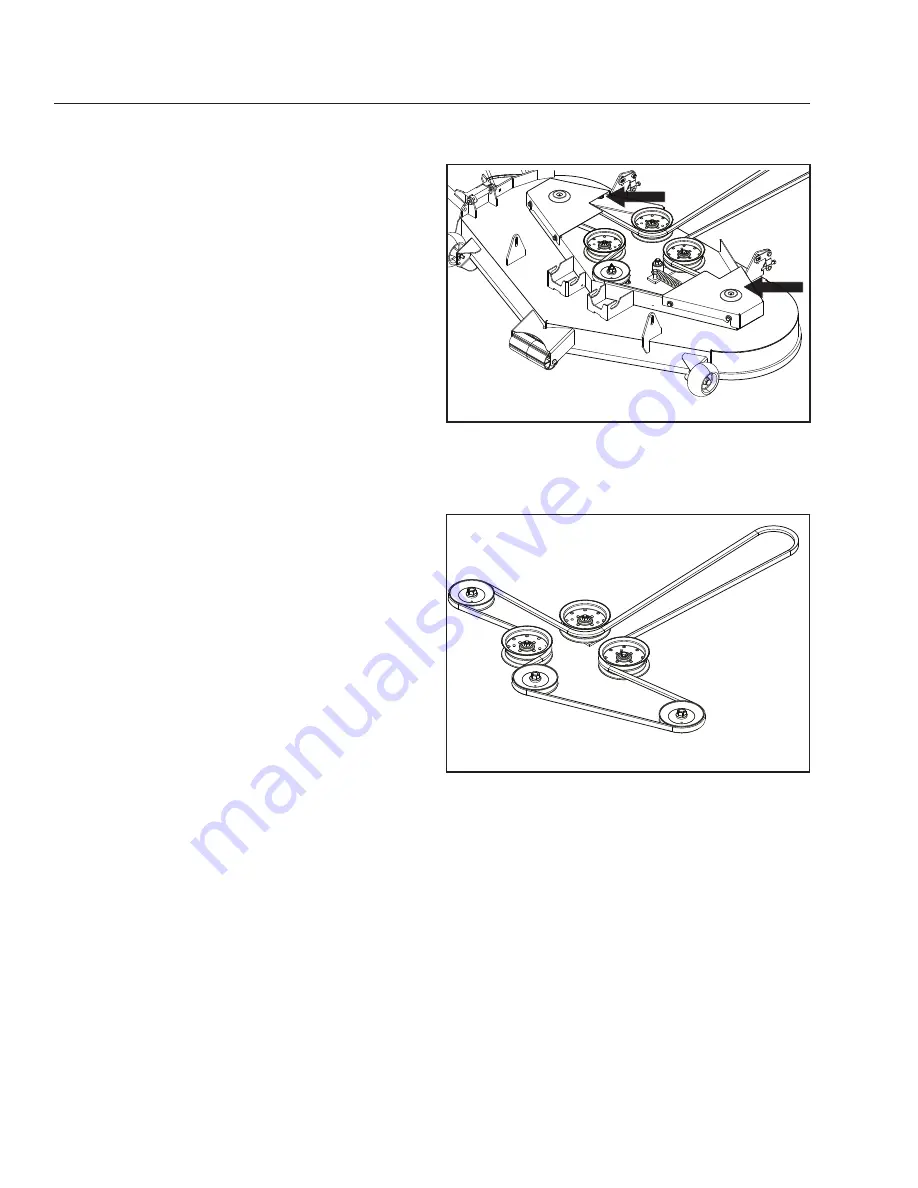
Remove bolts from belt shields and remove
3.
shields.
Remove any dirt or grass that may have
4.
accumulated around the cutter housings and
entire deck surface.
Carefully roll the belt over the top of the cutter
5.
housing pulleys and remove belt.
Deck Belt Installation
NOTE: For ease in installing the deck belt, refer to
the routing decal on bottom of seat.
Wrap the deck belt around the electric clutch
1.
pulley that is located on the engine shaft.
Route the belt forward between the EZT (E-Series
2.
Zeroturn Transaxles) and up onto the deck.
Place belt around spring loaded idler pulley.
3.
Wrap the belt around the stationary idler pulley
4.
and around the mandrel housings.
Push inward on the idler arm and carefully route
5.
belt over stationary idler pulley. Once belt is
properly routed, slowly release idler arm to tension
belt.
Double check belt routing to make sure it matches
6.
the routing decal, and the belt does not have any
twist. Correct as needed.
Adjust tension with deck eyebolt.
7.
Replace belt shields on both mandrel housings
8.
and secure with fasteners.
8050-843
Belt routing, deck belt
8050-842
Remove belt shields
Summary of Contents for 966985401
Page 50: ...50 SCHEMATIC 8053 002...
Page 60: ...60 SERVICE JOURNAL Action Date mtr reading stamp sign...
Page 61: ...61 SERVICE JOURNAL Action Date mtr reading stamp sign...
Page 62: ...62 SERVICE JOURNAL Action Date mtr reading stamp sign...
Page 63: ......
Page 64: ...P N 115 354727R1 01 06 10...


