background image

23

TO REPLACE HEADLIGHT BULB

• Raise 

hood.

•  Pull bulb holder out of the hole in the backside of the 

grill.

•  Replace bulb in holder and push bulb holder securely 

back into the hole in the backside of the grill.

• Close 

hood.

INTERLOCKS AND RELAYS

Loose or damaged wiring may cause your tractor to run 

poorly, stop running, or prevent it from starting.
• Check 

wiring. 

TO REPLACE FUSE

Replace with 20 amp automotive-type plug-in fuse.  The 

fuse holder is located behind the dash.

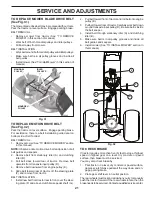
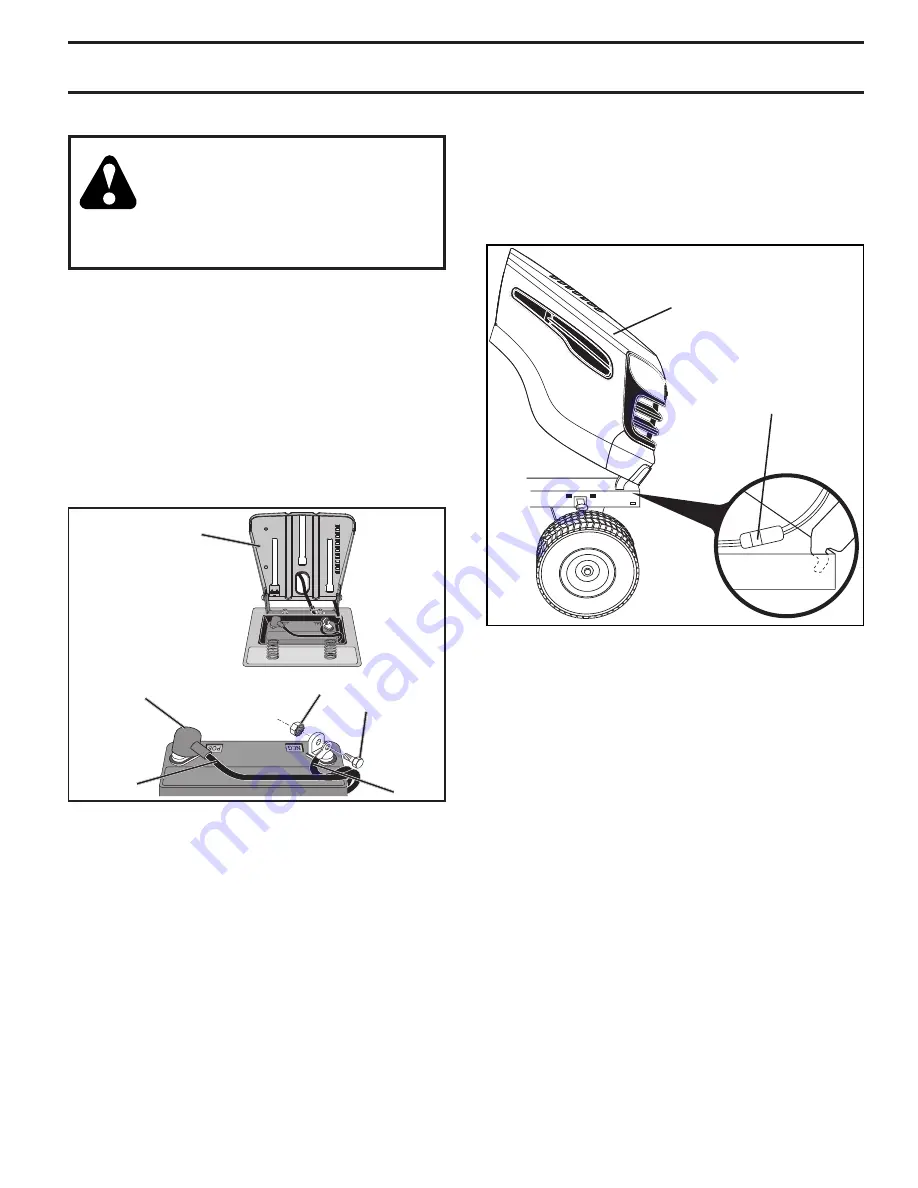
TO REMOVE HOOD AND GRILL ASSEMBLY 

(See Fig. 37)

• Raise 

hood.

•  Unsnap headlight wire connector.
• 

Stand in front of tractor.  Grasp hood at sides, tilt toward 

engine and lift off of tractor.

•  To replace, reverse above procedure.

ENGINE

TO AD JUST THROTTLE CON TROL CABLE 

The throttle control has been preset at the factory and 

ad just ment should not be necessary. If adjustment is nec-

 es sary, see engine manual.

TO AD JUST CHOKE CON TROL 

The choke control has been preset at the factory and ad just-

 ment should not be necessary. If adjustment is necessary, 

see engine manual.

TO ADJUST CARBURETOR  

Your carburetor is not adjustable. If your engine does not 

operate properly due to suspected carburetor problems, 

take your tractor to an authorized service center for repair 

and/or adjustment.

REPLACING BATTERY (See Fig. 36)

WARNING:  Do not short battery ter mi -

nals by allowing a wrench or any other 

object to contact both terminals at the 

same time. Before connecting battery, 

remove metal bracelets, wristwatch 

bands, rings, etc. Positive terminal must 

be connected first to prevent sparking 

from ac ci den tal grounding.

•  Lift seat pan to raised position and open battery box 

door.

• 

Disconnect BLACK battery cable first then RED battery 

cable and carefully remove battery from tractor.

•  Install new battery with terminals in same position as 

old battery.

•  First connect RED battery cable to positive (+) ter-

minal with hex bolt and keps nut as shown. Tighten 

securely.

•  Connect BLACK grounding cable to negative (-) ter-

 mi nal with remaining hex bolt and keps nut. Tighten 

se cure ly.

•   Close battery box door.

Fig. 36

Fig. 37

02603

SEAT PAN

NUT

POSITIVE 

(RED) 

CABLE

NEGATIVE 

(BLACK) 

CABLE

BOLT

TERMINAL 

COVER

SERVICE AND ADJUSTMENTS

HEADLIGHT

WIRE

CONNECTOR

HOOD

Summary of Contents for D17K38

Page 1: ...32 44 47 66 D17K38 Operator s Manual 03131 Gasoline containing up to 10 ethanol E10 is acceptable for use in this machine The use of any gasoline exceeding 10 ethanol E10 will void the product warrant...

Page 2: ...recommended by and comply with specificationsofthemanufacturerofyour tractor Usecommonsensewhentowing Operateonlyatthelowestpossiblespeed when on a slope Too heavy of a load while on a slope is dange...

Page 3: ...g Do not attach towed equipment except at the hitch point Follow the manufacturer s recommendation for weight limits for towed equipment and towing on slopes Neverallowchildrenorothersinorontowedequip...

Page 4: ...blem you cannot easily remedy please contact your nearest authorized service center department Wehavecompetent well trainedtechni cians and the proper tools to service or repair this tractor Please re...

Page 5: ...RE PLACINGBATTERY inthe ServiceandAdjustments section in this manual LABEL ASSEMBLY TOREMOVETRACTORFROMCARTON UNPACK CARTON Remove all accessible loose parts and parts cartons from carton Cut along do...

Page 6: ...ft Place tabs of steering boot over tab slots in dash and push down to secure INSTALL STEERING WHEEL Position front wheels of the tractor so they are pointing straight forward Remove steering wheel ad...

Page 7: ...connections are still secure and wires are properly clamped WHILE LEARNING HOW TO USE YOUR TRACTOR PAY EXTRA ATTENTION TO THE FOLLOWING IMPORTANT ITEMS Engine oil is at proper level Fuel tank is fill...

Page 8: ...ty inform ation about hazards which can result in death serious injury and or property damage DANGER indicates a hazard which if not avoided will result in death or serious injury WARNING indicates a...

Page 9: ...nd braking the tractor and starting the engine C PARKING BRAKE Locks clutch brake pedal into the brake position D THROTTLE CHOKE CONTROL Used for starting and controlling engine speed E ATTACHMENT CLU...

Page 10: ...y Full speed fast offers the best mower performance Fig 7 Fig 8 B C ATTACHMENT CLUTCH LEVER ENGAGED ATTACHMENT CLUTCH LEVER DISENGAGED OPERATION D F STOPPING See Fig 7 MOWER BLADES To stop mower blade...

Page 11: ...verse direction with the attachment clutch engaged will shut off the engine unless ignition key is placed in the ROS ON position WARNING Backing up with the attachment clutch en gaged while mowing is...

Page 12: ...ORE STARTING THE ENGINE CHECK ENGINE OIL LEVEL The engine in your tractor has been shipped from the factory already filled with summer weight oil Check engine oil with tractor on level ground Pull up...

Page 13: ...also be used during the engine warm up period NOTE If at a high altitude above 3000 feet or in cold temperatures below32 F 0 C thecarburetorfuelmixture may need to be adjusted for best engine performa...

Page 14: ...ce Mower Blades Che Clean Debris Off Steering Plate ck Transaxle Cooling Che Check Operator Presence ROS Systems ck V Belts Check Mower Levelness LUBRICATION CHART GENERAL RECOMMENDATIONS The warranty...

Page 15: ...n switch in the ROS ON position and the attachment clutch engaged any attempt by the operator to shift into reverse should NOT shut off the engine BLADE CARE Forbestresultsmowerbladesmustbekeptsharp R...

Page 16: ...N Only use high quality detergent oil rated with API service classification SG SL Select the oil s SAE viscosity grade according to your expected operating temperature Change the oil after every 50 ho...

Page 17: ...spot on your lawn near enough to a water spigot for your garden hose to reach IMPORTANT Make certain the tractor s discharge chute is directed AWAY from your house garage parked cars etc Remove bagge...

Page 18: ...ower suspension arm A from chassis pin B and rear lift link C from rear mower bracket D remove retainer springs and washers CAUTION AFTER REAR LIFT LINKS ARE DISCONNECTED THE ATTACH MENT LIFT LEVER WI...

Page 19: ...of tractor ATTACH REAR LIFT LINKS C Lift rear corner of mower and position slot in link assembly over pin D on rear mower bracket and secure with washer and retainer spring Insert end of link E into h...

Page 20: ...ight about 3 16 Test your adjustment by mowing some uncut grass and visually checking the appearance Readjust if necessary until you are satisfied with the results PRECISION SIDE TO SIDE ADJUSTMENT Se...

Page 21: ...e pulley E 5 Slide belt toward rear of tractor off the steering plate F and remove from tractor BELT INSTALLATION 1 Install new belt from tractor rear to front over the steer ing plate F and above clu...

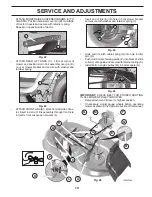
Page 22: ...neendoftheBLACKcabletotheNEGATIVE terminal C of fully charged battery Connect the other end of the BLACK cable D to good chassis ground away from fuel tank and battery TO REMOVE CABLES REVERSE ORDER B...

Page 23: ...t is necessary see engine manual TO ADJUST CARBURETOR Your carburetor is not adjustable If your engine does not operate properly due to suspected carburetor problems take your tractor to an authorized...

Page 24: ...LFUELSYSTEMPARTSSUCH AS CARBURETOR FUEL FILTER FUEL HOSE OR TANK DURING STORAGE ALSO EXPERIENCE INDICATES THAT ALCOHOL BLENDED FUELS CALLED GASOHOL OR USING ETHANOLORMETHANOL CANATTRACTMOISTUREWHICH L...

Page 25: ...fuse 4 Replace fuse 5 Corroded battery terminals 5 Clean battery terminals 6 Loose or damaged wiring 6 Check all wiring 7 Faulty ignition switch 7 Check replace ignition switch 8 Faulty solenoid or st...

Page 26: ...ace blade Tighten blade bolt 7 Buildup of grass leaves and trash under mower 7 Clean underside of mower housing 8 Mower drive belt worn 8 Replace mower drive belt 9 Blades improperly installed 9 Reins...

Page 27: ...never across the face Do not mow slopes greater than 15 degrees Make turns gradually to prevent tipping or loss of control Exercise extreme caution when changing direction on slopes 1 Fold this page a...

Page 28: ...06 28 11 BD Printed in the U S A...

Reviews: