background image

CARE AND MAINTENANCE

43

NEUTRAL  SPRING  ADJUSTMENT:

1. Loosen set screws on center spring stop collar

located on the control rods. (Requires a 1/8”
Allen wrench).

2. Swing control lever out. Tighten set screw on lock

collar.

3. Repeat for opposite side.

4. Engage parking brake and lower seat frame.

Release parking brake and swing control levers in.  If
wheel creeps, repeat steps 1 and 2.

5. Stop engine and remove rear of machine from jack or

blocks.

6. Return the seat to the operating position.

7. Drive machine with both levers in top speed position.

If one side now drives slightly faster than the other
adjust forward speed bolt in to contact stop sooner.

Summary of Contents for Kodiak Diesel

Page 1: ...Safety Instructions Operator s Manual KODIAK DIESEL ZTR...

Page 2: ...this Operator s Manual carefully It contains valuable information that is necessary for the safe operation of the machine Observe all safety rules and become completely familiar with the controls The...

Page 3: ...SAFETY WARNING 4 15 WARRANTY 16 SPECIFICATIONS 17 SEATADJUSTMENT 18 CONTROLS 19 21 OPERATION INSTRUCTIONS 22 32 CARE MAINTENANCE 33 46 TROUBLESHOOTING 47 48 STANDARD SERVICE PARTS LIST 49 KODIAK DIES...

Page 4: ...un Over Back Over RIDING LAWN MOWERS IF IMPROPERLY OPERATED CAN CAUSE SERIOUS INJURY OR DEATH Pictured below are the most common causes of injury to the operator or bystander Please read and understan...

Page 5: ...ntly hazardous situation which if not avoided will result in death or serious injury WARNING highlighted in orange indicates a potentially hazardous situation which if not avoided could result in deat...

Page 6: ...Stop mower if anyone enters the area Be aware of the mower discharge direction and do not point it at anyone Mower blades can throw rocks or other debris Do not operate the mower without either the en...

Page 7: ...g To avoid personal injury from accidental clutch engage ment stop engine before removing grass catcher or unclogging chute Mow only in daylight or good artificial light Do not operate the mower while...

Page 8: ...lity to operate the riding mower safely enough to protect themselves and others from serious injury To protect against possible tip over follow the manufacturer s recommendation for wheel weights coun...

Page 9: ...move obstacles such as rocks tree limbs wires and other foreign objects that can be thrown by mower blades Watch for holes ruts roots and bumps Uneven terrain could overturn the mower Tall grass can h...

Page 10: ...ilize the mower Discontinue mowing the slope When operating on slopes over 15 degrees the unit must be equipped with an approved dealer installed R O P S and Seat Belt Kit R O P S should be in the upr...

Page 11: ...a wheel is over the edge of a cliff or ditch or if an edge caves in Do not mow on wet grass Reduced traction could cause sliding Do not try to stabilize the mower by putting your foot on the ground Do...

Page 12: ...mower free of grass leaves and other debris build up If diesel is spilled do not attempt to start the engine Move mower away from the area of the spill Do not create any source of ignition until gas v...

Page 13: ...used by static electricity Never fill containers inside a vehicle or on a truck or trailer bed with a plastic liner Always place containers on the ground away from your vehicle before filling When pra...

Page 14: ...watchful care of another responsible adult Be alert and turn mower off if a child enters the area Before and during backing look BEHIND and DOWN for small children Never carry children They may fall...

Page 15: ...engine running unless otherwise specified Grass catcher components are subject to wear damage and deterioration which could expose moving parts or allow objects to be thrown Frequently check component...

Page 16: ...Warranty applies to new and unused mowers and is transferable 3 Lifetime warranty on all frames and leading edge of all fabricated welded decks 4 All Dixon warranty must be accomplished by authorized...

Page 17: ...foot assist BLADE DRIVE Electric clutch DRIVE SYSTEM Each rear wheel is independently driven by a HydroGear 12cc pump with fans and TJ230 wheel motor ENGINE The mower is powered by a 20 HP Yanmar Die...

Page 18: ...18 SEAT ADJUSTMENT INSTRUCTIONS 1 Grasp seat slide adjuster and move it into adjustment position 2 Slide seat forward or backward 3 Release seat slide adjuster...

Page 19: ...ward you TURNING Turning is controlled by moving one control lever slightly forward or rearward of the other To turn left move left lever rearward of the right lever To turn right move right lever rea...

Page 20: ...NG BRAKE The parking brake is designed to hold the mower from moving and is not intended for use in stopping the mower while it is in motion The engine will stop if the parking brake is engaged while...

Page 21: ...tion of the electrical system is by 1 15 amp circuit breaker If circuit breaker trips push button to reset If this condition repeats consult dealer for inspection and repair THROTTLE CONTROL LEVER Loc...

Page 22: ...ER dismount mower without applying parking brake or stopping engine During initial operation learning to drive set throttle at slow speed Sound judgement by the operator will prevent accidents BEFORE...

Page 23: ...ignition key to start position When engine starts release key Key will return to run position 5 Move throttle to maximum speed position 6 Release parking brake 7 Swing levers inward 8 Operate mower pe...

Page 24: ...e switch b Put parking brake in ON position c Swing control levers inward d Turn ignition switch to START Engine should not turn over or attempt to start NOTE If any safety check fails do not operate...

Page 25: ...a SAFE AREA away from bystanders start the engine b Leave control levers in outward position and put parking brake ON position c Engage blade drive d Raise slightly off seat ENGINE SHOULD STOP NOTE I...

Page 26: ...he engine speed control to the wide open or full setting 3 Place the mower deck cut height selector in either the top or second notch Never cut more than 3 4 to 1 off the grass at any one time Attempt...

Page 27: ...peller are still turning 8 Alternate mower direction This will evenlydisperse the mulched grass clippings over the lawn for even fertilization If the mulching quality of the mower does not seem to be...

Page 28: ...grass is tall place the mower deck cut height selector in the top or second notch Initially overlap cutting swaths instead of a full swath with each pass 5 Keep the underside of the mower deck clean...

Page 29: ...which might hit the catcher top while turning or backing the mower Use care when backing to avoid pushing the grass bags into the frame or hot exhaust muffler of the engine Fire could result Disengag...

Page 30: ...to cut grass when it is wet Wet grass will clog the underside of the deck and discharge area 3 If the grass is tall place the mower deck cut height lever in the top or second notch Initially overlap...

Page 31: ...blades throughout the cutting season As a rule of thumb never cut off more than 1 3 of the total grass blade length Correct mowing height can reduce weeds and disease by 50 to 80 The following grass c...

Page 32: ...ttempt to move the lever with the engine running The hydro release valves are located behind the seat on the front side of the hydro pumps To access the release valves lift the seat frame assembly use...

Page 33: ...op of radiator before each use Clean grass debris from muffler manifold area before each use Clean grass under deck after each use Check tire pressure every 10 hours Inspect blades for sharpness every...

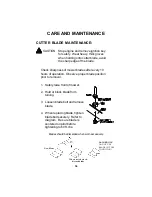
Page 34: ...ly DANGEROUS DO NOT USE BLADE IN THIS CONDITION When notch starts discard blade New Blade Check sharpness of mower blades after every 10 hours of operation Observe proper blade position prior to remov...

Page 35: ...Clean top of battery and terminals with baking soda and water Identify each cable so they can be reconnected to the correct terminal Disconnect cables from terminals ALWAYS discon nect ground cable f...

Page 36: ...res 13 x 6 50 6 16 21 lbs Rear tires 23 x 10 0 10 8 14 lbs Lug nuts or lug bolts should be checked regularly for tightness LUBRICATION CHASSIS 13 grease zerks LOCATIONS front wheel casters 4 mower dec...

Page 37: ...P N 11339 To adjust tension of the mower deck drive belt turn adjuster nut on threaded eyebolt Turning nut to the right will make the belt tighter Turning nut to the left will loosen the belt Note Bel...

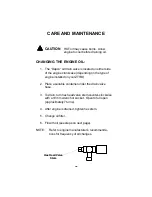
Page 38: ...depending on the type of engine installed on your ZTR 2 Place a suitable container under the drain valve hose 3 To drain turn hex head valve stem counter clockwise with a 10mm wrench or socket Open t...

Page 39: ...ngine literature NOTE Engine oil changes on the KODIAK will require replacement of the oil filter These filters may be available from your local Dixon Dealer OIL FILTERS 1 Replace filter each time the...

Page 40: ...Temperatures 20W50 engine oil Cold climate usage 10W40 engine oil Use engine oil with an API classification of SG CD Dixon Blue 15W 50 Synthetic Hydrostatic Fluid is specifically formulated to provid...

Page 41: ...o keep the reservoir clean Change the fluid in the reservoir and hydrostatic transmission fluid filter after the first 100 hours of use then every 500 hours after that Remove the filter and be sure al...

Page 42: ...s areleft hand threads 4 With steering control arms in the out neutral position start the engine and run at fast idle 5 Adjusttheneutralpositionbyturningthecontrolrod untilthe wheelsdo notrotate 6 Re...

Page 43: ...eat for opposite side 4 Engage parking brake and lower seat frame Release parking brake and swing control levers in If wheel creeps repeat steps 1 and 2 5 Stop engine and remove rear of machine from j...

Page 44: ...casters in the direction of forward travel 3 Put the mower deck in the mid range cut height position 4 Rotate the 2 outer blades so the blade tips point outboard 5 Turn front adjuster nut s to level...

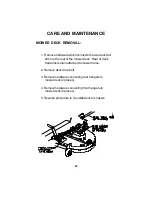
Page 45: ...arms to the rear of the mower deck Rear of deck trail arms remain attached to mower frame 2 Remove deck drive belt 3 Remove hardware connecting rear hangers to mower deck 2 places 4 Remove hardware co...

Page 46: ...your mower start the engine and engage the mower deck for a few minutes to disperse any water that may have accumulated in bearings pulleys or fans Note Allow mower to cool before washing If bearings...

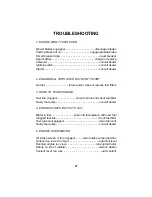
Page 47: ...TO START ENGINE Fuel line clogged clean fuel line and check fuel filter Faulty fuel pump consult dealer 4 ENGINE STARTS BUT CUTS OUT Water in fuel drain old fuel replace with new fuel Clogged fuel lin...

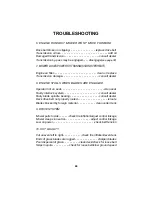
Page 48: ...ator not on seat sit on seat Faulty interlock system consult dealer Fauty blade spindle bearing consult dealer Deck drive belt not properly routed reroute Blades blocked by foreign material clean unde...

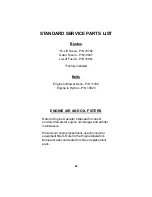
Page 49: ...Protect your engine investment use only original equipment filters Refer to the Engine Operator s Manual or ask your dealer for correct replacement parts STANDARD SERVICE PARTS LIST Blades Hi Lift Fu...

Page 50: ...50 NOTES...

Page 51: ...NFORMATION Date of Purchase Mower Model Number Mower Serial Number Purchased From Name Address DATE OIL CHANGED DATE ENGINE TUNED Dixon Industries Inc P O Box 1569 Coffeyville Ks 620 251 2000 Fax 620...

Page 52: ...es Inc DIXONINDUSTRIES INC P O Box 1569 Coffeyville Ks 67337 0945 620 251 2000 KODIAK Part No 18626 106 The engine exhaust from this product contains chemicals known to the State of California to caus...

Reviews: