background image

44

lUbRICatIon

General

Remove the ignition key to prevent unintentional 
movements during lubrication.
When lubricating with an oil can, it must be filled with 
engine oil.
When lubricating with grease, unless otherwise stated, 
use a high grade molybdenum disulphide grease.
for daily use, the machine should be lubricated twice 
weekly.

Wipe away excess grease after lubrication.
It is important to avoid getting lubricant on the belts 
or the drive surfaces on the belt pulleys. Should this 
happen, attempt to clean them with spirits. If the belt 
continues to slip after cleaning, it must be replaced. 
Gasoline or other petroleum products must not be 
used to clean belts.

8050-832

12/12 every year

lubricate with grease gun

filter change 

1/52 every Week

1/365 every day

Oil change

level check

Summary of Contents for SPEEDZTR 42SE

Page 1: ...E10 is acceptable for use in this machine The use of any gasoline exceeding 10 ethanol E10 will void the product warranty Please read the operator manual carefully and make sure you understand the ins...

Page 2: ...he information contained in these instructions Use only original parts for repairs The use of other parts voids the warranty Do not modify or install non standard equipment to the unit without consent...

Page 3: ...nkages 23 Operation 24 Training 24 Steering 24 Before Starting 25 Starting the Engine 26 Jumper Cables Use 29 Running 30 Operating On Hills 31 Mowing Tips 32 Stopping the Engine 33 Moving Machine By H...

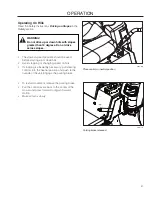
Page 4: ...d mind and body and must not be under the influence of any mind altering substance WARNING Engine exhaust some of its constituents and certain vehicle components contain or emit chemicals known to the...

Page 5: ...pment and ensure that the machine is well anchored DO NOT operate this machine on public roadways Towing If machine is equipped with a tow hitch use extreme caution when towing Never allow children or...

Page 6: ...Manual belongs to the machine with the manufacturing number Engine Manufacturing Number The machine s manufacturing number can be found on the printed plate affixed to the engine compartment Stated o...

Page 7: ...xx Used in this publication to notify the reader of a risk of personal injury or death particularly if the reader should neglect to follow instructions given in the manual Used in this publication to...

Page 8: ...tor Manual Shut off engine and remove key before performing any maintenance or repair work Keep a safe distance from the machine Use on slopes no greater than 10 No passengers Whole body exposure to t...

Page 9: ...ne person Do not mow in reverse unless absolutely necessary Always look down and behind before and while backing Never direct discharged material toward anyone Avoid discharging material against a wal...

Page 10: ...involved in a large percentage of riding mower related injuries These operators should evaluate their ability to operate the riding mower safely enough to protect themselves and others from serious i...

Page 11: ...n objects Uneven terrain could overturn the machine Tall grass can hide obstacles Choose a low ground speed so that you will not have to stop while on the slope Do not mow on wet grass Tires may lose...

Page 12: ...sible adult other than the operator Be alert and turn machine off if a child enters the area Before and while backing look behind and down for small children Never carry children even with the blades...

Page 13: ...he truck or trailer and refuel it on the ground If this is not possible refuel such equipment with a portable container rather than from a gasoline dispenser nozzle Keep the nozzle in contact with the...

Page 14: ...ly to be sure it works properly The machine must not be driven with defective or unmounted protective plates protective cowlings safety switches or other protective devices Do not change the settings...

Page 15: ...ke repairs before starting Never make adjustments with the engine running The machine is tested and approved only with the equipment originally provided or recommended by the manufacturer Only use app...

Page 16: ...ent force to penetrate the skin causing serious injury If injured by escaping fluid see a doctor at once Serious infection or reaction can develop if proper medical treatment is not administered immed...

Page 17: ...draulic pumps Using the left and right steering controls the flow is regulated and thereby the direction and speed 1 Steering control levers 2 Parking brake 3 Tracking adjustment 4 Fuel shut off valve...

Page 18: ...el is reduced and the machine turns to the right Zero turn can be achieved by moving one control backward behind the neutral position and carefully moving the other steering control forward from its n...

Page 19: ...eed the control is moved forward or back respectively Avoid idling the engine for long periods as there is a risk of fouling the spark plugs USE FULL THROTTLE WHEN MOWING for best mower performance an...

Page 20: ...rts 8058 134 Ignition switch 8058 134 Hour meter Hour Meter The hour meter displays the total operating time with the blade activated eliminating hours being added if the key was accidentally left on...

Page 21: ...truction WARNING The engine and the exhaust system become very hot during operation Risk for burns if touched Allow engine and exhaust system to cool before refueling WARNING Fill to bottom of filler...

Page 22: ...f the mower is not tracking straight check the air pressure in both rear tires Recommended air pressure for the rear tires is 15 psi 1 bar 1 Tracking adjustments are made using the tracking bolts The...

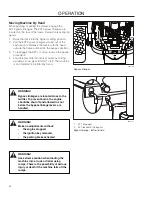
Page 23: ...ar engine plate The bypass linkage is used when manually pushing or pulling the unit See Moving Machine By Hand in the Operation section 8058 0147 Left side bypass linkage WARNING Bypass linkages are...

Page 24: ...unit under its own power the operator must sit in the seat and start the engine see Before Starting in the Operation section Adjust the engine speed to idle disengage the parking brake but do not eng...

Page 25: ...esired position 8058 255 Secure selected cutting height 8058 023 Lengthways adjustment 5 Set the deck cutting height by inserting the lift pin into the desired cut height Resecure the lift pin with th...

Page 26: ...Pull the lifting lever backward to the locked transport position 3 Activate the parking brake by pushing the release button in and pulling the lever fully upwards 4 Disengage the mower blades by pres...

Page 27: ...ard to the locked outer neutral position 6 Move the throttle to the middle position 7 If the engine is cold the choke control should be pulled up 8058 148 Set the throttle 8058 148 Set the choke contr...

Page 28: ...n key back to the run position Push the choke control in gradually when the engine has started 10 Set the engine speed with the throttle Allow the engine to run at a moderate speed approximately mid t...

Page 29: ...ttery is too weak to start the engine it should be recharged See Battery in the Maintenance section Jumper Cables Use 1 Connect each end of the RED cable to the POSITIVE terminal on each battery takin...

Page 30: ...steering controls inwards out of the neutral position N 3 Push the release button on the cutting height lever and move lever to the pin release the button 8058 213 Parking brake released 8058 256 Mowe...

Page 31: ...pull steering controls into the neutral position and push to the outside of the unit Engage the parking brake 8058 213 Parking brake released WARNING Do not drive up or down hills with slopes greater...

Page 32: ...awn becomes more even and the grass clippings more evenly distributed over the mown area The total time taken is not increased as a higher operating speed can be used without poor mowing results Avoid...

Page 33: ...tton on the lever and pulling the lever upward to the transport position 6 Turn the ignition key to the stop position 7 Remove key Always remove key when leaving the mower to prevent unauthorized use...

Page 34: ...truck or trailer by driving up ramps in low gear DO NOT LIFT The machine is not intended to be lifted by hand 8058 150 Bypass linkages 8058 147 1 EZT engaged 2 EZT locked in the bypass Bypass linkage...

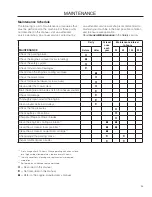
Page 35: ...the engine s cooling air intake Check the mower deck Check for loose hardware screws nuts Clean under the mower deck Start the engine and blades listen for unusual sounds Check for damage Thoroughly c...

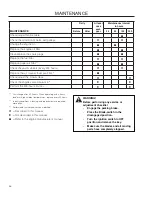
Page 36: ...ys Change the engine oil 1 Replace the engine oil filter Clean replace the spark plugs Replace the fuel filter Replace paper air filter 2 Check the caster wheels every 200 hours Replace the air cleane...

Page 37: ...g time depends on battery capacity condition age temperature and efficiency of charger Cleaning battery and terminals Corrosion and dirt on the battery and terminals can cause the battery to lose powe...

Page 38: ...the operator leaves the seated position Check that the engine stops if the mower blades are engaged and the driver temporarily moves off the drivers seat IMPORTANT INFORMATION In order to be able to d...

Page 39: ...e belt Deck belt installation NOTE For ease in installing the deck belt refer to the routing decal on the top of the deck 1 Wrap the deck belt around the electric clutch pulley that is located on the...

Page 40: ...lower grade hardware than specified 8058 027 1 Blade 2 Blade bolt special 3 Cutter housing Blade attachment Cutting Blades For the best mowing results it is important that blades are well sharpened an...

Page 41: ...or adjustable wrench turn the lift link adjustment nuts on either side counter clockwise to lower or clockwise to raise Adjust until both measurements are equal 8058 030 Lift link adjustment nut 8058...

Page 42: ...erly adjusted when they are just slightly off of the ground when the deck is at the desired cutting height in the operating position Anti scalp rollers then keep the deck in the proper position to hel...

Page 43: ...deck will increase the machine s life span Make it a habit to clean the machine directly after use after it is cooled before the debris sticks Do not spray water on the top of the mower deck Use comp...

Page 44: ...hine should be lubricated twice weekly Wipe away excess grease after lubrication It is important to avoid getting lubricant on the belts or the drive surfaces on the belt pulleys Should this happen at...

Page 45: ...ease gun on each set of wheel bearings 8058 068 Lubricating the front wheels IMPORTANT INFORMATION Use minimal lubrication and remove excess lubricant so that is does not come into contact with belts...

Page 46: ...r contact of the battery terminal cable connections Blown fuse Fault in the starter safety circuit See Safety System in the Maintenance Section Engine runs rough Faulty carburetor Choke control is pul...

Page 47: ...brake on Bypass valve on pump open Drive belt for the transmission slack or has come off Air trapped in hydraulic system Mower deck not engaging Drive belt for the mower deck has come loose Contact fo...

Page 48: ...nks or add a fuel stabilizer Start the engine and allow it to run until the carburetor is drained of fuel or the stabilizer has reached the carburetor 5 Remove the spark plug and pour about a tablespo...

Page 49: ...49 schematics...

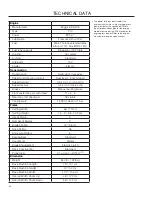
Page 50: ...re 15 PSI 103 kPa 1 bar Frame Cutting Width 46 117cm Cutting Height 1 5 4 3 8 10 2 cm Uncut Circle 0 Number of Blades 2 Blade Length 15 38 cm Nose Rollers No Anti scalp Rollers 3 Sprung Seat Standard...

Page 51: ...ank Size Diameter in inches fine or coarse thread 9 12 13 18 5 16 18 24 28 38 24 33 3 8 31 42 46 62 40 54 7 16 50 68 75 108 75 102 115 156 9 16 110 150 165 224 5 8 150 203 225 305 250 339 370 502 7 8...

Page 52: ...the machine will fulfill the requirements This is also applicable to special requirements for any of the states California emission rules etc Do not remove any of these labels Certificates can also b...

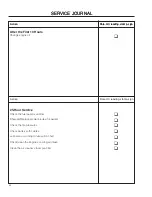
Page 53: ...he mower deck adjustment q Check Safety switch for the parking brake q Safety switch for the mower deck q Safety switch in the seat q Safety switch in the steering controls q Parking brake functionali...

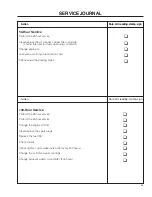
Page 54: ...mp sign 25 Hour Service Check the fuel pump s air filter q Sharpen Replace mower blades if required q Check the tire pressures q Check battery with cables q Lubricate according to lubrication chart q...

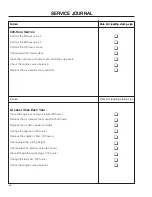
Page 55: ...ace the spark plugs q Replace the fuel filter q Check V belts q Check tighten caster wheel axle bolts every 200 hours q Change the air filter s paper cartridge q Change hydraulic pump oil and filter 2...

Page 56: ...gine oil 50 hours q Replace the engine oil filter 100 hours q Check adjust the cutting height q Check adjust the parking brake 50 hours q Clean Change the spark plugs 100 hours q Change the fuel filte...

Page 57: ...SERVICE JOURNAL Action Date mtr reading stamp sign 57...

Page 58: ...SERVICE JOURNAL Action Date mtr reading stamp sign 58...

Page 59: ......

Page 60: ......

Reviews: