background image

ELECTRICAL SYSTEMS


Keep ail connections clean and tight. Maintain the fluid in the 

battery at correct level.


BODY


The body may be washed with a mild detergent and waxed 

with any automotive type wax.


TRANSAXLE


For adjustment or repair confer with authorized Dixon dealer 

service department. Adjustment or repair by other  than 

authorized dealer voids warranty.


SPARE PARTS


See your dealer for ordering spare parts or warranty service.


INSTALLING AND REMOVING MOWER 
DECK FROM FRAME


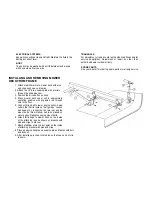
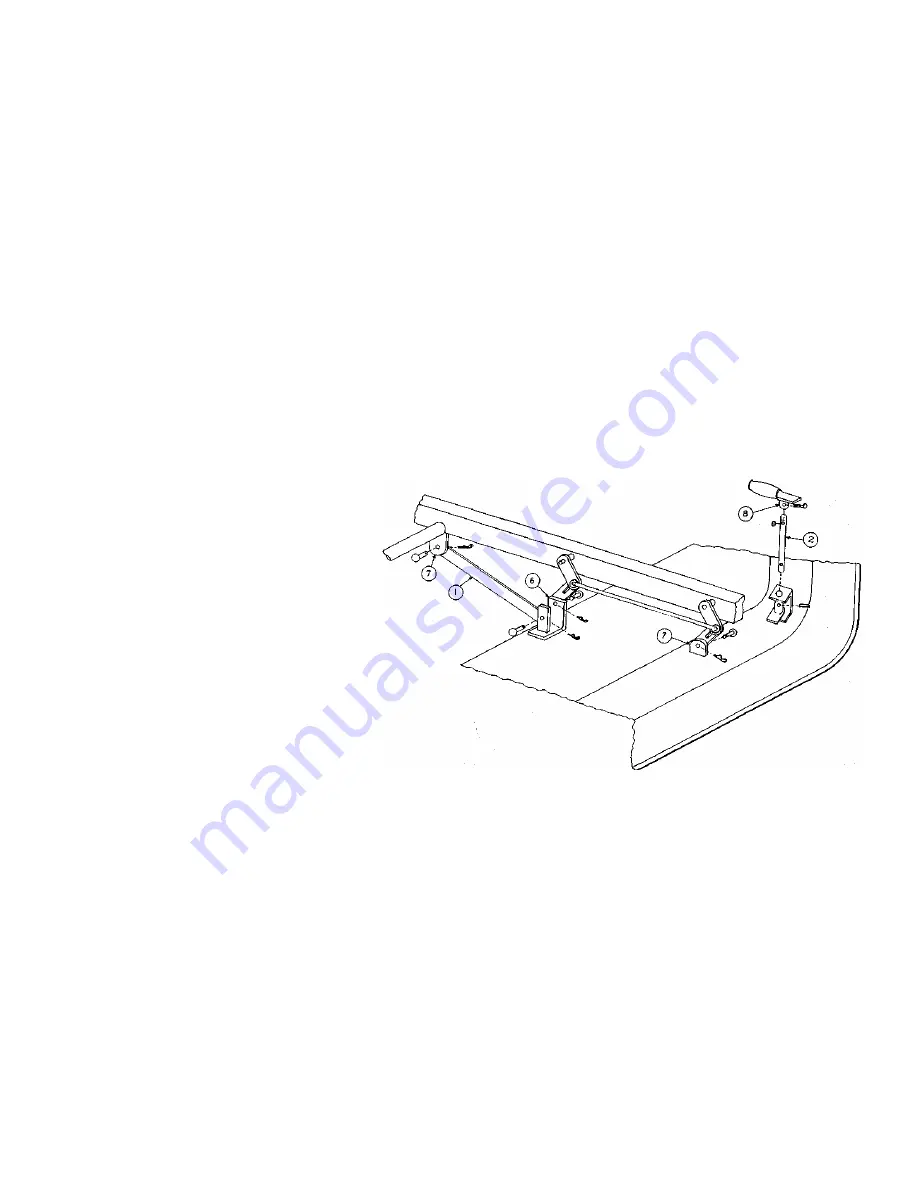
1. Attach stabilizer arms to mower deck with pins 

and clips as shown on drawing.


2. Attach the Vz" dia. engaging rod with a rollpin 

through the engaging cam.


3. Position the drive belt on pulleys.


4. Place mower deck under unit in approximate 

operating position with engaging rod through 

hole in the floor.


5. Connect drive belt to lower engine pulley, being 

certain that belt is inside of belt guides. Loosen 

belt keeper by  loosening the two rear engine 

mount bolts; this will allow  belt to be placed on 

motor pulley. Retighten engine mount bolts.


6. Attach lift linkage to mower deck on the inside 

of the  attaching lugs as shown on drawing with 

pins and clips. (4 places)


7. Attach stabilizer arms to pivot point on the inside 

of attaching bracket with pins and clips.


8. Place engaging handle on engaging rod and fasten with bolt 

and locknut.


9. After installing pin clips, rotate pins so that open end of clip 

is down.


Summary of Contents for ZEETER 422 & 424

Page 1: ...OPERATOR S MANUAL...

Page 2: ...parts which within the warranty period shall be shown to be defective due to faulty workmanship or materials at the factory All parts claimed defective must be returned to the factory for inspection...

Page 3: ...ays mow at the slowest speed that will cut satisfactorily 5 Keep hands and feet away from the blade at all times 6 Although the Dixon mower is equipped with a missile deflector keep persons clear of t...

Page 4: ...ALWAYS SET PARKING BRAKE AND DISENGAGE BLADE OPERATION BEFORE DISMOUNTING...

Page 5: ...ontrol braking turning direction and acceleration TO GO FORWARD From neutral position gently push both drive levers forward to increase speed move levers further forward TO GO BACKWARD From neutral po...

Page 6: ...may be easily reconnected to the correct terminal See also wiring diagram shown on Body Assembly illustration 3 Clean top of battery and terminals 4 Do not remove battery from mower 5 To reactivate re...

Page 7: ...on readjust switch With operator in normal mowing position engage mower deck and remove weight from seat The engine should die Repeat this procedure in each cutting height position CHAIN DRIVES ADJUST...

Page 8: ...with a rollpin through the engaging cam 3 Position the drive belt on pulleys 4 Place mower deck under unit in approximate operating position with engaging rod through hole in the floor 5 Connect driv...

Page 9: ......

Page 10: ......

Page 11: ...10...

Page 12: ......

Page 13: ......

Page 14: ...axle Shim 16 ga 4054 Seat Switch Assembly 1503 Wheel Hub Assembly 2222 Transaxle Shim 22 ga 4058 Arm Rest Bracket R 1504 Wheel Hub 2436 Switch Decal 4059 Arm Rest Bracket L 1506 Hub Flange 3029 Front...

Page 15: ...09R Cradle R 5061L HD Support Assembly L 6107 Deck Pin 5009L Cradle L 5065 HD Cone Frame Assembly 6108 1 Center Hub Assembly replaces 6108 501 OR Cradle Assembly R 5066 HD Cone Frame Shaft 6109 V Belt...

Page 16: ...________ Oil changed this date 1 _____________________________________________ 4 __________________________________________ 2 _____________________________________________ 5 __________________________...

Page 17: ...DIXON INDUSTRIES INC BOX 494 COFFEYVILLE KANSAS 67337 DIXON and ZTR are registered trademarks of Dixon Industries Inc 281 Litho in U S A...

Reviews: