background image

SPECIFICATIONS


CHASSIS:


11 GA - rectangular tube.


BODY:


Two piece - made of rotational molded polyethylene. Front body contains access 

panels for battery service and engine to mower deck belt removal. Rear body 

tilts up to allow service on the entire drive system.


SEAT:


Economically designed for operator comfort by use of high density closed cell 

foam, contoured back rest and arm rests. Seat is adjustable fore and aft.


MOWER DECK:


11 GA stamped steel construction, 3 blades, 60" cut width, cut height 1 " to 4" via 

7 position lift handle. Self cleaning design, aides discharge of grass.


BLADE DRIVE:


Electric clutch.


DRIVE SYSTEM:


Each rear wheel is independently driven by a Hydro Gear BDU-10L Series 70 

hydrostatic transmission. The hydrostatic transmissions, in turn, power a fully 

enclosed Hydro Gear gearbox.   The gears in the Hydro Gear gearbox are 

permanently lubricated using a special grease which completely eliminates the 

need for any type of maintenance.


The Hydro Gear BDU-1 OL Series 70 hydrostatic transmissions are serviced with 

any high quality 10W-30 motor oil. The oil is filtered by a 10 micron oil filter. 

Recommended service interval for filter is after the first 250 hours of operation, 

then after every 400 hours of operation. If the system becomes contaminated by 

dirt or other foreign debris, both oil and filter must be replaced immediately.


ENGINE:


20 HP Kohler Magnum, 4-Cycle, air-cooled, gasoline, vertical shaft, twin cylinder 

opposed, aluminum crankcase, removable cast-iron cylinder barrels, L-head.


STARTING SYSTEM:


Electric by key switch operation with safety interlocks on parking brake and blade 

drive clutch.


TIRES:    


Front 11 X 4.10 X 4 ribbed tread. 

Rear 20 X 1 0 X 8 turf savers.


CAPACITIES:


Fuel - 4.8 gallons total (dual tanks). Hydrostat oil tank - 3 quart with inline 10 

micron filter. Hydrostat oil recommendation - name brand SAE 10W-30 motor 

oil.


DIMENSIONS:


Width        72" 

Height       45" 

Length       73 1/2" 

Weight      685 lbs.


NOTE:


Additional information provided in service instructions under the individual 

component.


SPECIFICATIONS SUBJECT TO CHANGE WITHOUT NOTICE.


Page 5


Summary of Contents for ZTR 560

Page 1: ......

Page 2: ...perator s manual carefully and become completely familiar with the controls The information in this operator s manual applies to all Dixon ZTR Model 560 Mowers Your Dixon dealer will gladly provide a...

Page 3: ...TY POLICY Page 4 3 SPECIFICATIONS Page 5 4 SET UP AND SERVICE Pages 6 12 5 OPERATION INSTRUCTIONS Pages 13 14 6 CARE AND MAINTENANCE Pages 15 22 7 TROUBLESHOOTING Pages 23 25 8 PARTS ILLUSTRATIONS Pag...

Page 4: ...slopes when the grass is dry and watch for bumps holes and other obstacles Test the slope with the blades off A good rule of thumb is Don t mow on a slope you can t back up Stay clear of drop offs es...

Page 5: ...ttended Your Dixon mower is equipped with a weight sensitive switch that kills the engine when operator leaves the seat while blades are engaged Note This important safety feature must be tested prior...

Page 6: ...d screws tight to be sure the mower is in safe working condition 20 To reduce fire hazard keep the engine free of grass leaves or excessive grease 21 The mower should be stopped and inspected for dama...

Page 7: ...Covers etc Limited to 90 days from date of purchase 5 Warranty does not apply to damage in transit or incidents of misuse negligence accidents or alteration The use of parts or components other than...

Page 8: ...ype of maintenance The Hydro Gear BDU 1 OL Series 70 hydrostatic transmissions are serviced with any high quality 10W 30 motor oil The oil is filtered by a 10 micron oil filter Recommended service int...

Page 9: ...SET UP AND SERVICE 1 Seat Assembly Instructions 2 Upper Control Lever Installation 3 Mower Deck Installation 4 Deck Leveling 5 Final Preparation Page 6...

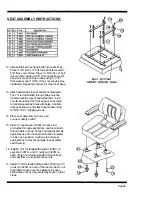
Page 10: ...NOT TIGHTEN SECURELY 4 Insert 1 1 4 20 X 3 4 Phillips machine screw through remaining hole in bracket and start screw threads DO NOT TIGHTEN SECURELY 5 Repeat steps 2 through 4 for the other armrest...

Page 11: ...seat straps using 4 5 16 18 X 1 tapping screws 14 Place seat assembly on body and connect safety switch 15 Place 1 seat spacer 1849 on each stud protruding through seat bottom and insert studs throug...

Page 12: ...en second flat washer 3 Push control lever into the neutral slot and install 2 cup washers 1 flat washer and jam nut See illustration 4 Tighten jam nut Proper tightness or tension on jam nut is achiev...

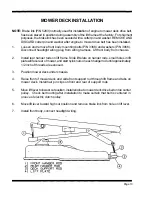
Page 13: ...ger rods on lift frame Slide lift plate on hanger rods small holes in lift plate will face rear of mower and start nylok nuts on each hanger rod until approximately 1 2 inch of threads are exposed 3 P...

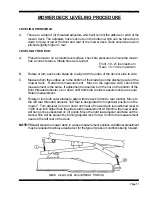
Page 14: ...ve to the opposite side check that measurement is the same If adjustment is required turn the nut on the bottom of the front threaded adjuster up or down until both side to side measurements are equal...

Page 15: ...s 6 Observe proper battery polarity when re connecting leads on chassis Always connect positive lead first ENGINE SERVICE Final preparation of engine should be completed using engine service manual pr...

Page 16: ...SYSTEM Allows the mower to turn on its own axis zero radius Each lever controls one side of the mower The pressure required to operate the mower is very light and a minimum of 112 hour should be spent...

Page 17: ...uld be set to the maximum or wide open setting to insure adequate cooling of the engine and to maintain mower deck blade speed while mowing MOWER DECK CUT HEIGHT LIFT LEVER Controls the cutting height...

Page 18: ...t if failure should occur MAINTENANCE SCHEDULE To insure a long and trouble free service life on all the components used on the Model 560 a regular and thorough maintenance schedule should be followed...

Page 19: ...ted after removal 9 Reinstall the clutch to the engine Be sure to torque the mounting bolt back to 50 ft lbs B OHMS TEST 1 Disconnect clutch from mower wiring harnass which is located on the right sid...

Page 20: ...de deck from under chassis 3 Reverse procedure to re install deck assembly CUTTER BLADE REMOVAL 1 Carefully place deck assembly in a manner which will allow access to the blade bolts Hold blade from t...

Page 21: ...arking brake Caution should be used when releasing parking brake as mower may tend to creep or move prior to adjustment If adjustment is required loosen lock nuts at each end of the control rods and b...

Page 22: ...ADJUSTMENT POINTS FOR T BOX BELT TENSION Page 18...

Page 23: ...FORWARD LEVER STOP ADJUSTMENT Page 20...

Page 24: ...is not recommended as damage to seals and bearings could occur Using a hand pressure grease gun lubricate each front wheel to allow even distribution of grease within the wheel rotate or spin each fr...

Page 25: ...tiff brush can be used to loosen excess grass and dirt build up Avoid directing water pressure onto the mower deck hub assemblies electrical wiring and engine components such as air filter openings To...

Page 26: ...ler is also available to provide assistance to you SITUATION CAUSES REMEDY Poor cut quality Ground speed Reduce mowing speed Poor cut quality Loose belts Adjust per operators manual Poor cut quality E...

Page 27: ...T Box belts slipping Adjust per operators manual Consult your dealer for repair Loss of power on both wheels after being operated for a length of time Belt from engine to T Box is slipping Adjust per...

Page 28: ...correctly Have electrical system checked by your dealer Battery discharge Engine being operated at too low an RPM Increase engine RPM Contact your dealer for information Electric clutch will not enga...

Page 29: ......

Page 30: ......

Page 31: ......

Page 32: ......

Page 33: ......

Page 34: ......

Page 35: ......

Page 36: ...w Nylok 2928 3 1 6 X1 Key 3224 5 16 18 X 1 HH Bolt w Nylok GR5 3002 5 16 18X21 2 HHBGR8 3225 3 8 16X21 4 HHBolt 3005 5 16 18UNCHexNut 3227 5 16 18X2 HHBoltGR5 3006 5 16 18X 1 4 HH Bolt GR5 3231 9 1 6...

Page 37: ...Danger 3348 5 1 6 1 8X3 4 Tap Screw 3746 Decal Parking Brake 3349 806 Woodruff Key 3772 By Pass Keeper 3351 1 4 20 X 1 2 HWH Tap Screw 3773 LH Rod End 3352 3 8 16X1 1 4 HH Bolt GR5 3774 RH Rod End 335...

Page 38: ...om 5641 G Box Mount Spacer 4757 Seat Assembly 50 5643 Input Gear GB 4773 Lower Wiring Loom 5644 Bearing Gearbox 4774 Battery Cable Assembly 5645 Bearing Spacer GB 5070 Key 3 1 6 Sq X 88 5661 5 8 X 12...

Page 39: ...ce 8469 Brake Pin 9377 Brake Lever 8470 Lug Bolt 9381 Mower Deck Weldment 8471 Cap Plug 3 8 9382 Mower Deck Assembly 8472 Cap Plug 1 4 9383 Hi Lift Blade 8484 Frame Weldment 560 9385 Belt Guard LH 857...

Page 40: ...NOTES Page 37...

Page 41: ...NOTES Page 38...

Page 42: ...DIXON INDUSTRIES INC A BLOUNT COMPANY AIRPORT INDUSTRIAL PARK PO BOX 1569 COFFEYVILLE KS 67337 O945 316 251 2OOO FAX 316 251 4117...

Reviews: