Summary of Contents for Cendence

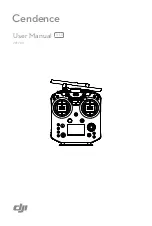
Page 1: ...Cendence 2017 08 V1 0 User Manual ...

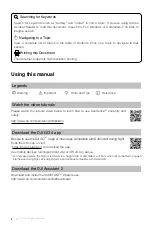
Page 2: ...d safety the flight is restricted to a height of 30 m and distance of 50 m when not connected or logged into the app during flight including DJI GO 4 and all apps compatible with DJI aircraft Download the DJI Assistant 2 Download and install the ASSISTANTTM 2 before use http www dji com cendence info downloads Searching for Keywords Search for keywords such as battery and install to find a topic I...

Page 3: ...rging the Battery 8 Mounting the Monitor to the Remote Controller 9 Linking the Remote Controller 10 Remote Controller Operations 10 Button Types 10 Turning the Remote Controller On and Off 10 Operating the Aircraft 12 Controlling the Gimbal 14 Operating the Camera 15 Adjusting Camera Settings 15 Customizable Buttons 16 Dual Remote Controller Mode 16 Using Accessories 18 Mounting the Patch Antenna...

Page 4: ...sed as example in this user guide which offers an HD live camera view with its built in DJI Pilot app or DJI GOTM 4 app for a precise and responsive flying experience With various customizable buttons you can adjust a number of flight controller camera and gimbal parameters with just your hands The Cendence Patch Antenna also allows for high gain signal transmission and improved reception The remo...

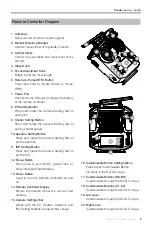
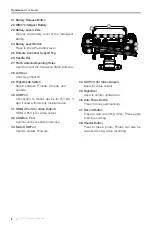
Page 5: ... aperture 11 ISO Setting Button Press and rotate the Camera Setting Dial to set the ISO 12 Pause Button Press once to exit TapFly ActiveTrack or other Intelligent Flight Modes 13 Power Button Used to turn the Remote Controller on and off 14 Remote Controller Display Shows information about the aircraft and camera 15 Camera Settings Dial Works with the EV Shutter Aperture and ISO Setting Buttons to...

Page 6: ...e and A mode 30 USB Port Connection to mobile device for DJI GO 4 app if used a third party mobile device 31 HDMI A Port for Video Output HDMI A Port is for video output 32 CAN Bus Port Used to connect external devices 33 Micro USB Port Used to update firmware 19 18 18 20 21 22 23 24 25 26 27 28 29 30 31 30 32 33 34 35 36 37 38 34 SDI Port for Video Output Used for video output 35 Right Dial Used ...

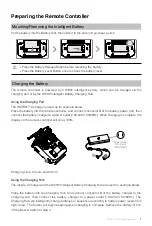
Page 7: ...ontroller and connect connector B of the battery power port then connect the battery charger to a power outlet 100 240V 50 60Hz When charging is complete the display on the remote controller will show 100 OK Charging Time 2 hours and 24 min Using the Charging Hub The Inspire 2 Charger and the WCH2 Intelligent Battery Charging Hub are used for example below Place the battery into the Charging Hub a...

Page 8: ...acket Lock the Mounting Bracket Use a coin to adjust the tightness of the pitch axis B A Mounting the Third Party Mobile Devices For other mobile devices e g iPhones iPads the Cendence Mobile Device Holder and an appropriate USB cable are required B A B Unlock the Mounting Bracket and mount the Mobile Device Holder The charging hub blinks green while charging and turns solid green when charging is...

Page 9: ...e remote controller on and off 1 Press the power button once to check the current battery level Charge the remote controller if the battery is too low 2 Next press and hold the Power button to power on the remote controller 3 Repeat step 2 to power off the remote controller after you finish using it Linking the Remote Controller Linking is only required when using for the remote controller for the...

Page 10: ...ess the Linking button to start linking The remote controller display shows the current status information The master remote controller shows the aircraft status and the slave remote controller shows the camera settings If No Connection is shown after linking repeat the above steps to try linking again ...

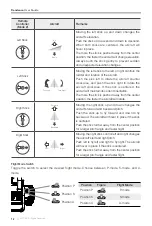
Page 11: ... to a custom mode Right Stick Left Stick Turn Right Turn Left UP Down Right Left UP Down Turn Right Turn Left Right Left Forward Backward Left Stick Right Stick Forward Backward Right Stick UP Down Forward Backward Left Stick Turn Right Turn Left Right Left Mode 1 Mode 2 Mode 3 The Stick Mode is set to Mode 2 by default Stick Neutral Mid Point Control sticks are centered Moving the Control Stick C...

Page 12: ...urrent orientation The more the stick is pushed away from the center position the faster the aircraft will rotate Right Stick Forward Backward Moving the right stick up and down changes the aircraft s forward and backward pitch Push the stick up to fly forward and down to fly backward The aircraft will hover in place if the stick is centered Push the stick further away from the center position for...

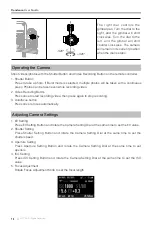
Page 13: ...To change flight modes go to the Camera View in DJI GO 4 and enable Multiple Flight Modes in Main Controller Settings After enabling multiple flight modes toggle the switch to P for Position mode and S for Sport Mode RTH Button Press and hold the RTH button to start the Return to Home RTH procedure The aircraft will then return to the last recorded Home Point Press this button again to cancel the ...

Page 14: ...and rotate the Camera Setting Dial at the same time to set the EV value 2 Shutter Setting Press Shutter Setting Button and rotate the Camera Setting Dial at the same time to set the shutter speed 3 Aperture Setting Press Aperture Setting Button and rotate the Camera Setting Dial at the same time to set aperture 4 ISO Setting Press ISO Setting Button and rotate the Camera Setting Dial at the same t...

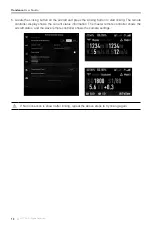
Page 15: ...pitch and pan When the Slave remote controller is primary it can control gimbal pitch pan and roll Dual Remote Controller mode is not available in Russia and Israel Setting Up Dual Remote Controller Mode Dual Remote Controller mode is disabled by default Users must enable this feature on the Master remote controller via DJI GO 4 Follow the steps below to setup Master Remote Controller 1 Connect th...

Page 16: ...emote controller from the Master list and input the password to connect Slave Remote Controller 1 Select Slave to set the remote controller to Slave Search Master Remote Controller Settings Master and Slave Set Remote Controller Status Master Slave OFF Master ID 28172d Slave ID 14f93f Connection Status OFF 2816f2 28172d 56 00 RSSI 22 00 Search Master Master Scan Connect Connect Search Master Remot...

Page 17: ...the Patch Antenna Follow the steps below to mount the patch antenna 1 Rotate the original antenna screws to remove the antennas Only pull the antennas from the screws not the antenna bodies to avoid damage 2 Connect the patch antenna with two screws connect two antenna cables and connect the CAN bus cable to the remote controller Ensure the aircraft is flying within the optimal transmission range ...

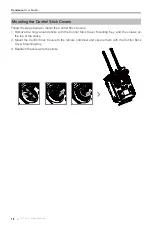
Page 18: ...elow to mount the Control Stick Covers 1 Remove the rings around sticks with the Control Stick Cover Mounting Key and the screws on the top of the sticks 2 Mount the Control Stick Covers to the remote controller and secure them with the Control Stick Cover Mounting Key 3 Reattach the screws to the sticks ...

Page 19: ...EIRP 2 4 GHz 26 dBm FCC 17 dBm CE 20 dBm SRRC 5 8 GHz 28 dBm FCC 14 dBm CE 20 dBm SRRC Power Supply Extended Intelligent Battery Model WB37 4920mAh 7 6V Intelligent Battery 4920 mAh LiPo Charging DJI charger Output Power 20 W supplying power to DJI CS550 monitor 12 W without supplying power to a monitor Video Output Ports USB HDMI SDI USB Power Supply iOS 1 A 5 2 V Max Android 1 5 A 5 2 V Max Dual...

Page 20: ...If you have any questions about this document please contact DJI by sending a message to DocSupport dji com DJI incorporates HDM ITM technology The terms HDMI and HDMI High Definition Multimedia Interface and the HDMI Logo are trademarks or registered trademarks of HDMI Licensing LLC in the United States and other countries ...

Reviews: