background image

DJI Goggles 2 User Manual

 v1.0

Contents


  © 2022 DJI All Rights Reserved   

23

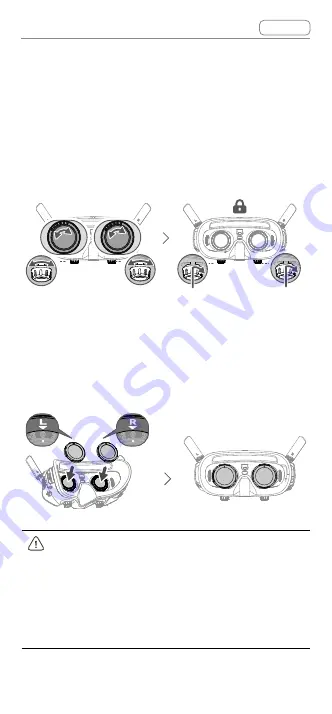
3. Adjust the diopter of the goggles according to your 

needs and lock the knobs.

For example, if you usually wear -6.0 D glasses 
and the self-prepared lens is -3.0 D, then you will 
need to adjust the diopter of the goggles to -3.0 D 
to ensure that the overall diopter is -6.0 D after the 
eyeglass frame is installed on the goggles. 

<

 2.8 mm

4. Install the left and right frames onto the goggles. 

When installing, make sure that the mark on the top 
of the frame is facing upwards, and the triangular 
arrow is aligned with the white dot on the upper 
edge of the goggle lens.

L

R

If the installed lens supports astigmatism 
correction, do not rotate the knob after the 
eyeglass frame is installed. Otherwise, the 
astigmatism axis will shift resulting in blurred 
vision. Make sure to adjust the diopter of the 
goggles before installing the eyeglass frames.

Summary of Contents for GOGGLES 2

Page 1: ...User Manual v1 0 2022 11 ...

Page 2: ...n 17 Linking 18 Getting a Clear Vision 19 Using the Eyeglass Frames 21 DJI Goggles 2 24 Using the Touch Panel 25 Goggles Home Screen and Menu 27 Switching Aircraft 36 Using the Head Tracking Function 36 Using the Wireless Streaming Function 36 DJI Motion Controller 37 Controlling the Aircraft 38 Controlling the Gimbal and Camera 41 Motion Controller Alert 42 Motion Controller Calibration 42 Firmwa...

Page 3: ...ntents 2022 DJI All Rights Reserved 3 Maintenance 46 Replacing the Antennas 47 Replacing the Foam Padding 48 Cleaning and Maintenance of the Lenses 49 Appendix 50 Specifications 51 Low Blue Light Statement 54 After Sales Information 55 ...

Page 4: ...ics in the table of contents Click on a topic to navigate to that section Searching for Keywords Search for keywords such as battery and install to find a topic If you are using Adobe Acrobat Reader to read this document press Ctrl F on Windows or Command F on Mac to begin a search Printing this Document This document supports high resolution printing Using this Manual ...

Page 5: ...product 5 8 GHz is not supported in some regions This frequency band will automatically be disabled when the aircraft is activated or connected to DJI Fly in these regions Observe local laws and regulations Using the goggles does not satisfy the requirement of visual line of sight VLOS Some countries or regions require a visual observer to assist by observing the flight Make sure to comply with lo...

Page 6: ...rved 6 Download DJI ASSISTANTTM 2 Consumer Drones Series https www dji com goggles 2 downloads This user manual covers both DJI Goggles 2 and DJI Goggles 2 Motion Combo The DJI Motion Controller mentioned in this manual is a product of the DJI Goggles 2 Motion Combo ...

Page 7: ... 2022 DJI All Rights Reserved 7 Product Overview ...

Page 8: ...screen bringing you an immersive viewing experience DJI Goggles 2 supports the Head Tracking function With this function the aircraft and gimbal can be controlled through head movements When used with the DJI Motion Controller you can control the aircraft and the gimbal camera freely to meet your shooting needs in various scenarios The touch panel enables you to easily complete operations using on...

Page 9: ...ce Slider Diopter Adjustment Knob hereinafter referred to as knob Toggle left and right to adjust the distance between the lenses until the images are properly aligned Rotate the knobs to adjust the diopter in the range of 8 0 D to 2 0 D 9 7 12 13 8 10 11 7 microSD Card Slot 8 3 5mm Audio Port 9 LED Dot Matrix Display 10 Lens 11 Proximity Sensor Detects whether the user is wearing the goggles and ...

Page 10: ...mately 1 2 m and hover Press and hold while the aircraft is hovering to make it land automatically and stop the motors 3 Mode Button Press once to switch between Normal mode and Sport mode 4 Brake Button Press once to make the aircraft brake and hover in place only when GPS or Downward Vision System is available Press again to unlock the attitude Press and hold to initiate RTH Press again to cance...

Page 11: ...o switch between photo and video mode 7 Accelerator Press to fly the aircraft in the direction of the circle in the goggles Apply more pressure to accelerate Release to stop and hover 8 Lanyard Hole 9 USB C Port 10 Power Button Press once to check the current battery level Press once then press again and hold for two seconds to power the motion controller on or off ...

Page 12: ... 2022 DJI All Rights Reserved 12 Getting Started ...

Page 13: ...avoid damage when the goggles are not in use If the antenna is accidentally damaged you can contact DJI after sales to purchase a new one for replacement Refer to Replacing the Antennas for the replacement procedure 2 Remove the screen protector Re attach the screen protector after use to protect the lens and prevent damage caused by direct sunlight ...

Page 14: ...d to connect the power port of the goggles to the goggles battery Only use the DJI goggles battery provided DO NOT use non DJI batteries DO NOT use the goggles battery to power other mobile devices 1 3 2 Press the power button once to check the current battery level Press once then press again and hold for two seconds to power the goggles on or off ...

Page 15: ...g and when in use The statuses of the LEDs are defined below LED is on LED is flashing LED is off Battery Level LEDs Battery Level Battery Level 88 75 Battery Level 88 63 Battery Level 75 50 Battery Level 63 38 Battery Level 50 25 Battery Level 38 13 Battery Level 25 0 Battery Level 13 The table below shows the battery level during charging Battery Level LEDs Battery Level 0 Battery Level 50 50 Ba...

Page 16: ...l Charge before using if the battery level is too low USB Power Delivery chargers are not supported Press once then press again and hold for two seconds to power the motion controller on or off The battery level LEDs display the power level of the battery during charging and when in use The statuses of the LEDs are defined below LED is on LED is flashing LED is off ...

Page 17: ...ion DJI Fly App Activate the device and update the firmware before using for the first time Power on the aircraft goggles and motion controller Make sure all the devices are linked Connect the USB C port of the goggles to your mobile device run the DJI Fly App and follow the prompted instructions to activate Make sure the mobile device is connected to the internet during activation Use the USB C O...

Page 18: ...aft must be linked with the goggles first followed by the motion controller 2s 1 Power on the aircraft goggles and motion controller 2 Press the link button on the goggles The goggles will start to beep continually 3 Press and hold the power button on the aircraft until the battery level LEDs start to blink in sequence 4 Once linking is completed the battery level LEDs of the aircraft turn solid a...

Page 19: ...nd hold the power button of the motion controller until it beeps continually and the battery level LEDs blink in sequence 7 The motion controller stops beeping once linking is successful and both the battery level LEDs of the aircraft and motion controller turn solid and display the battery level The aircraft can be controlled with only one remote control device during flight If your aircraft has ...

Page 20: ...knobs in the direction as shown to unlock them Once unlocked the knobs will pop out 56 72 mm 8 0 D 2 0D 2 Toggle the knobs left and right to adjust the distance between the lenses until the images are properly aligned 56 72 mm 8 0 D 2 0D 3 Slowly rotate the knobs to adjust the diopter The supported adjustment range is from 8 0 D to 2 0 D 56 72 mm 8 0 D 2 0D ...

Page 21: ...t time you are advised to adjust to a degree that is slightly lower than the strength of your actual eyeglasses Give your eyes enough time to adapt then adjust the diopter again until you get a clear view Do not use a diopter higher than your actual eyeglass power to avoid eyestrain 4 After you get a clear view press the knobs in and rotate them in the direction as shown to lock in the lenses posi...

Page 22: ...pe size astigmatism axis and edge thickness 2 8 mm of the lenses meet the installation requirements of the eyeglass frames The overall diopter is the sum of the goggles diopter and the diopter of the additional lenses Make sure to adjust the diopter of the goggles first and lock the knobs before installing the eyeglass frames 1 Detach the eyeglass frame and remove the original dummy lens 2 8 mm 2 ...

Page 23: ...e eyeglass frame is installed on the goggles 2 8 mm 4 Install the left and right frames onto the goggles When installing make sure that the mark on the top of the frame is facing upwards and the triangular arrow is aligned with the white dot on the upper edge of the goggle lens L R If the installed lens supports astigmatism correction do not rotate the knob after the eyeglass frame is installed Ot...

Page 24: ... 2022 DJI All Rights Reserved 24 DJI Goggles 2 ...

Page 25: ...m h 80 80 20 20 75 75 12 59 12 59 15min 15min 10min 10min 1 8km h 1 8km h 1024 4m 1024 4m D D 500m 500m H H 20 5km h 20 5km h 80 80 20 20 75 75 12 59 12 59 Manual Mode 300 ISO 1 200 Shuttle 5 5 Apeture 3 M M Manual WB 1200K 15min 15min 10min 10min Status Album Transmission Setting More Swipe down from the top enter Shortcut Menu 15min 15min 10min 10min 1 8km h 1 8km h 1024 4m 1024 4m D D 500m 500m...

Page 26: ... 500m H H 20 5km h 20 5km h 80 80 20 20 75 75 12 59 12 59 15min 15min 10min 10min 1 8km h 1 8km h 1024 4m 1024 4m D D 500m 500m H H 20 5km h 20 5km h 80 80 20 20 75 75 12 59 12 59 Manual Mode 300 ISO 1 200 Shuttle 5 5 Apeture 3 M M Manual WB 1200K 15min 15min 10min 10min Status Album Transmission Setting More 15min 15min 10min 10min 1 8km h 1 8km h 1024 4m 1024 4m D D 500m 500m H H 20 5km h 20 5km...

Page 27: ...1000m D D 500m 500m H H 6m s 6m s 3m 3m 80 20 20 75 75 12 59 12 59 15 24 24 10 15min 15min 10min 10min 10 10 Top 2m Top 2m Bottom 5m Bottom 5m 5 6 7 8 9 10 11 2 3 4 12 13 14 15 Press Brake button to cancel RTH Low battery RTH 1 Obstacle Detection Status only available for aircrafts with the obstacle sensing function Indicates the distance between the aircraft and obstacles as well as the general d...

Page 28: ... insert or remove the microSD card while recording otherwise data or system files may be lost or damaged 3 Gimbal Slider Displays the gimbal tilt angle when the gimbal dial is toggled 4 Prompts Displays notifications and information such as when a new mode is applied or battery level is low 5 Goggles Battery Level Displays the battery level of the goggles 6 GPS Signal Strength Displays the current...

Page 29: ...fferent directions The icon is white when the Vision System is working normally Red indicates that the Vision System is disabled or working abnormally where the aircraft will not be able to avoid obstacles automatically 10 Remaining Flight Time Displays the remaining flight time of the aircraft after starting the motors 11 Aircraft Battery Level 12 Distance to the Ground Displays the current altit...

Page 30: ...reen saver Reconnect the goggles to the aircraft and image transmission will be restored Shortcut Menu 15min 15min 10min 10min 1 8km h 1 8km h 1024 4m 1024 4m D D 500m 500m H H 20 5km h 20 5km h 80 80 20 20 75 75 12 59 12 59 Swipe down from the top of the touch panel to enter the Shortcut Menu and perform the following functions Take a photo or start stop recording Lock unlock the screen Enable di...

Page 31: ... enter the Camera Settings and to quickly change camera parameters Menu 15min 15min 10min 10min Status Album Transmission Setting More Switch abnormal Calibration abnormal Calibration Calibration 1 2 3 4 5 Swipe right from the left of the touch panel to open the goggles menu 1 Status Displays the in use aircraft model and detailed information of prompt alerts To change aircraft use the switch func...

Page 32: ...so that other devices can find the device and enter the channel to see the camera view b Set the Focus mode to on off or auto c Set the channel mode to auto or manual It is recommended to select auto so that the video transmission will automatically switch between the 2 4 and 5 8 GHz frequency bands and select the channel with the best signal d Set the frequency band You can select either 2 4 or 5...

Page 33: ...s Safety a Set the safety configurations such as max flight altitude max flight distance and RTH altitude Users can also update the Home Point set Obstacle Avoidance behavior and view the IMU and compass status and calibrate them if necessary b Find My Drone helps to find the location of the aircraft on the ground by using the cached video in the goggles c Advanced Safety Settings include aircraft...

Page 34: ...ted functions such as setting the stick mode customizing functions of certain buttons and calibrating the IMU and compass b Calibrate the motion controller or view its tutorial c Calibrate the gimbal or adjust the gimbal tilt speed d Invert horizontal swipe for the touch panel e View the goggles tutorial Camera a Users can set the transmission video specs format and gridlines enable or disable the...

Page 35: ...Home Point About a View device information such as the serial number and the firmware of the goggles and linked devices b Set the system language c Select Reset All to reset the goggles and the linked devices to their default settings 5 More Enable the wireless streaming function to cast the video playing on the mobile device to the goggles screen the video player must support the wireless streami...

Page 36: ...enabling the head tracking the horizontal orientation of the aircraft and the gimbal tilt can be controlled through head movements The remote control device will only control the flight path of the aircraft The gimbal will not be able to be controlled by the remote control device Using the Wireless Streaming Function The wireless streaming function enables you to project the video playing on your ...

Page 37: ...DJI Goggles 2 User Manual v1 0 Contents 2022 DJI All Rights Reserved 37 DJI Motion Controller ...

Page 38: ... Button Lock Button Takeoff Press twice to start the motors of the aircraft Press and hold to make the aircraft automatically take off ascend to approximately 1 2 m and hover Landing Press and hold while the aircraft is hovering to land it automatically and stop the motors Press once to cancel Low Battery RTH when the countdown appears in the goggles Critical Low Battery landing cannot be canceled...

Page 39: ...ntil the motion controller beeps to indicate that RTH has started When the aircraft is performing RTH or auto landing you can press the button once to cancel RTH or landing Motion Control Before using for the first time practice flying with the motion controller using DJI Virtual Flight Speed Control Press the accelerator to fly in the direction of the circle in the goggles Apply more pressure to ...

Page 40: ...n of the aircraft can be controlled by tilting the motion controller left and right Tilt left to rotate the aircraft counterclockwise and tilt right to rotate clockwise The circle in the goggles will move left and right and the video transmission will change accordingly The greater the tilt angle of the motion controller the faster the aircraft will rotate Gimbal Control Tilt the motion controller...

Page 41: ...ts Reserved 41 Controlling the Gimbal and Camera 1 Gimbal Tilt Slider push up and down to adjust the tilt of the gimbal 2 Shutter Record Button press once to take a photo or to start or stop recording Press and hold to switch between photo and video mode 1 2 ...

Page 42: ...alibration The compass IMU and accelerator of the motion controller can be calibrated Immediately calibrate any of the modules when prompted to do so On the goggles go to Settings Control Motion Controller and then Motion Controller Calibration Select the module and follow the prompts to complete calibration DO NOT calibrate the compass in locations where magnetic interference may occur such as cl...

Page 43: ...DJI Goggles 2 User Manual v1 0 Contents 2022 DJI All Rights Reserved 43 Firmware Update ...

Page 44: ... of the goggles to your mobile device run DJI Fly and follow the prompted instructions to update Make sure your mobile device is connected to the internet during the update Use the USB C OTG cable provided to connect if you are using a UBS A to USB C The goggles only support standard USB C protocols and MFI certified Lightning cables Non standard cables are not supported If the devices do not resp...

Page 45: ...all the steps to update the firmware otherwise the update may fail The firmware update will take several minutes It is normal if the screen turns off or the goggles restart automatically during the update Please wait patiently for the firmware upgrade to complete Make sure the computer is connected to the internet during the update Make sure that the device has sufficient power before updating the...

Page 46: ... 2022 DJI All Rights Reserved 46 Maintenance ...

Page 47: ...tennas If an antenna is damaged you can contact DJI after sales to purchase a new one for replacement To remove the antenna hold the bottom of the antenna and pull it upwards When installing distinguish the left and right antennas and make sure the antenna is properly aligned with the port ...

Page 48: ...tly as shown below DO NOT pull the sides when removing the foam padding Otherwise the padding may be damaged 2 Align the positioning columns of the new foam padding with the positioning holes on the goggles install it and press the left and right sides After hearing a click check and make sure that there is no gap between the foam padding and the goggles ...

Page 49: ... cleaning and make sure that no cables are connected DO NOT clean the lenses with alcohol The lenses are delicate Clean them gently DO NOT scratch them as this will affect viewing quality Store the goggles in a dry place at room temperature to avoid damage to the lenses and other optical components from high temperatures and humid environments Keep the lenses away from direct sunlight to avoid scr...

Page 50: ... 2022 DJI All Rights Reserved 50 Appendix ...

Page 51: ... screen 1920 1080 p Screen Refresh Rate Max 100 Hz IPD Range 56 72 mm Diopter Range 2 0 D to 8 0 D FOV 51 Transmission When used with different aircraft the goggles will automatically select the corresponding firmware to match the transmission specification of the aircraft Operating Frequency 2 4000 2 4835 GHz 5 725 5 850 GHz not available in some countries regions Transmitter Power EIRP 2 4 GHz 3...

Page 52: ... Transmitter Power EIRP 8 dBm Supported Video Recording Format MOV Supported Video Playback Format MP4 MOV Video format H 264 H 265 Audio format ACC PCM Wireless Streaming DLNA Operating Temperature 10 to 40 C 14 to 104 F Power Input DJI Goggles 2 Battery Supported SD Cards microSD Card max 256 GB Recommended microSD Cards SanDisk Extreme U3 V30 A1 32 GB microSDXC SanDisk Extreme Pro U3 V30 A1 32 ...

Page 53: ...Operating Time Around 2 hours when in flight DJI Motion Controller Model Number FC7BMC Weight Approx 167 g Operating Frequency 2 4000 2 4835 GHz 5 725 5 850 GHz not available in some countries regions Transmitter Power EIRP 2 4 GHz 28 5 dBm FCC 20 dBm CE SRRC MIC 5 8 GHz 31 5 dBm FCC 19 dBm SRRC 14 dBm CE Operating Temperature 10 to 40 C 14 to 104 F Operating Time Around 5 hours Measured in a wide...

Page 54: ... all mode low blue light protecting users from exposure to harmful blue light DJI Goggles 2 has obtained the Low Blue Light certification It is highly recommended to follow the steps below to protect your eyes against prolonged display use Look away from the screen and then at a distant place for 20 seconds every 20 minutes Rest your eyes for 10 minutes after 2 hours of continuous use Roll your ey...

Page 55: ...JI Goggles 2 User Manual v1 0 Contents 2022 DJI All Rights Reserved 55 After Sales Information Visit https www dji com support to learn more about after sales service policies repair services and support ...

Page 56: ...rsion from https www dji com goggles 2 Trademarks is a trademark of SZ DJI TECHNOLOGY CO LTD abbreviated as DJI and its affiliated companies Names of products brands etc appearing in this document are trademarks or registered trademarks of their respective owner companies ...

Reviews: