background image

31

ES

Batería

3950 mAh a 3,83 V

Potencia de transmisión

(PIRE)

2,4 GHz

FCC: ≤ 26 dBm; CE/MIC: ≤ 20 dBm; SRRC: ≤ 20 dBm
5,8 GHz

FCC: ≤ 26 dBm; CE: ≤ 14 dBm; SRRC: ≤ 26 dBm

Voltaje de funcionamiento


1800 mA a 3,83V (al cargar el dispositivo móvil)

Tamaño admitido de dispositivo móvil Espesor admitido: 6,5-8,5 mm, longitud máxima: 160 mm

Tipos de puerto USB compatibles: Lightning, Micro USB (tipo B)

USB-C


Cargador

Voltaje

17,6±0,1 V

Potencia nominal

60 W


Batería de Vuelo Inteligente

Capacidad

3850 mAh

Voltaje

17,6 V (máx.)

15,4 V (típico)

Tipo de batería

LiPo 4S

Energía

59,29 Wh

Peso neto 

Aprox. 297 g

Intervalo de temperatura de carga

De 5 °C a 40 °C (de 41 °F a 104 °F)  

Potencia de carga máx.

80 W

Para obtener más información, lea el manual del usuario:

http://www.dji.com/mavic-2

 Este contenido puede modificarse sin notificación previa.

MAVIC es una marca comercial de DJI.

Copyright © 2018 DJI Todos los derechos reservados.

Diseñado por DJI. Impreso en China.

Summary of Contents for MAVIC 2 PRO

Page 1: ...V1 0 MAVIC 2 PRO Quick Start Guide Kurzanleitung Gu a de inicio r pido Guide de d marrage rapide Guida rapida Snelstartgids Guia de in cio r pido...

Page 2: ......

Page 3: ...Contents Quick Start Guide 2 Kurzanleitung 12 Gu a de inicio r pido 22 Guide de d marrage rapide 32 Guida di avvio rapido 42 Snelstartgids 52 Guia de in cio r pido 62 72 EN DE ES FR IT NL PT PT RU...

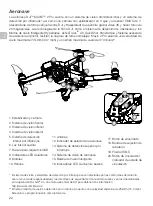
Page 4: ...Camera 2 Forward Vision System 3 Downward Vision System 4 Lateral Vision System 5 Downward Infrared Sensing System 6 Auxiliary Bottom Light 7 microSD Card Slot 8 Front LEDs The Vision Systems and Inf...

Page 5: ...Flight Pause Button 3 5D Button 4 Removable Control Sticks 5 Power Button 6 Antennas 7 RTH Button 8 Control Sticks Storage Slot 9 Reserve Video Downlink Port USB 10 Mobile Device Clamp 11 Flight Mode...

Page 6: ...ww dji com mavic 2 or in DJI GO 4 by tapping the icon in the top right corner of your screen 2 Preparing the Aircraft Remove the gimbal cover from the camera Unfold the front arms Unfold the rear arms...

Page 7: ...ove the Intelligent Flight Battery Charging Time 1 hour 30 minutes Charging Time 2 hour 15 minutes Power Outlet 100 240V Low High Checking the Battery Levels and Powering On Off Press once to check th...

Page 8: ...an iPad or tablet use the USB port on the remote controller Do not use the Micro USB and the USB ports simultaneously for linking video 4 Preparing the Remote Controller Unfold the antennas and mobil...

Page 9: ...craft Status Bar in DJI GO 4 displays Ready to Go Combination stick command to start stop the motors Auto Takeoff Landing Manual Takeoff Landing The motors can only be stopped mid flight when the flig...

Page 10: ...left stick controls the aircraft s altitude and heading while the right stick controls its forward backward left and right movements The gimbal dial controls the camera s tilt Press the Flight Pause b...

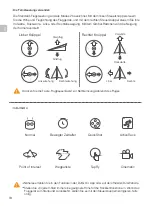
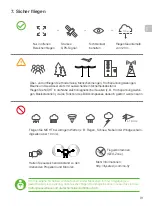
Page 11: ...lines and base stations as it may affect the onboard compass DO NOT use the aircraft in adverse weather conditions such as rain snow fog and wind speeds exceeding 10 m s or 22 mph No Fly Zone Stay aw...

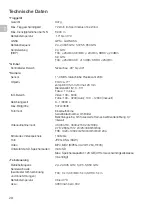
Page 12: ...0 3200 auto 100 12800 manual Electronic Shutter Speed 8 1 8000 s Max Image Size 5472 3648 Still Photography Modes Single shot Burst shooting 3 5 frames Auto Exposure Bracketing AEB 3 5 bracketed frame...

Page 13: ...USB Type B USB C Charger Voltage 17 6 0 1 V Rated Power 60 W Intelligent Flight Battery Capacity 3850 mAh Voltage 17 6 V max 15 4 V typical Battery Type LiPo 4S Energy 59 29 Wh Net Weight Approx 297...

Page 14: ...rts gerichtetes Sichtsystem 3 Abw rts gerichtetes Sichtsystem 4 Seitliches Sichtsystem 5 Nach unten gerichtetes Infrarotsensorsystem 6 Hilfsbeleuchtung 7 Einschub f r die Micro SD Karte 8 Vordere LED...

Page 15: ...usentaste 3 5D Taste 4 Abnehmbare Steuerkn ppel 5 Ein Aus Taste 6 Antennen 7 R ckkehrtaste 8 Staufach f r Steuerkn ppel 9 USB Anschluss Assistant Video Downlink 10 Mobilger teklammer 11 Flugmodusschal...

Page 16: ...pen auf das Symbol in der oberen rechten Ecke des Bildschirms an 2 Flugger t vorbereiten Entfernen Sie die Gimbal Abdeckung von der Kamera Klappen Sie die vorderen Arme aus Klappen Sie die hinteren Ar...

Page 17: ...men Ladezeit ca 1 Std 30 Minuten Ladezeit ca 2 Std 15 Minuten Steckdose 100 240 V Niedrig Hoch Ladezustand pr fen und Ein Ausschalten Dr cken Sie die Taste einmal um den Akku Ladezustand zu berpr fen...

Page 18: ...et verwenden nutzen Sie den USB Anschluss der Fernsteuerung Verwenden Sie die Micro USB und USB Anschl sse nie gleichzeitig f r die Videoverbindung 4 Fernsteuerung vorbereiten Klappen Sie die Antennen...

Page 19: ...dem Losfliegen dass die Statusleiste in DJI GO 4 Bereit anzeigt Kn ppelkombination zum Ein Ausschalten der Motoren Automatisches Starten Landen Automatisches Starten Landen Die Motoren k nnen w hrend...

Page 20: ...he und Flugrichtung des Flugger ts und mit dem rechten Steuerkn ppel steuern Sie ihre Vorw rts R ckw rts Links oder Rechtsbewegung Mit dem Gimbal R dchen wird die Neigung der Kamera verstellt Dr cken...

Page 21: ...tionen da die Funktion des Bordkompasses dadurch gest rt werden kann Fliegen Sie NICHT bei widrigem Wetter z B Regen Schnee Nebel oder Windgeschwin digkeiten ber 10 m s Flugverbotszonen GEO Zone Halte...

Page 22: ...400 Fotos 100 3200 Auto 100 12800 manuell Belichtungszeit 8 1 8000 s Max Bildgr e 5472 3648 Fotomodi Einzelaufnahme Serienbildaufnahme 3 5 Bilder Belichtungsreihe 3 5 fokussierte Frames bei Blenden ff...

Page 23: ...USB Typ B USB C Ladeger t Spannung 17 6 0 1 V Nennleistung 60 W Intelligent Flight Battery Kapazit t 3850 mAh Spannung 17 6 V max 15 4 V normal Akkutyp LiPo 4S Energie 59 29 Wh Nettogewicht ca 297 g...

Page 24: ...istema de visi n lateral 5 Sistema de detecci n inferior por infrarrojos 6 Luz inferior auxiliar 7 Ranura para tarjeta microSD 8 Indicadores LED delanteros 9 Motores 10 H lices El sistema de visi n y...

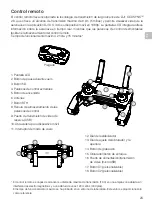
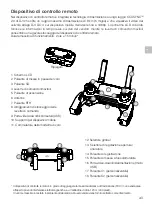
Page 25: ...ntrol extra bles 5 Bot n de encendido 6 Antenas 7 Bot n RTH 8 Ranura de almacenamiento de las palancas de control 9 Puerto de transmisi n de v deo de reserva USB 10 Abrazadera para dispositivo m vil 1...

Page 26: ...n la aplicaci n DJI GO 4 tocando el icono en la esquina superior derecha de la pantalla 2 Preparaci n de la aeronave Retire la cubierta del estabilizador de la c mara Despliegue los brazos delanteros...

Page 27: ...Tiempo de carga 1 hora y 30 minutos Tiempo de carga 2 horas y 15 minutos Toma de alimentaci n 100 240 V Bajo Alto Comprobar los niveles de bater a y encendido apagado Pulse una vez para comprobar el...

Page 28: ...eta utilice el puerto USB del control remoto No utilice el cable micro USB ni los puertos USB de forma simult nea para conectar v deo 4 Preparaci n del controlador remoto Despliegue las antenas las ab...

Page 29: ...e la aeronave en la aplicaci n DJI GO 4 muestre Ready to Go Comando de combinaci n de palancas para arrancar detener los motores Despegue aterrizaje autom ticos Despegue aterrizaje manuales Los motore...

Page 30: ...direcci n de la aeronave mientras que la derecha controla los movimientos hacia delante atr s izquierda y derecha El selector del estabilizador controla la inclinaci n de la c mara Pulse el bot n de...

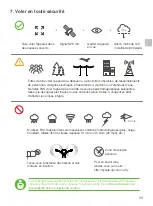
Page 31: ...nes base ya que puede afectar a la br jula de a bordo NO utilice la aeronave en condiciones clim ticas adversas como lluvia nieve niebla ni con una velocidad del viento superior a 10 m s o 22 mph Zona...

Page 32: ...o 100 12800 manual Velocidad de obturador electr nico 8 1 8000 s Tama o de imagen m ximo 5472 3648 Modos de fotograf a fija Disparo simple Disparo en r fagas 3 5 fotogramas Exposici n autom tica en ho...

Page 33: ...SB tipo B USB C Cargador Voltaje 17 6 0 1 V Potencia nominal 60 W Bater a de Vuelo Inteligente Capacidad 3850 mAh Voltaje 17 6 V m x 15 4 V t pico Tipo de bater a LiPo 4S Energ a 59 29 Wh Peso neto Ap...

Page 34: ...me optique avant 3 Syst me optique inf rieur 4 Syst me optique lat ral 5 Syst me de d tection infrarouge vers le bas 6 Lampe inf rieure 7 Logement de la carte microSD 8 LED avant 9 Moteurs Les syst m...

Page 35: ...le amovibles 5 Bouton d alimentation 6 Antennes 7 Bouton RTH 8 Emplacement de rangement des manches de contr le 9 Port Video Downlink USB de r serve 10 Bride de fixation pour appareil mobile 11 Commu...

Page 36: ...bles l adresse www dji com mavic 2 ou dans DJI GO 4 en appuyant sur l ic ne situ e dans le coin sup rieur droit de votre cran 2 Pr paration de l appareil Retirez le cache de la nacelle de la cam ra D...

Page 37: ...Temps de charge environ 1 heure et 30 minutes Temps de charge environ 2 heures et 15 minutes Prise de courant 100 240 V Faible lev V rification des niveaux de batterie et mise sous hors tension Appuye...

Page 38: ...tilisez le port USB de la radiocommande N utilisez pas les ports USB et Micro USB simultan ment pour la liaison vid o 4 Pr paration de la radiocommande D pliez les antennes et la bride de fixation pou...

Page 39: ...JI GO 4 que la mention Ready to Go s affiche dans la barre d tat de l appareil Commande de manche combin e pour d marrer couper les moteurs D collage atterrissage automatique D collage atterrissage ma...

Page 40: ...et l orientation de l appareil tandis que le manche droit contr le ses mouvements vers l avant l arri re la gauche et la droite La molette de la nacelle contr le l inclinaison de la cam ra Appuyez sur...

Page 41: ...s antennes relais Celles ci risquent en effet d affecter le compas int gr N utilisez PAS l appareil dans de mauvaises conditions m t orologiques pluie neige brouillard rafales dont la vitesse d passe...

Page 42: ...0 3200 Auto 100 12800 Manuel Vitesse d obturation lectronique 8 1 8000 s Taille max de l image 5472 3648 Mode de photographie Prise de vue unique Prise de vue en rafale 3 5 clich s Bracketing d exposi...

Page 43: ...ghtning Micro USB Type B USB C Chargeur Tension 17 6 0 1 V Puissance nominale 60 W Batterie de Vol Intelligente Capacit 3 850 mAh Tension 17 6 V max 15 4 V standard Type de batterie LiPo 4S nergie 59...

Page 44: ...so 4 Sistema visivo laterale 5 Sistema di rilevamento a infrarossi verso il basso 6 Luce ausiliaria sulla parte inferiore 7 Slot per scheda micro SD 8 LED anteriori 9 Motori I sistemi visivi e i siste...

Page 45: ...4 Levette di comando rimovibili 5 Pulsante di accensione 6 Antenne 7 Pulsante RTH 8 Alloggiamenti di stoccaggio delle levette di comando 9 Porta video downlink di riserva USB 10 Supporto per dispositi...

Page 46: ...ic 2 o in DJI GO 4 toccando la relativa icona nell angolo in alto a destra dello schermo 2 Preparazione del velivolo Rimuovere la protezione del gimbal dalla telecamera Dispiegare i bracci anteriori D...

Page 47: ...ntelligente Tempo di carica 1 ora e 30 minuti Tempo di carica 2 ore e 15 minuti Presa di alimentazione 100 240 V Basso Alto Controllo dei livelli della batteria e accensione spegnimento Premere una vo...

Page 48: ...un tablet usare la porta USB sul dispositivo di controllo remoto Non utilizzare la porta micro USB e la porta USB contemporaneamente per il collegamento video 4 Preparazione del dispositivo di contro...

Page 49: ...a di stato del velivolo nell app DJI GO 4 indichi Ready to Go Combinazione di comandi da levette per avviare arrestare i motori Decollo e atterraggio automatici Decollo e atterraggio manuali I motori...

Page 50: ...ntrolla l altitudine e la direzione del velivolo mentre la levetta destra ne controlla i movimenti in avanti all indietro a sinistra e a destra Il quadrante del gimbal controlla l inclinazione della t...

Page 51: ...stazioni di base in quanto tali sorgenti possono influenzare la bussola di bordo NON utilizzare il velivolo in condizioni meteorologiche avverse come pioggia neve nebbia e venti con velocit superiore...

Page 52: ...200 auto 100 12800 manuale Velocit dell otturatore elettronico 8 1 8000 s Massima dimensione immagine 5 472 3 648 Modalit fotografia Scatto singolo Scatti a raffica 3 5 fotogrammi Auto Exposure Bracke...

Page 53: ...Tipo B USB C Caricatore Tensione 17 6 0 1 V Potenza nominale 60 W Batteria di volo intelligente Capacit 3850 mAh Tensione 17 6 V max 15 4 V tipico Tipo di batteria LiPo 4S Energia 59 29 Wh Peso netto...

Page 54: ...10 11 12 1 Gimbal en camera 2 Vision System naar voren 3 Vision System naar beneden 4 Vision System dwarsrichting 5 Naar beneden gericht infraroodsensorsysteem 6 Extra lampje onderaan 7 microSD kaarts...

Page 55: ...inuten 1 LCD scherm 2 Vluchtpauzeknop 3 5D knop 4 Verwijderbare joysticks 5 Aan uitknop 6 Antennes 7 RTH knop 8 Opslagsleuf joysticks 9 Reserve video downlinkpoort USB 10 Klem mobiel apparaat 11 Vluch...

Page 56: ...DJI GO 4 door op het pictogram in de rechter bovenhoek van je scherm te klikken 2 Drone voorbereiden Verwijder de gimbal afdekking van de camera Klap de voorarmen uit Klap de achterarmen uit Uitgekla...

Page 57: ...dtijd 1 uur en 30 minuten Oplaadtijd 2 uur en 15 minuten Stopcontact 100 240 V Laag Hoog Controleer het laadniveau van de accu en de aan uit schakelaar Druk eenmaal op de knop om het accuniveau te con...

Page 58: ...ad of tablet gebruikt gebruik dan de USB poort op de afstandsbediening Gebruik de micro USB en de USB poorten tegelijkertijd om video te koppelen 4 Voorbereiding van de afstandsbediening Klap de anten...

Page 59: ...drone in de DJI GO 4 app Ready to Go aangeeft Combination Stick Command CSC voor het starten stoppen van de motoren Automatisch opstijgen landen Handmatig opstijgen landen De motoren kunnen gedurende...

Page 60: ...nkerjoystick regel je de hoogte en koers terwijl je met de rechterjoystick vooruit achteruit naar links en rechts kunt bewegen Met de gimbal regel je de kanteling van de camera Druk op de Flight Pause...

Page 61: ...sstations daardoor kan het ingebouwde kompas ongunstig worden be nvloed Gebruik de drone NIET bij ongunstige weersomstandigheden zoals regen sneeuw mist en bij windsnelheden van meer dan 10 m s of 22...

Page 62: ...auto 100 12800 handmatig Elektronische sluitertijd 8 1 8000 s Maximale beeldgrootte 5472 3648 Fotografeermodi stilbeelden Enkele opname Serieopnamen 3 5 frames Auto Exposure Bracketing AEB 3 5 bracket...

Page 63: ...ader Spanning 17 6 0 1 V Nominaal vermogen 60 W Intelligent Flight Battery Capaciteit 3850 mAh Spanning 17 6 V max 15 4 V typisch Accutype LiPo 4S Vermogen 59 29 Wh Netto gewicht Ongeveer 297 g Bereik...

Page 64: ...o para a frente 3 Sistema de vis o para baixo 4 Sistema de vis o lateral 5 Sistema de dete o de infravermelhos para baixo 6 Luz auxiliar inferior 7 Ranhura para cart o microSD 8 LED frontais 9 Motore...

Page 65: ...s 5 Bot o de alimenta o 6 Antenas 7 Bot o para voltar posi o inicial RTH 8 Ranhura para armazenamento dos man pulos de controlo 9 Porta de reserva para liga o de v deo USB 10 Grampo para dispositivo m...

Page 66: ...2 ou na aplica o DJI GO 4 tocando no cone no canto superior direito do ecr 2 Preparar a aeronave Retire a cobertura da suspens o card da c mara Desdobre os bra os dianteiros Desdobre os bra os trasei...

Page 67: ...eligente Tempo de carregamento 1 hora e 30 minutos Tempo de carregamento 2 horas e 15 minutos Tomada el trica 100 240 V Baixo Alto Verificar os n veis da bateria e ligar desligar Prima uma vez para ve...

Page 68: ...izar um iPad ou um tablet utilize a porta USB do telecomando N o utilize portas micro USB e USB em simult neo para a liga o de v deo 4 Preparar o telecomando Desdobre as antenas e as bra adeiras para...

Page 69: ...tica Antes de descolar assegure se de que a barra de estado da aeronave na aplica o DJI GO 4 indica Ready to Go Comando de man pulos combinados para ligar desligar os motores Descolagem Aterragem auto...

Page 70: ...esquerdo controla a altitude e o rumo da aeronave e o man pulo direito controla os movimentos para a frente para tr s para a esquerda e para a direita O bot o da suspens o card controla a inclina o da...

Page 71: ...ois estas podem afetar a b ssola integrada N O utilize a aeronave em condi es atmosf ricas adversas tais como chuva neve nevoeiro e ventos com velocidades superiores a 10 m s ou 35 4 km h Zona de excl...

Page 72: ...tografia 100 3200 auto 100 12 800 manual Velocidade do obturador eletr nico 8 1 8000 s Tamanho m ximo da imagem 5472 x 3648 Modos de fotografia Disparo nico Disparos cont nuos 3 5 fotogramas Varia o d...

Page 73: ...Micro USB Type B USB C Carregador Tens o 17 6 0 1 V Pot ncia nominal 60 W Bateria de voo inteligente Capacidade 3850 mAh Tens o 17 6 V m x 15 4 V t pico Tipo de bateria LiPo 4S Energia 59 29 Wh Peso l...

Page 74: ...Hyperlapse ActiveTrackTM 2 0 QuickShot APAS Mavic 2 Pro 72 44 7 31 13 14 19 18 16 17 15 20 1 2 3 4 5 6 7 8 9 10 11 12 1 2 3 4 5 6 7 microSD 8 DJI GOTM 4 DJI http www dji com mavic 2 25 15 5 9 10 11 1...

Page 75: ...73 RU 12 13 14 15 17 16 18 DJI OCUSYNCTM 2 0 8 5 DJI GO 4 1080p 2 15 1 2 3 5D 4 5 6 7 8 9 USB 10 11 12 13 14 15 16 micro USB 17 C1 18 C2 FCC 120 400 1 3 4 6 7 2 8 9 10 11 5...

Page 76: ...74 RU DJI GO 4 iOS 9 0 Android 4 4 1 DJI GO 4 DJI GO 4 App Store Google Play QR www dji com mavic 2 DJI GO 4 2 1 2 3 1 2 3 DJI GO 4...

Page 77: ...75 RU B A A B 3 Intelligent Flight Battery Intelligent Flight Battery 1 30 2 15 100 240...

Page 78: ...76 RU 1 Lightning iPad USB Micro USB USB 4 1 2 3...

Page 79: ...77 RU DJI GO 4 App 6 Ready to Go GPS DJI GO 4 Ready to Go 5 DJI GO 4 DJI...

Page 80: ...78 RU DJI GO 4 QuickShot TapFly Waypoints HyperLapse Point of Interest ActiveTrack Cinematic mode 2 DJI GO 4 DJI...

Page 81: ...79 RU 120 10 120 400 10 22 http flysafe dji com no fly 7...

Page 82: ...f 2 8 f 11 1 ISO 100 6400 100 3200 100 12 800 l 8 1 8000 5472 3648 3 5 AEB 3 5 0 7 EV 4K Ultra HD 3840 2160 24 25 30 2 7K 2688 1512 24 25 30 48 50 60 FHD 1920 1080 24 25 30 48 50 60 120 100 JPEG DNG...

Page 83: ...26 CE MIC 20 SRRC 20 1800 3 83 6 5 8 5 160 USB Lightning Micro USB Type B USB C 17 6 0 1 60 Intelligent Flight Battery 3850 17 6 15 4 4S 59 29 297 5 40 C 41 104 F 80 http www dji com mavic 2 MAVIC DJI...

Page 84: ...MAVIC 2 PRO For online support please scan this code with Facebook Messenger 0M6DPARM01EU...

Reviews: