background image

02/2020


8


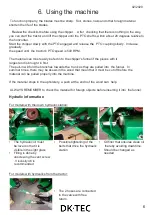
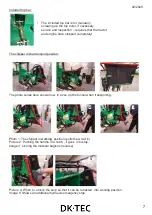
 Adjusting the rolling tension – how hard the roller holds the tree.


 There is 1 handle on  each side.


Chipper's knives


IMPORTANT: The machine must be completely turned off and stopped before changing  the 

blades!


The flywheel and stationary blades must be sharp to get the chipper to do the work as expected.


When the blades  have become lethargic, they can be turned 180 degrees as a result of which a 

new knife appears. Open to the chipper's flywheel and loosen the 4 bolts that hold the blades and 

then turn them over.


Be sure to tighten

 the 

 mounting bolts of the blades  when reinstalling the blades on

 the 

 flywheel. 


The stationary blades are designed with 4 sharp corners. When the corner opposite the 

flywheel rounds, the knife is dismantled and another is installed. When installing new blades, 

or when changing already existing blades, the blades are set in relation to the counter cutter 

found by looking down into the flywheel. The blades should not hit the counter cutter, but 

should drive as close to it as possible.


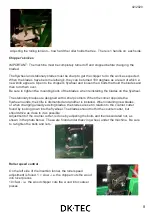
Adjustment of the counter cutter, is done by adjusting the bolts and their associated nut, as 

shown in the photo below.


 These are found under thesv ing wheel, under the machine.


 Be sure  

to re-tighten the bolts and nuts. 


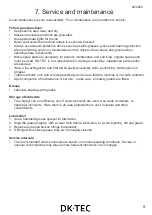
Roller speed control


On the left side of the insertion funnel, the roller speed 

adjustment is found. 1 = slow - i.e. the chipper cuts the wood 

into nicer pieces


10 =fast - ie.


 the wood chipper cuts

 the 

 wood into coarser 

pieces


Summary of Contents for HNDK

Page 1: ...01 2021 Woodchipper for tractor User manual Original manual Model HNDK ALWAYS READ INSTRUCTIONS BEFORE USING THE MACHINE DK TEC A S r vej 8 5800 Nyborg Phone 66128222 E mail info dk tec dk...

Page 2: ...02 2020 Table of contents 1 Introduction 1 2 Safety Labels 2 3 Safety Instructions 4 4 Safety equipment 4 5 Checklist 5 6 Using the machine 6 7 Service and Maintenance 9 8 Problem Solving 11...

Page 3: ...been installed Warning and instructions This and the upcoming sections will inform you of the various warnings and instructions for the hazards associated with the chipper as well as instructions for...

Page 4: ...xplanation of mm may vary CAUTION Flying objects Pay attention and stay away from the material from the ejection spout The chipper eject ejects wood chips quickly enough to predict damage Do not turn...

Page 5: ...ulic fluid under pressure Do not check for leaks with your hand or fingers This will result in serious injuries CAUTION Make sure that you turn off and decouple the PTO when doing maintenance on the w...

Page 6: ...ection spout away from doorways sidewalks and other areas where people may reside The funnel should be turned with the wind if possible otherwise the tile will blow in your eyes or down your neck Neit...

Page 7: ...e knife beam Make sure that 1 The PTO shaft is properly lubricated 2 The PTO shaft is properly lubricated and that the clutch is released when the levers are pushed against the funnel 3 The PTO shaft...

Page 8: ...fold the branches towards the trunk as they are pulled into the funnel In summer times there may be skews in the wood that mean that it must be cut off before the material can be pulled properly into...

Page 9: ...the transport position The photo series here shows how to close up the funnel when transporting Photo 1 The chipper in working position pulls the wood in Picture 2 Pushing the handle in a notch it goe...

Page 10: ...tionary blades are designed with 4 sharp corners When the corner opposite the flywheel rounds the knife is dismantled and another is installed When installing new blades or when changing already exist...

Page 11: ...kit easily accessible while performing maintenance on Chipper Tighten all bolts nuts and screws periodically and ensure that the machine is in a safe condition Upon completion of maintenance or servi...

Page 12: ...tling cleaning and lubrication is recommended to ensure that all components function as intended For the maintenance of the shaft this procedure should be followed 1 Remove the shaft from the chipper...

Page 13: ...pin Replace safety pin Slow feeding The knives are dull Turn or replace the blades The ejection spout is clogged Clean the eject spout The chipper requires a large amount of force otherwise it will st...

Page 14: ...maskine Betegnelse Flishugger Model WSH148 HNDK148 WC52R HNDK178 WSH178 WC72R Beskrivelse Flishugger til traktor med egen hydraulik Er fremstillet i overensstemmelse med f lgende EF direktiv Maskindi...

Page 15: ...02 2020 12 Always refer to the latest version of the manual as well as the spare parts list parts list for your item on www dk tec dk under the machine itself...

Reviews: