background image

www.dkn-uk.com

13

6. I/-

Use the +/- to adjust the incline during your 
workout. Press once to increase or decrease 
the incline by 1 level at a time. Press and 
hold for more than 2 seconds to alter the 
incline more quickly.

7. QUICK INCLINE

There are quick incline buttons labelled 0, 
2, 4, 6, 8, 10 & 12. Use them to adjust the 
incline level to the respective value with one 
touch during your workout. 

Handlebar Controls

The treadmill features controls on the 
handlebars for increasing and decreasing the 
speed and incline more conveniently as you 
are exercising. They function in the same way 
as the +/- buttons on the console.

Console Feedback Display 

Functions

PROGRAM


Displays the program you are doing. 

SPEED 

Displays your running speed. 

TIME 

Displays the cumulated workout time when 
in manual or the time countdown when in a 
selected mode or program. 

DISTANCE


Displays the cumulated workout distance 
when in manual or the distance countdown 
when in a selected mode or program. 

CALORIES


Displays the cumulated workout calories 
burnt when in manual or the calorie 
countdown when in a selected mode or 
program.
 

PULSE


Measure your heart rate either by holding 
the hand pulse sensors or by wearing a 
compatible chest strap. Your pulse will display 
when a heart rate signal is detected. If no 
heart rate signal is being received, it will 
display “P”. 

This data is for reference only 

and cannot be used for medical purposes.

FEEDBACK DATA DISPLAY RANGES

Time:   

0:00 – 99.59 (MIN) 

Distance:   0.00 – 99.9 (KM) 
Calories:  

0.0 – 999 (C) 

Speed:  

0.8 -20.0 (km/h) 

Pulse:  

50 – 200 (BPM) 

Incline:  

0 – 12 sections  

Summary of Contents for EZRUN

Page 1: ...www dkn uk com Owner s Manual...

Page 2: ...8 FOLDING UNFOLDING INSTRUCTIONS 9 CONSOLE OPERATION GUIDE 10 11 HOW TO USE YOUR DKN TREADMILL 12 13 WORKOUT PROGRAMS 14 16 BEGINNER S GUIDE TO EXERCISE 17 18 STRETCHING GUIDE 19 20 TREADMILL MAINTENA...

Page 3: ...se read these instructions carefully before using this product and retain this manual for future reference The specifications of this product may vary slightly from the illustrations and are subject t...

Page 4: ...medical purposes 17 WARNING Heart rate monitoring systems may be inaccurate Over exercising may result in serious injury or death If you experience dizziness nausea chest pain or any other abnormal s...

Page 5: ...replace its plug place heavy objects on the it or place it near a source of high heat 29 The power cord earths the treadmill and must therefore always be plugged into an appropriate outlet directly of...

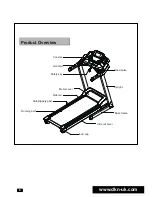
Page 6: ...6 www dkn uk com Product Overview Console Handrail Safety key Motor cover Side rail Running belt Hand pulse Upright Base frame Side rail cover End cap Anti slippery pad...

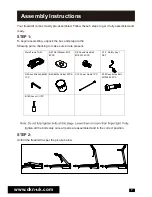
Page 7: ...llowing parts checking to make sure all are present STEP 2 Unfold the treadmill as per the picture below tighten all the bolts only once all parts are assembled and in the correct position Main Frame...

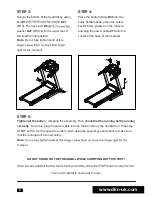
Page 8: ...this plug the power cable into the mains and turn the treadmill on Press the START button Set the speed to under 3 km h using the speed keys and check to make sure that the running belt turns smoothly...

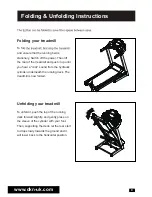
Page 9: ...oot Then supporting the deck let the rear start to drop slowly towards the ground and it will lower back to the horizontal position Folding your treadmill To fol and ensure that the running belt is st...

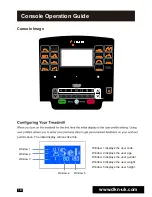
Page 10: ...play will look like this Console Operation Guide Window 1 displays the user code Window 2 displays the user age Window 3 displays the user gender Window 4 displays the user weight Window 5 displays th...

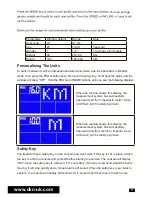
Page 11: ...ey The treadmill has a safety key on the console and won t work if the key is not in place Attach the key to both the console and yourself before starting to exercise The console will display OFF when...

Page 12: ...START to continue the workout or press STOP to end your session The display will show END all the values will be Simply follow these steps to start using your treadmill reset to zero and the treadmil...

Page 13: ...am you are doing SPEED Displays your running speed TIME Displays the cumulated workout time when in manual or the time countdown when in a selected mode or program DISTANCE Displays the cumulated work...

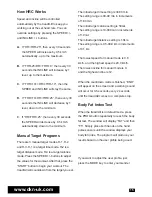
Page 14: ...ttings mode Heart Rate Control HRC Programs The EzRun features a wireless heart rate receiver To perform the HRC programs you need to wear a compatible wireless heart rate chest strap The computer det...

Page 15: ...e START button to begin your workout The treadmill will countdown from the target you set The initial target time setting is 30 00 min The setting range is 00 99 min in increments of 1 00 min The init...

Page 16: ...e used for medical purposes Bluetooth App Function Turn on the Bluetooth function on the treadmill by pressing the button when it is in standby mode The Bluetooth icon on the console will start to fla...

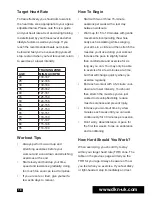
Page 17: ...neral wellbeing Regular exercise will Relieve tension and stress Provide enjoyment and fun Stimulate the mind Help maintain a stable weight Control appetite Boost self image Improve muscle tone and st...

Page 18: ...er How To Begin Start with two or three 15 minute sessions per week with a rest day between workouts Warm up for 5 to 10 minutes with gentle movements incorporating the whole body such as walking whil...

Page 19: ...bility Warm Up And Cool Down A successful cardio vascular exercise program consists of a full body warm up aerobic exercise and a cool down Do the entire program at least two and preferably three time...

Page 20: ...our physician before starting any exercise program COOL DOWN The purpose of cooling down is to return the body to its normal or near normal resting state at the end of each exercise session A proper c...

Page 21: ...can be cleaned with a wet soapy cloth Be careful to keep liquid away from mechanical and electrical parts including the motor and under the belt At least once a year remove the motor cover and vacuum...

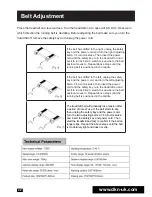
Page 22: ...til the running belt is positioned in the middle If the belt has drifted to the left unplug the safety key and the power cord and turn the left adjusting bolt a 1 4 turn clockwise then insert the powe...

Page 23: ...t In the case of an issue with the electrics the EzRun provides error codes on the console Please note the code your machine displays so we can help with diagnosing and resolving the issue Important P...

Page 24: ...ed in the user manual 3 Damage resulting from a Transport b Abuse misuse failure to follow instructions or improper or abnormal use c Non home use including commercial professional or rental purposes...

Page 25: ...13 14 15 16 Speed kph 8 8 8 9 9 8 10 11 10 8 10 10 9 11 11 6 Incline 0 2 4 2 2 4 2 0 2 4 2 2 4 2 2 0 P8 Segments 1 2 3 4 5 6 7 8 9 10 11 12 13 14 15 16 Speed kph 9 12 12 5 12 11 11 5 11 10 10 5 10 9...

Page 26: ...26 www dkn uk com Appendix 2 Exploded Diagram C32 B1 B3 D21 C11 D21 C34 D58 D21 D21 D21 B44 B45 B65L B58 B59 B5 D41 D59 D52 C29 B4 B49 B65R B59 D44 D24 B9 B6 B6 B10 B10 D23 D4 D21 D45 B13...

Page 27: ...older 1 B6 Transporting wheel cover 2 B44 EVA pad 1 B8 Flat foot pad 2 B45 Console housing back cover 1 B9 U shaped foot pad 2 B49 Bottle holder 2 B10 Limited cushion 2 B52 Side rail cover 2 B13 Motor...

Page 28: ...ex bolt M10X50 1 D42 Cross head bolt M4X10 washer 2 D12 Round hex bolt M10X55 6 D44 Cross head bolt M5X12 washer 1 D14 Round hex bolt M8X30 1 D45 Cross head bolt M5X15 washer 5 D15 Round hex bolt M8X4...

Reviews: