8
www.dkn-uk.com
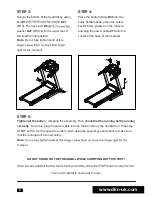
STEP 3:
Secure the bottom of the treadmill by using
bolt
D12
D21
(M10). Then use bolt
D8
washer
D21
the treadmill into position.
Note:
Do not fully tighten bolts at this
tight for the moment.
STEP 5:
Tighten all the bolts
to complete the assembly. Then
check that the running belt is running
correctly
. To do this, plug the power cable into the mains and turn the treadmill on. Press the
START button. Set the speed to under 3 km/h using the speed keys and check to make sure
that the running belt turns smoothly.
Note:
moment.
STEP 4:
Place the bottle holders
B49
into the
bottle holder bases, place the safety
key
C13
into position on the console,
and plug the power cable
C15
into the
socket at the base of the treadmill.
DO NOT STAND ON THE TREADMILL WHILE CARRYING OUT THIS TEST!
Your new treadmill is now ready for use!
D12
D21
D21


