DMEGC AC Module Installation Manual
- 11 -
Step 5: Connect the Microinverter
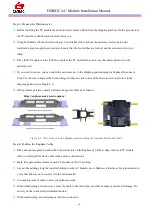
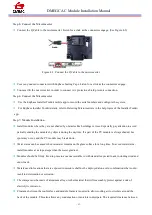
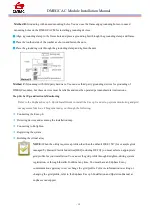
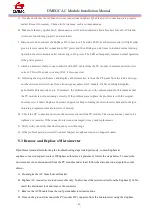
Connect the Q Cable to the microinverter. Listen for a click as the connectors engage. (See Figure 4-2)
Figure 4-2. Connect the Q Cable to the microinverter
Cover any unused connectors with Enphase Sealing Caps. Listen for a click as the connectors engage.
You must lift the microinverter in order to connect it. A protective shield prevents connection.
Step 6: Connect the Microinverter
Use the Enphase Installer Toolkit mobile app to record the serial numbers and configure the system.
For Enphase Installer Toolkit details, refer to Detecting Microinverters in the help topics of the Installer Toolkit
app.
Step 7: Module Installation
Install modules where they are not shaded by obstacles like buildings or trees. Especially pay attention to avoid
partially shading the modules by objects during the daytime. If a part of the PV module is always shaded, hot
spots may occur, and the PV module may break down.
Water stains can be caused when rainwater remains on the glass surface for a long time. To avoid water stains,
install modules at a slope steeper than the water gradient.
Modules should be firmly fixed in place in a manner suitable to withstand all expected loads, including wind and
snow loads.
Metals used in locations that are exposed to moisture shall not be deployed alone or in combinations that could
result in deterioration or corrosion.
The clamps must be made of aluminum alloy or other material that will reasonably protect against a risk of
electrolytic corrosion.
Clearance between the roof surface and module frame is required to allow cooling air to circulate around the
back of the module. This also allows any condensation or moisture to dissipate. The required clearance between

