background image

18 

9800 Series Keypad Installation Guide

Programming Cards into the System

Access the User Menu by pressing the Keypad icon in the carousel menu on the main 

screen, then press CMD until MENU? NO YES displays.
From the User Menu, select USER CODES. Choose ADD. At the ENTER CODE: - display, 

present the credential to the reader. The keypad works by reading the 4 to 10-digit 

user code from the data sent by the access control reader. For more information, 

refer to Entry Cards in the programming section of this document and the panel 

User’s Guide section on adding, deleting, and changing user codes.

Proximity Credentials Compatibility

DMP Keypads with internal proximity readers are compatible with most standard 

125Khz Prox credentials available from HID and all DMP proximity credentials. DMP 

Keypads are not compatible with iClass.
There are custom and non-standard credentials from HID that are not compatible 

with DMP proximity keypads. If you are using HID cards that have not been purchased 

directly from DMP, it is recommended to thoroughly test the application fully before 

installation. DMP does not guarantee compatibility with credentials not purchased 

from DMP.

Keypad Display Arming and Disarming
Area system Arming and Disarming

Select Keypad from the Carousel menu. Press CMD until Arm  Disarm displays. Select 

the desired option. The keypad displays ENTER CODE: - if Disarm is selected. Present 

your card to the reader. Once validated by the system, all areas assigned to your code 

arm or disarm automatically.

RESET

1

ABC 

5

MNO

9

YZ


2

DEF


6

PQR

0


3

GHI


7

STU


4

JKL 

8

VWX

CMD

ALL

CHIME

PERIM

HOME

SLEEP

USER MENU

ENTER CODE: -

Exit delay starts.

The System arms the area.

RESET

1

ABC 

5

MNO

9

YZ


2

DEF


6

PQR

0


3

GHI


7

STU


4

JKL 

8

VWX

CMD

ALL

CHIME

PERIM

HOME

SLEEP

ARM                DISARM

Figure 25: Area Arming and Disarming

All/Perimeter System Arming and Disarming

Present your card to the reader, the keypad displays PERIM  ALL when arming. Select 

the desired option. Once validated by the system, the selected areas arm or disarm 

automatically.

Home/Away System Arming and Disarming

Present your card to the reader. If the system is armed, once the card is validated, all 

areas are disarmed and the keypad displays ALL SYSTEM OFF. If the system is disarmed 

when you present your card, once the card is validated, HOME  SLEEP  AWAY displays. 

Manually select HOME, SLEEP, AWAY or after a short time-out, all areas automatically 

arm in the AWAY mode.

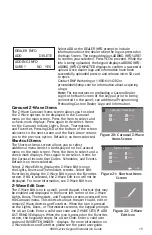
Summary of Contents for 9800 Series

Page 1: ...INSTALLATION GUIDE TODAY WEDNESDAY 82 98 77 HI LO CURRENT 98 77 HI LO 9800 Series Wireless Graphic Touchscreen Keypad ...

Page 2: ...b 9800 Series Keypad Installation Guide 2016 Digital Monitoring Products Inc Information furnished by DMP is believed to be accurate and reliable This information is subject to change without notice ...

Page 3: ...ction 9862 Snap in deskstand legs 9862USB Optional backboxes for conduit or wall mount applications Touchscreen Display 9800 Series Wireless Graphic Touchscreen Keypads have an integrated LCD touchscreen user interface The display can be set up to display a custom logo image on the main screen See the Custom Dealer Logo section The display can also be programmed to turn off blank screen during per...

Page 4: ...eports to the central station Panic Zone 19 Device Address Emergency non medical Zone 29 Device Address Fire Zone 39 Device Address Keypad Backlighting The touchscreen illuminates at the maximum brightness any time the display is pressed During an alarm condition the touchscreen turns Red When all alarm conditions are cleared the user selected brightness is restored Cleaning the Touchscreen Displa...

Page 5: ...abel dmp com for information To add a custom dealer logo see the Dealer Logo option under Installer Options menu AC Power Armed LED Operation The LED at the top center of the keypad indicates the keypad power status and armed status of the panel Depending on the operation the LED displays in Red or Blue as listed in the table Internal Card Reader When a proximity credential is presented to the int...

Page 6: ... not sounded for 30 seconds the user selected standby brightness level restores When the keypad is operating only on standby battery power the backlight brightness is turned off after 30 seconds When pressed the touchscreen reverts to maximum intensity Internal Speaker Tone Set the keypad speaker tone for screen presses At the SET TONE display use the left to lower the tone and the right to raise ...

Page 7: ... hole locations Selecting the Proper Location 9800 Series Wireless Graphic Touchscreen Keypads provide a built in survey capability in the Installer Options menu to allow one person to confirm keypad communication with the panel See Accessing Keypad Wireless Survey later in this document Remove the Cover The keypad housing is made up of two parts the cover which contains the circuit board and comp...

Page 8: ...2USB Wireless Graphic Touchscreen Keypad is intended for tabletop use 1 Attach the keypad deskstand by pressing the slide lock on one of the stand legs into the hole located on the back of the keypad case 2 Slide the leg upwards until the top ridge seats in the rectangular opening See Figure 10 3 Repeat the process to attach the second side of the stand Deskstand Leg 9862 USB Keypad Case 1 2 Slide...

Page 9: ...he J5 header on the 9862 Wireless Graphic Touchscreen Keypad Note Do not remove the PCB from the keypad housing to install the power supply connector When the power supply connector is plugged into the keypad the internal battery is automatically connected The keypad can operate from battery only as long as the power supply connector is plugged into the keypad Plug the power supply into a 120 Volt...

Page 10: ...ower supply into the outlet 6 Place the outlet screw through the two holes in the plastic strap and tighten it into the outlet See Figure 12 7 Plug the micro USB end of the cable into the back of the 9862USB keypad See Figure 13 USB end Transformer Strap Micro USB Port Micro USB end Figure 13 9862USB Power Supply Keypad Connection ...

Page 11: ... replace the battery DMP recommends replacing the battery every 3 years under normal use Note If removing the keypad from service disconnect the power supply connector from the back of the keypad to avoid discharging the battery Battery Replacement 1 Disconnect the battery lead connector from the keypad J3 battery header 2 Squeeze the battery straps to remove the standby battery 3 Observe polarity...

Page 12: ...ds Version 109 or higher that do not have a previously assigned house code A maximum of four wireless keypads are allowed on each panel To pair a 9800 Series keypad with an XTLplus panel power up both the panel and the keypad A 10 minute pairing timer begins The auto pairing process starts immediately and the keypad displays Pairing Keypad With System See Figure 15 If the panel acquires the keypad...

Page 13: ...es To enable wireless keypad association operation in the XT30 XT50 XR100 XR500 or XR150 XR350 XR550 panel reset the panel three times allowing the keypad bus transmit light to begin flashing between each reset For 60 seconds the panel listens for wireless keypads that are in RF Survey mode and have not been programmed or associated into another panel When the keypad associates with the panel the ...

Page 14: ...s menu allows you to set the keypad address selectively enable the Panic keys and set code entry card options Programming Keypad Options KPD KPD KPD OPT DIAG RF STOP Keypad Options KPD OPT To program keypad options press KPD OPT Default Keypad Message Enter a custom message of up to 16 characters to appear on the keypad display top line whenever that line is not used for any other purpose Press an...

Page 15: ...y When CUSTOM displays press CMD Default is DMP Custom Card Definitions Card Options Wiegand Code Length When using a custom credential enter the total number of bits to be received in Wiegand code including parity bits Press the display to enter a number between 0 255 to equal the number of bits Default is 26 bits Typically an access card contains data bits for a site code a user code and start s...

Page 16: ...e greater than three digits cannot be used Use only cards with three digit site codes SITE CODES 1 4 Site Codes 1 4 Enter site codes 1 4 left to right separated by sign Press the sign to add delete or change the site code Press CMD to save the entry Site code range is 0 999 SITE CODES 5 8 Site Codes 5 8 Enter site codes 5 8 left to right separated by sign Press the sign to add delete or change the...

Page 17: ...enu items to be displayed in the Carousel menu on the main screen Press the item to select and a check mark displays Press again to de select Items for the Carousel include User Codes Schedules and Events Default is no items selected Select Z Wave Edit to display the Z Wave Edit icon on the Lights Doors and Thermostats screens Select Edit Favorites to display the Z Wave Edit icon on the Favorites ...

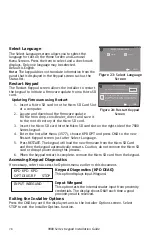
Page 18: ...uage 5 Press RESTART The keypad will load the new firmware from the Micro SD Card and then the keypad automatically restarts Caution do not remove the Micro SD card or disrupt power during this process 6 When the keypad restart is complete remove the Micro SD card from the keypad Accessing Keypad Diagnostics If necessary refer to Access the Options Menu earlier in this document KPD KPD KPD OPT DIA...

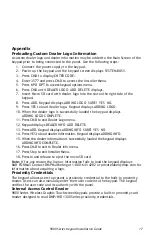
Page 19: ...CMD to exit Dealer Logo menu 12 Keypad displays DEALER INFO ADD DELETE 13 Press ADD Keypad displays ADDING INFO SURE YES NO 14 Press YES to load dealer information Keypad displays ADDING INFO 15 When the dealer information is successfully loaded the keypad displays ADDING INFO COMPLETE 16 Press CMD to exit to Dealer Info menu 17 Press Stop to exit Installer Menu 18 Press in and release to eject th...

Page 20: ... guarantee compatibility with credentials not purchased from DMP Keypad Display Arming and Disarming Area system Arming and Disarming Select Keypad from the Carousel menu Press CMD until Arm Disarm displays Select the desired option The keypad displays ENTER CODE if Disarm is selected Present your card to the reader Once validated by the system all areas assigned to your code arm or disarm automat...

Page 21: ...alidated the system disarms all areas accessible by you Area systems provide a delay to allow selected areas only to be disarmed RESET 1ABC 5MNO 9YZ 2DEF 6PQR 0 3GHI 7STU 4JKL 8VWX CMD ALL CHIME PERIM HOME SLEEP USER MENU ENTER CODE Entry delay starts The System disarms the area RESET 1ABC 5MNO 9YZ 2DEF 6PQR 0 3GHI 7STU 4JKL 8VWX CMD ALL CHIME PERIM HOME SLEEP ENTER CODE Figure 26 Entry Delay ...

Page 22: ...ion reception which can be determined by turning the equipment off and on the user is encouraged to try to correct the interference by one or more of the following measures Reorient or relocate the receiving antenna Increase the separation between the equipment and receiver Connect the equipment into an outlet on a circuit different from that to which the receiver is connected Consult the dealer o...

Page 23: ...9800 Series Keypad Installation Guide 21 ...

Page 24: ... 9800 4 Replacement 4 wire Power Harness Proximity Credentials 1306P Prox Patch 1306PW Prox Patch 26 Bit 1326 HID ProxCard II Card 1386 HID ISOProx II Card 1346 HID ProxKey II Access Device Keypad Mounting 694 7800 Keypad Backplate 695 7800 In Wall Backbox 698 7800 Plastic Keypad Wall Cover 699 7800 Keypad Deskstand with Cord Certifications FCC Part 15 CCKPC0132 Industry Canada 5251A PC0132 ANSI U...

Reviews: