background image

DLP 

 Digital Projector

 User’s Guide


27 

ENG

L

ISH 

Reference 


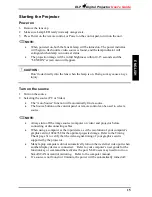
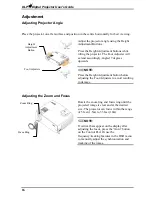
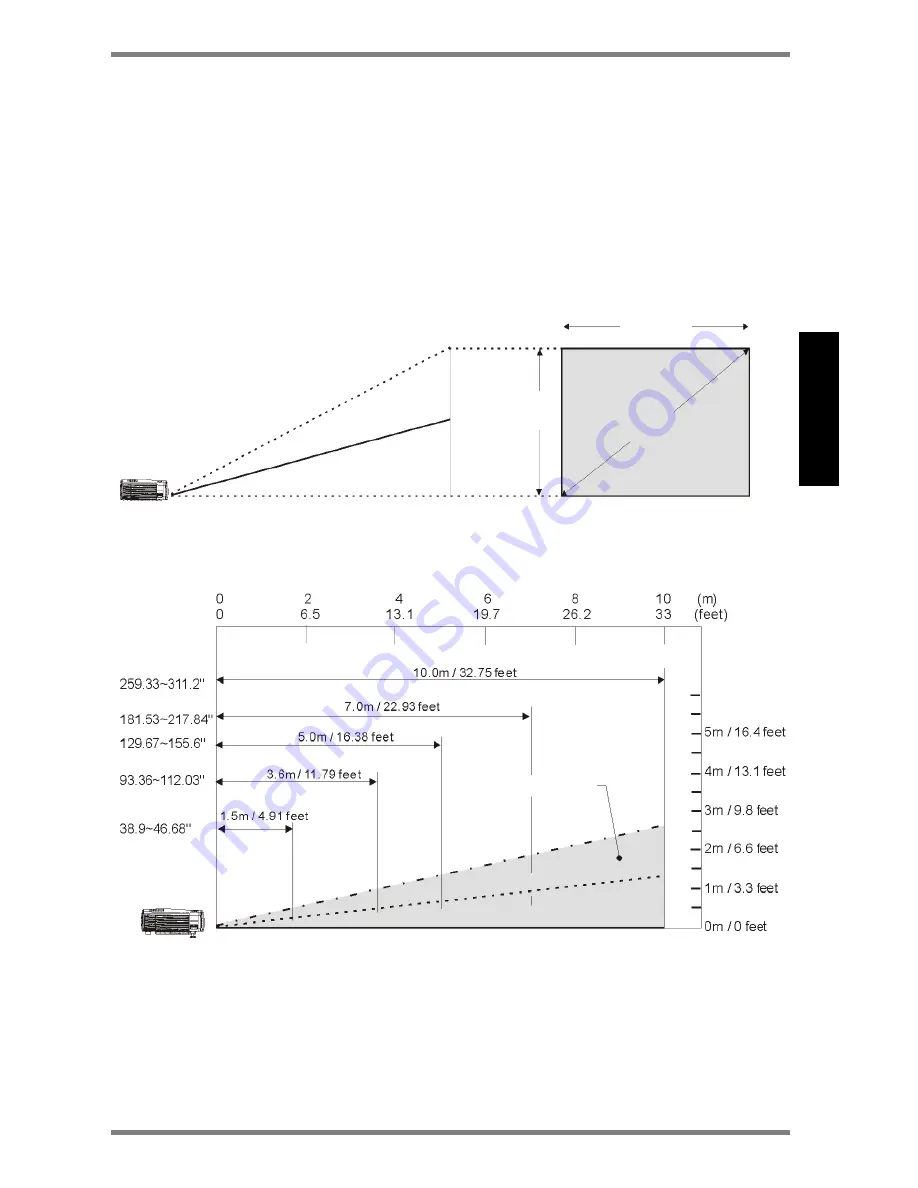
Positioning the Projector


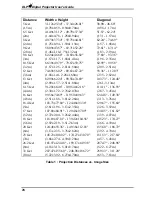
To adjust the size of the projected image, refer to figures 1 below and table 1 on the next 
page for Projection Distances to increase/decrease the distance between the projector and the 
projection screen. 


Figure 1 : Projection Distance vs. Image Size


Screen  

Width 

Screen size 

(diagonal) 

Screen 

Height 

Center of image 

Summary of Contents for D315M

Page 1: ...D315M ORDERCODE 100100 ...

Page 2: ...projector will void the warranty Refer all service to qualified service personnel Do not loosen or remove any screws other than those on the lamp module cover and the lamp module Doing so may result in electric shock For information about use of a feature please refer to this User Guide Hot surface Do not touch CAUTION Proper ventilation is important Don t block ventilation openings Never operate ...

Page 3: ... the glass may shatter Battery Safety Read and follow all warnings and instructions supplied by the battery manufacturer WARNING Keep batteries away from children CAUTION Store batteries in their original packaging When inserting batteries verify that the and terminals are aligned correctly Replace all batteries of a set at the same time Do not mix new batteries with used ones Do not use batteries...

Page 4: ...r may be required to take adequate measures The typical use is in a conference room meeting room or auditorium Declaration of Conformity We declare under our sole responsibility that the DLP Zoom Digital Projector conforms to the following directives and norms Directive 89 336 EEC Amended by 93 68 EEC EMI EN 55022 1992 Class B EMC EN 50082 1 1992 EMC EN 55024 1998 IEC61000 4 2 IEC61000 4 3 IEC6100...

Page 5: ... LED Indicators Message 10 Control Pad Function 10 Remote Control Instruction 11 Installation Steps 13 Getting Started 13 Connecting the Projector 13 Connecting Input and Output Devices 14 Starting the Projector 15 Power on 15 Turn on the source 15 Adjustment 16 Adjusting Projector Angle 16 Adjusting the Zoom and Focus 16 Adjusting the Keystone Control 17 Adjusting the Zoom and Pan 17 Power Off 18...

Page 6: ...ion Range 29 Product Specification 30 Timing Charts 31 Troubleshooting 32 Power Indicator 32 Remote Control 32 Sound 32 Image Source 33 Image Quality 33 Lamp 34 Maintenance 35 Changing the Lamp 35 Changing the Battery of Remote Control 36 Cleaning 37 Cleaning the Projection Lens 37 Cleaning Exterior Case 37 Cleaning the Projector 37 Customer Support 38 ...

Page 7: ...to an image source Computer DVD VCR or HDTV Package Contents Make sure that all of the following components are included in the package If anything is missing please contact your dealer immediately DLP Projector with lens cap Standard Accessories Power Cord Remote Mouse Cable with USB Connector S Video Cable Computer Cable DVI to D Sub 15 pin VGA Cable Audio Cable Stereo Min Jack to RCAx2 Red Whit...

Page 8: ... please contact your dealer for further service Power Cord US type Power Cord UK type Power Cord Euro type Power Cord China type Computer and Video Cables Computer Cable DVI I to DB 15 pin VGA Remote Mouse Cable with USB Connector S Video Cable Audio Cable Stereo Mini Jack to RCAx2 Component Video Cable DVI I to HDTV Composite Video Cable DVI DVI signal cable for computer with DVI graphic cards Au...

Page 9: ...For permanent installations follow local codes The security lock corresponds to Kensington s MicroSaver Security System If you have any comment contact Kensington 2853 Campus Drive San Mateo CA94403 U S A Tel 800 535 4242 http www kensington com Zoom Ring Ventilation Hole Speaker Focus Ring Adjuster Foot IR Sensor Control Pad Kensington Security Lock AC IN Socket I O Connectors Fan Cover Ceiling M...

Page 10: ...rol Pad Function Description Function Power Power on off EZ Key Quick adjustment on Keystone Frequency Volume and Brightness by repeatedly pressing to scroll through these functions Source Input Source selection to perform adjustment increasingly in EZ Key function Auto Auto Image to perform adjustment decreasingly in EZ Key function Power LED Indicator Lamp Ready LED Indicator EZKEY with function...

Page 11: ...TE Do not leave the remote control close to the cooling fan outlet of the projector For the information of remote control transmission range please refer page 29 Left mouse button Right direction button Up direction Setup menu Auto sync Video source ie composite or component Laser aperture pointer beam Mouse cursor Enter button Volume Zoom Zoom Blank screen Power LED Status of video information ie...

Page 12: ...atus information L Button Use as the left mouse cursor R Button Use as the right mouse cursor Button Press to enter function 4 Directional Selection Buttons Use to select or adjust control items Laser Pointer Button Use instead of a pointer to activate the laser pointer for use in presentations Volume Button Use to adjust the volume of the audio output Keystone Button Use to adjust the image verti...

Page 13: ...ducts transformers or other electrical devices For permanent installations follow local codes Don t set liquids on the projector Spilled liquids may damage your projector Don t put the projector on a hot surface or in direct sunlight Do not drop the projector Connecting the Projector 1 Connect the power cable 2 When you connect the power cable to the projector the Power LED Lamp Ready LED on the c...

Page 14: ...n the Status Menu of the OSD MENU Manually pressing the Source button operates selection The illustration below shows the ports and appropriate cables for connecting external devices to the projector VCR DVD player HDTV Component Video Power outlet Computer Notebook Computer Desktop Computer Cable DVI to D Sub 15 pin VGA Remote Mouse Cable Audio Cable Stereo to Stereo Power Cable Component Video C...

Page 15: ...ideo The Auto Source function will automatically find a source The Source button on the control panel or remote control can be used to select a source NOTE Always turn off the image source computer or video and projector before connecting or disconnecting cables When using a computer as the input device set the resolution of your computer s graphic card to 1024x768 for the optimal projected image ...

Page 16: ...e Height Adjustment button before adjusting the Foot Adjusters to avoid resulting in damage Adjusting the Zoom and Focus Rotate the zoom ring and focus ring until the projected image is clear and at the desired size The projector can focus within the range of 5 feet 1 5m to 33 feet 10m NOTE If vertical bars appear on the display after adjusting the focus press the Auto button on the Control Pad Or...

Page 17: ...ystone button on the remote control or through OSD menus Adjusting the Zoom and Pan Press the zoom buttons on remote control to enter zoom mode and use directional keys to pan upward downward right and left Make any necessary image adjustments by using the on screen menus Refer page OSD Menu section for the details ZOOM Original size Four times as large as the original size ...

Page 18: ...it shortly after powering off user must wait for 1 minute for the lamp to cool down The lamp ready LED will stop flashing when the projector is ready to power up CAUTION The unit may remain HOT for up to 45 minutes upon power off User should be careful before handling the unit to prevent any burn or injury WARNING To reduce the risk of electric shock or damage to the equipment Do not disable the p...

Page 19: ...Signal No Input Signal will show on the screen when there is no active signal detected within 16 seconds Standby When input signal is not detected for 16 seconds the splash screen will appear until a signal is detected Power Off The splash screen will be displayed for 6 seconds requesting power off confirmation Source button on Remote control Source button on control pad Input Source The splash sc...

Page 20: ...e frequency Volume Use the and to adjust the volume level Brightness Use the and to adjust the display brightness Remote Control Buttons OSD Following menus functions can be accessed through corresponding buttons on the remote control Zoom Pan Use Zoom keys to zoom the image in and out Use the 4 directional selection buttons to pan the image Mute Use the mute key to turn on or off the speaker Blan...

Page 21: ... Use arrow keys Left Right W X to adjust the contrast Adjustment range from min max 0 100 by 50 steps Default value factory calibrated Brightness Use arrow keys Left Right W X to adjust the brightness Adjustment range from dark light 0 100 by 50 steps Default value factory calibrated Horizontal Position Use arrow keys Left Right W X to adjust the position in horizontal direction Adjustment range f...

Page 22: ...efault value auto detected Video AGC Use arrow keys Left Right W X to adjust the video automatic gain control Selection item on off Default value on Video Type Use arrow keys Left Right W X to adjust the video source type Selection item RGB Y Pb Pr HD Y Cb Cr DVD Default value Y Pb Pr Aspect Ratio Use arrow keys Left Right W X to select the video aspect ratio Selection item 4 3 16 9 Default value ...

Page 23: ...o reset video AGC aspect ration projection type volume keystone to default value In HDTV mode to reset video type aspect ratio projection type volume keystone to default value Color Manager Menu PC Mode Video Mode Video Type Use arrow keys Left Right W X to adjust the video source type Selection item RGB Y Pb Pr HD Y Cb Cr DVD Default value RGB Color Temp Use arrow keys Left Right W X to select di...

Page 24: ...y 5 steps Default value 3 Gamma Use arrow keys Left Right W X to select different gamma correction Selection items from PC MAC Graphic Video and Black White by 5 steps Default value PC in PC mode Video in Video mode Reset Use button to reset to default value In PC mode to reset color temp OSD translucent gamma to default value In Video HDTV mode to reset color saturation color tint color temp gamm...

Page 25: ...Comp by 3 steps Default value auto Blank Color Use arrow keys Left Right W X to select different blanking color Selection items Black Red Green Blue by 4 steps Default value black OSD Position Use arrow keys Left Right W X to select different OSD location Selection items from upper left to bottom right by 5 steps Default value centre OSD Display Time Use arrow keys Left Right W X to select auto ti...

Page 26: ...urn on or off the function for automatically lamp off when there is no active signal Video Information To show resolution H V sync information at RGB mode color standard at Video mode Software Revision Software version information Lamp Hours Lamp hour used information Lamp Hour Reset To reset lamp hour after changing the lamp See page 36 for lamp changing process ...

Page 27: ... size of the projected image refer to figures 1 below and table 1 on the next page for Projection Distances to increase decrease the distance between the projector and the projection screen Figure 1 Projection Distance vs Image Size Screen Width Screen size diagonal Screen Height Center of image ...

Page 28: ...74 69 103 73 124 48 4m 2 09x1 57 2 51x1 88m 2 61 3 13m 14 5 feet 91 29x68 46 109 54x82 16 114 11 136 93 4 4m 2 30x1 72 2 76x2 07m 2 87 3 45m 16 feet 99 58x74 69 119 50x89 63 124 48 149 38 4 8m 2 51x1 88 3 01x2 26m 3 13 3 76m 16 4 feet 103 73x77 80 124 48x93 36 129 67 155 60 5m 2 61x1 96 3 13x2 35m 3 26 3 92m 17 feet 107 88x80 91 129 46x97 09 134 85 161 82 5 2m 2 72x2 04 3 26x2 44m 3 39 4 07m 18 fe...

Page 29: ...n IR Transceiver located at the front cover of the unit for the receipt of remote control transmission The IR Transceiver can receive a transmission signal with the effective range of 60 from an outstretched arm pointed towards the IR Transceiver The effective transmission distance of the remote control is about 10 meter including the reflection distance response from the screen to the remote cont...

Page 30: ...jection Image Size diagonal 40 to 311 Audio Noise 35 dB Input Terminals DVI I Video S Video Audio Output Terminals USB for mouse control Speakers 0 5W x 1 Video Compatible NTSC NTSC 4 43 PAL SECAM Dimensions WxDxH 188mm x 240mm x 64mm 7 4 x 9 5 x 2 5 Weight 3 5 lbs Power Supply 100 240vac 47 63 Hz Power Consumption 220 Watts On Screen Display Language English French Spanish German Portuguese Tradi...

Page 31: ... 768 68 7 85 Native XGA 1280 x 1024 64 0 60 Compressed SXGA 1280 x 1024 79 98 75 Compressed SXGA 640 x 480 35 0 66 68 Expanded Mac II 13 832 x 624 49 73 74 55 Expanded Mac 16 1280 x 1024 64 0 60 Compressed FM Town Table 3 DIGITAL Computer Timings Resolution and Refresh Rate fV Resolution FH kHz FV Hz Signal mode 640 x 350 37 9 85 Expanded VGA 640 x 480 31 5 60 Expanded VGA 640 x 480 37 9 72 Expand...

Page 32: ...d and the interval for every blink is lasted 1 second Remote Control Symptom Cause and Solution Projector responds poorly or not at all to the remote control Make sure that the total distance from the remote to the projector is no more than 33 feet 10m Point the remote control at the screen or at the front of the projector Make sure nothing is blocking the infrared sensor on the front of the proje...

Page 33: ...e screen Reposition the image Image is out of focus Make sure that the projection screen is at least 5 ft 1 5m from the projector Turn the projection lens till the image is focused Check the projection lens to see if it needs cleaning Image and menus are upside down Check main menu of Setup to make sure projection type is correct in accordance with the projection status If projecting from a ceilin...

Page 34: ...ust color temperature gamma to optimize the colors The Image Manager settings work best if you reset the main menu and Adjust to the prior to setting Color Manager Adjust Function can not find from Ezkey on main set or remote Press menu key on the remote to go into several function keys selection Lamp Symptom Cause and Solution No light is coming from the lamp Make sure that the power cable is pro...

Page 35: ...r and do not touch any hot surface inside Do not loosen or remove any screws other than lamp module or its cover Doing so many cause electric shock To replace the lamp module 1 Turn off the projector and let the unit cool down for at least 45 minutes 2 Unplug the power cord from projector 3 Turn the projector upside down Loosen the screw with a phillips screwdriver Remove the lamp cover by lifting...

Page 36: ... its cover 3 Do not touch any of the glass surface on the lamp unit Lamp Hour Reset Press the cursor keys through following sequence to reset Lamp hour downbJupcJlefteJrightf Press Exit to cancel Changing the Battery of Remote Control Remove the battery cover Push the knob while lifting up the cover of the battery compartment Insert the batteries Install AAA battery x2 included into the remote Mak...

Page 37: ...e the projector is powered off and has cooled down 2 Unplug the projector 3 Wipe off the dirt or dust on the case with a soft dry lint free cloth 4 Moisten a soft cloth with water or a non abrasive is recommended to clean off stubborn dirt or stains CAUTION Do not use alcohol benzene thinner or other chemical cleaners which may fade deform or melt the exterior case Do not apply a detergent solutio...

Page 38: ... that you fill in following information when you purchase this product For Your Records Product Name Model Number Serial Number Purchase Date Service Information Contact Person Company Address Telephone Fax No E mail Product Warranty from to Lamp Warranty from to Product disposal at end of product life Please dispose of this product properly at the end of its useful life Your local waste disposal ...

Page 39: ...2006 DMT ...

Reviews: